Painting Textured Walls: Surface Prep
Painting textured walls can be a challenging task, but with the right surface preparation, you can achieve a beautifully transformed space. Our expert guidance will help you navigate the ins and outs of prepping textured walls for optimum results. Let’s dive into the essential steps to ensure a successful, long-lasting paint job for those uniquely textured surfaces.
Painting textured walls: surface prep:
To prepare textured walls for painting, first assess the wall condition, looking for damage and loose paint. Next, clean the walls using a mild detergent and water. Repair any damaged areas with patching materials or professional guidance, and remove loose paint and sand edges. Prime the walls using a high-quality primer designed for textured surfaces to ensure proper paint adhesion and a long-lasting result.

Eager to perfect the art of painting textured walls? Discover expert tips on surface prep, ensuring a flawless finish every time. Read on to learn the secrets to achieving stunning, long-lasting results.
Contents
- 1 Prepping Textured Walls for Painting: Surface Guide
- 2 Steps for Preparing Textured Walls Before Painting
- 3 Is Painting Directly on Textured Walls Possible?
- 4 Sanding Textured Walls: Necessary before Painting?
- 5 Techniques for Painting Over Textured Surfaces Successfully
Prepping Textured Walls for Painting: Surface Guide
• Importance of Surface Preparation
Surface preparation is the key to achieving a professional-looking and long-lasting paint job. When it comes to painting textured walls, it is especially important to properly prepare the surface to ensure that the paint adheres well and that the texture remains intact.
• Assessing the Wall Condition
The first step in surface preparation is to assess the condition of the walls. Look for any cracks, holes, or other damage that will need to be repaired before painting.
Additionally, check for any loose or peeling paint that may be present, as this can lead to an uneven finish and paint that does not adhere properly. Furthermore, take note of any mold, mildew, or staining on the wall.
If your walls are in poor condition (cracks, water damage, old and flaking paint), it is a good idea to consult a professional before proceeding with your painting project. In some cases, repair or replacement of the wall may be necessary prior to painting.
• Cleaning the Walls
Before you can begin repairing or priming the textured walls, it is crucial to clean them thoroughly. Dirt, grime, and dust can interfere with paint adhesion and lead to an unsatisfactory finish.
Use a mild detergent mixed with water to gently clean the walls. A soft-bristled brush or sponge can be helpful in reaching the crevices and nooks of the textured surface.
Be sure to rinse the walls well with clean water to remove any soap residue, as this can also affect the paint’s adhesion. Allow the walls to dry completely before moving on to the next step.
In the case of mold, mildew, or other staining, specialized treatments may be necessary. Consult a professional for advice on how to best treat and clean these issues to ensure a successful painting project.
• Repairing Damaged Areas
Once the walls are clean and dry, it’s time to address any damage. For small cracks and holes, use a flexible pre-made patch material, such as Spackling Compound, that is designed for use with textured surfaces.
Apply the patching compound with a putty knife, making sure to press it firmly into the damaged area and blend it into the surrounding texture. Allow the patched area to dry completely, and then lightly sand it to ensure a smooth transition between the patch and the existing wall texture.
For larger cracks or holes that require more extensive repair, consult a professional for guidance. They may recommend using mesh tape and joint compound to reinforce the damaged area and to help match the texture of the surrounding wall.
• Dealing with Peeling Paint
Loose and peeling paint should be removed before priming and painting. Use a scraper or putty knife to carefully remove any loose paint chips or flakes, taking care not to damage the underlying textured surface.
Once all peeling paint has been removed, lightly sand the edges of the remaining paint to ensure a smooth transition between the painted and bare areas.
• Priming the Walls
Priming is a critical step in surface preparation, especially for textured walls. A high-quality primer helps to create a uniform surface that allows for better paint adhesion, and it can also help to seal any stains or discoloration.
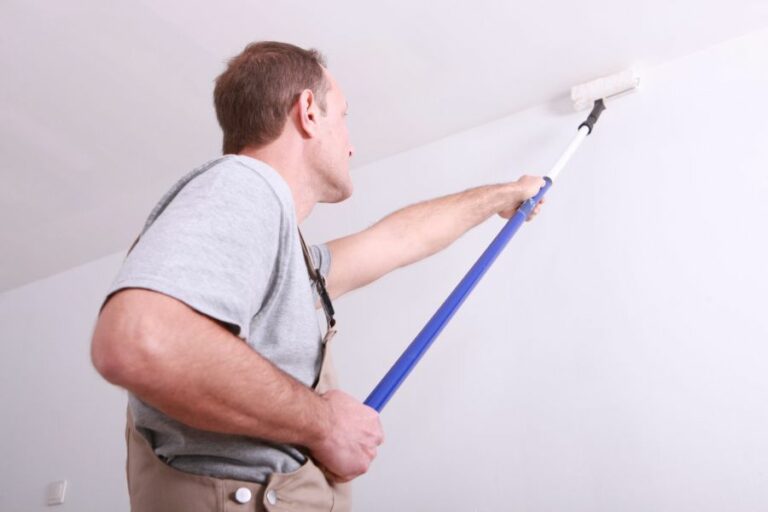
Choose a primer that is specifically designed for use on textured surfaces. Using a thick nap roller, apply the primer evenly over the entire wall, taking care to press the primer into the crevices and valleys of the texture.
Allow the primer to dry according to the manufacturer’s instructions before proceeding with painting.
• Final Tips
With a clean, repaired, and primed textured wall, you are now ready to proceed with painting. Remember to choose high-quality paint that is suitable for textured surfaces to ensure a long-lasting and professional finish.
And, as always, be sure to properly ventilate your workspace and follow all safety precautions when working with paint and primers.
By taking the time to thoroughly prepare the surface of your textured walls, you will set yourself up for a successful and beautiful paint job that you can be proud of for years to come.
Steps for Preparing Textured Walls Before Painting
Painting a textured wall can be a daunting task, but with the right preparation, it can result in a beautiful, professional-looking finish
• Inspecting the Wall Surface
The first step to preparing your textured walls for painting is to inspect the surface for any damage, such as cracks, holes, or peeling paint.
If you find any issues, it’s essential to address them before painting. To do this, you can use a joint compound for small repairs or a patching material for larger holes. Allow any repairs to dry completely before proceeding.
The Environmental Protection Agency (EPA) recommends testing for lead-based paint if your home was built before 1978, as it may pose health risks. Follow their guidelines for proper testing and handling of lead-based paint.
• Cleaning the Wall
Before painting, it’s important to thoroughly clean the textured walls to remove any dust, dirt, and debris that could interfere with the paint adhering properly. Using a sponge or soft cloth and a mixture of mild dish soap and warm water, gently wash the walls, working from top to bottom.
Rinse with a clean, damp cloth to remove any soap residue. Allow the walls to dry completely before proceeding.
• Sanding the Surface
Sanding textured walls can help ensure a smooth and even paint application. Using a pole sander and medium-grit sandpaper (100 to 120 grit), lightly sand the surface in a circular motion to remove any rough spots and create a smooth base for the paint.
Be cautious not to sand too aggressively, as this may cause damage to the texture. Once the sanding is complete, use a vacuum with a brush attachment or a microfiber cloth to remove the dust.
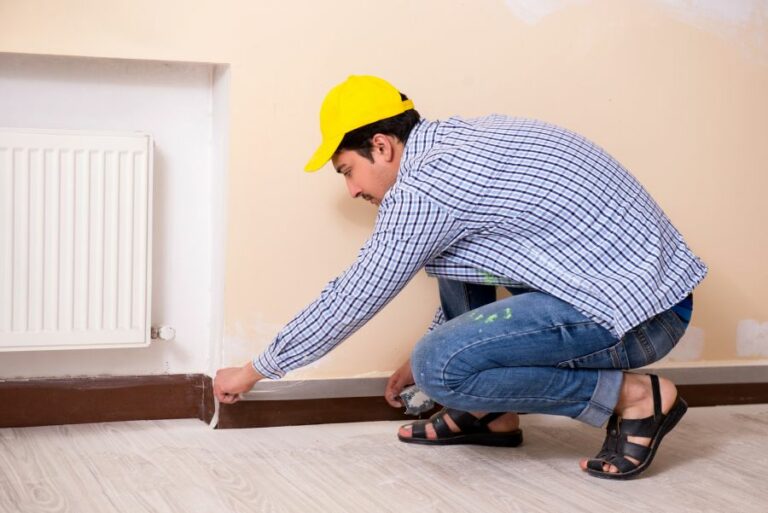
• Taping Off Trim and Fixtures
To protect trim, fixtures, and other surfaces from getting painted, use painter’s tape to carefully cover these areas.
Be sure to press the tape firmly against the surface to create a tight seal and prevent paint from seeping underneath. Establish a guideline for straight edges using a level or a straight edge.
• Priming the Walls
Before painting textured walls, applying a high-quality primer is essential to ensure proper paint adhesion and an even finish.
Use a roller with a -inch or -inch nap, designed for textured surfaces, to apply the primer evenly across the wall. Work in small sections and use a brush to cut in around edges and other hard-to-reach areas.
Allow the primer to dry according to the manufacturer’s instructions before painting. Some primers may require additional drying time, or even a second coat, particularly on heavily textured surfaces or if the current wall color is dark and you’re planning to apply a lighter paint.
• Choosing the Right Paint and Tools
Selecting the appropriate paint and tools for textured walls is crucial to achieving a professional finish. When choosing paint, look for high-quality, durable options with good coverage.
Flat or matte finishes are often recommended for textured walls, as they help to mask imperfections and minimize glare.
For painting textured walls, using a roller with a -inch or -inch nap is recommended to effectively navigate the various highs and lows of the surface. In addition, a quality angled brush is essential for cutting in around edges and other hard-to-reach areas.
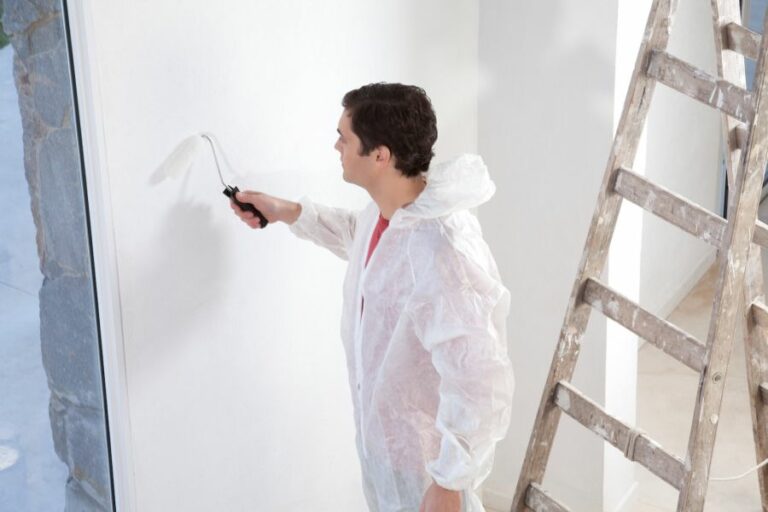
• Applying the Paint
With the walls properly prepared, primed, and protected, it’s finally time to paint the textured surface. Start by using the angled brush to cut in around the edges, trim, and fixtures. Then, dip the roller into the paint, removing any excess to avoid drips or splatters.
Begin applying the paint to the walls, working in small sections, using a ‘W’ or ‘M’ pattern. This technique provides the best coverage and minimizes the appearance of roller marks.
Allow the first coat of paint to dry according to the manufacturer’s recommended drying time. Then, evaluate the coverage and determine if a second coat is needed. If so, wait for the appropriate amount of time before applying the second coat.
• Finishing Touches
Once the paint has dried completely, carefully remove the painter’s tape, pulling it away at a 45-degree angle for a clean finish. Touch up any areas with a small brush if needed. Additionally, reinstall any outlet covers or fixtures that were removed prior to painting.
With these steps completed, your textured walls will have a beautifully updated, professional-looking finish that you can enjoy for years to come.
Step | Description |
|---|---|
1 | Clean the textured walls with a mixture of warm water and mild detergent. |
2 | Remove any dust, dirt, and grease from the surface by gently scrubbing it with a sponge or soft brush. |
3 | Rinse the walls thoroughly with clean water to remove any remaining detergent residue and allow them to dry completely. |
4 | Examine the walls for any damaged areas, such as cracks or peeling paint, and repair them with a suitable patching compound or filler as needed. |
5 | Lightly sand the raised areas of the textured surface with a fine-grit sanding sponge, if necessary, to create a smooth surface for painting. |
6 | Apply painter’s tape to any adjacent surfaces, trim, or fixtures that you want to protect from the paint. |
7 | Prime the textured walls with a suitable primer to help ensure proper adhesion of the paint and to prevent any stains from bleeding through. |
8 | Choose a high-quality paint that is designed for textured surfaces, and apply it using a paint roller with a nap length appropriate for the texture type. |
9 | Allow the paint to dry completely before applying any additional coats, if desired, and before removing the painter’s tape and reinstalling any fixtures or hardware. |
Is Painting Directly on Textured Walls Possible?
When updating the look of a room, painting over textured walls might seem like a daunting task. The good news is that it is achievable with the right techniques and materials.
• Understanding Textured Walls
Textured walls are created by applying a joint compound or special textured paint over drywall or plaster, resulting in patterns or designs.
This method is popular for adding interest and dimension to a room while also hiding imperfections. Some common textures include:
- Orange peel
- Knockdown
- Stippled
- Swirl
- Sand
Before deciding whether to paint over textured walls, it is essential to identify the type of wall texture and consider the look you want to achieve.
• Preparing Textured Walls for Painting
Preparation is critical for a successful paint job over textured walls. This process ensures a smooth, even surface that will allow the paint to adhere correctly.
– Clean the Walls
Start by dusting and cleaning the walls to remove any dirt, dust, or cobwebs. A vacuum cleaner with a soft brush attachment or microfiber cloth can be effective.
For more stubborn dirt or grime, use a mild detergent and warm water, rinsing the area with a clean damp cloth afterward. Allow the walls to dry completely before proceeding.
– Address Damaged Areas
Inspect the walls for any damaged areas, such as cracks or peeling. To repair these imperfections, use a putty knife and joint compound to fill in the affected areas.
After the patch dries, lightly sand it down to create an even surface. Wipe away any dust afterward.
– Prime the Walls
Priming the walls is a crucial step, as it creates a better surface for the paint to adhere to and prevents discoloration.
Choose a high-quality primer intended for textured walls, and apply it using a thick-nap roller to ensure adequate coverage. Allow the primer to dry fully before applying paint.
• Choosing the Right Paint and Tools
Selecting the proper paint and tools is essential when painting over textured walls. The following recommendations will help you achieve the desired result.
– Paint Type
The ideal paint for textured walls is one with a flat or matte finish, as it reduces the reflection of light and downplays the texture’s appearance. Satin, semi-gloss, or glossy paints can accentuate the texture, which may not be the desired effect.
High-quality, acrylic-latex paint is recommended for durability and resistance to peeling.
– Paint Tools
A thick-nap roller is necessary for painting textured walls, as it can better distribute paint within the grooves and patterns of the texture.
Depending on the wall’s texture and the desired result, you might also need a paintbrush or sponge for touch-ups and hard-to-reach areas.
• Painting Techniques for Textured Walls
The following techniques can help achieve a smooth, even finish when painting over textured walls:
– Use Adequate Paint
Using too little paint can result in an uneven finish or missed spots. Be generous when loading the roller with paint, making sure to cover as much of the roller nap as possible. This approach ensures better distribution across the texture.
– Roll in Multiple Directions
Instead of only painting up and down, use a crisscross or overlapping pattern to ensure the paint reaches every part of the texture. This method prevents missed spots and helps create a more consistent finish.
– Apply Multiple Coats
Depending on the color and texture, you might need to apply multiple coats of paint to achieve adequate coverage. Be sure to allow each coat to dry fully before adding the next one.
• Additional Tips for Painting Over Textured Walls
- Use painter’s tape to protect baseboards, trim, and other areas you don’t want to be painted. Properly press down the tape to prevent paint from seeping underneath.
- If you are not confident in your painting abilities or feel that the task might be too challenging, consider hiring a professional painter with experience in textured surfaces.
- If you decide that painting over the textured walls is not the right approach, consider removing the texture entirely through a process called “skim coating,” which involves applying a thin layer of joint compound over the entire wall, followed by sanding and priming before painting.
In conclusion, painting over textured walls is possible with the correct preparation, techniques, and materials. By following these guidelines, you can successfully update the appearance of a room while maintaining the unique design of textured walls.
Consideration | Description |
|---|---|
Preparation | Before painting, it’s essential to clean and repair any damage to the textured walls. You may also need to prime the walls if the existing paint is dark or glossy. |
Paint Selection | Choose high-quality paint that’s specifically designed for textured surfaces. This will ensure better coverage and durability. |
Application | Use a thick-nap roller or a paint sprayer for an even application. The nap should be at least 3/4 inches for best results. |
Additional Coats | Textured walls might require more coats than smooth surfaces. Be prepared to apply at least two coats of paint for full coverage. |
Sanding Textured Walls: Necessary before Painting?
Painting textured walls can be a bit more challenging compared to smooth surfaces. One crucial step that many people wonder about is whether or not they need to sand these textured surfaces before painting them.
• Importance of Preparing Textured Walls for Painting
Preparation is the key to any successful painting project. It ensures that the paint adheres correctly to the surface and provides a smooth, long-lasting finish.
In the case of textured walls, proper preparation is even more critical, as improper preparation may lead to uneven paint coverage, peeling, and reduced longevity of the paint job.
– Surface Cleaning
Before considering sanding, cleaning the textured walls thoroughly is vital to remove any dirt, dust, or grease that may have accumulated over time. This can be done using a vacuum cleaner with a brush attachment and wiping the walls with a damp cloth.
A diluted solution of mild dish soap and water can also be used for better cleaning, especially for areas with stubborn dirt or grease stains.
– Repairing Damages
After cleaning, it’s essential to check the textured surface for any damage, such as cracks or loose areas of texture.
These damages need to be repaired before moving on to sanding or painting. Cracks can be filled using a suitable patching compound or joint compound, while loose texture may require re-application with matching texture material.
• When to Sand Textured Walls
Sanding textured walls before painting is not always necessary. However, there are specific scenarios where sanding may be required:
– High Gloss Paint
If the previous paint on the textured wall has a high gloss finish, sanding may be necessary to create a better surface for the new paint to adhere to. By using fine to medium-grit sandpaper, you can lightly scuff the glossy surface, providing a better bonding surface for the new paint layer.
– Uneven Texture
In cases where the wall texture is uneven or inconsistent, sanding can help in smoothing the surface to achieve a more uniform finish. It can also help in reducing the prominence of the texture if a more subtle appearance is desired.
– Removing Loose Texture
As mentioned earlier, any loose texture should be removed or repaired to prevent future paint peeling or flaking. If the loose texture cannot be reapplied, carefully sanding to remove the loose material is necessary.
– Preparing Surface for Special Paints
Some special paints, such as metallic finishes or color-changing paints, may require a smooth surface for the desired effect. In such cases, lightly sanding the textured walls can help achieve a smoother surface for better paint application and results.
• Sanding Techniques for Textured Walls
– Manual Sanding
For smaller areas, manual sanding using a sanding block or a piece of sandpaper wrapped around a block can be effective. You should use fine to medium-grit sandpaper and apply gentle pressure to avoid damaging the texture or removing too much material.
– Sanding Sponge
A sanding sponge is an excellent tool for sanding textured walls, as it can conform to the irregular surface and provide uniform scuffing. They are available in various grits and can be rinsed and reused multiple times.
– Power Sanders
For larger areas or more aggressive sanding, power sanders can be used. However, they should be used with caution to prevent damaging the texture or removing too much material. Examples of power sanders include orbital sanders and handheld power sanders with fine-grit sanding discs.
• Tips for a Successful Textured Wall Painting Project
- Always perform a test patch: Before starting a larger area, apply paint to a small test area to ensure proper adhesion, coverage, and desired results.
- Use a suitable primer: Priming textured walls before painting can provide a uniform base for the paint to adhere to, ensuring better coverage and longer-lasting results.
- Choose the right paint: For textured walls, paints with a sheen, such as satin or eggshell, are recommended as they provide better durability and coverage on irregular surfaces.
- Use appropriate roller covers and brushes: Select roller covers with a thicker nap (3/4″ to 1″) and quality brushes designed for textured surfaces to achieve even coverage.
- Use proper painting techniques: Ensure even paint distribution, maintain a wet edge, and overlap roller passes for the best results.
In conclusion, the need for sanding textured walls before painting depends on various factors, such as the existing paint finish, texture uniformity, and the type of paint to be applied.
Proper preparation and using suitable techniques can help ensure a successful painting project with long-lasting results.
| Do you need to sand textured walls before painting? | |
|---|---|
| Answer | It is not necessary to sand textured walls before painting, but it can improve the appearance of the final paint job. Lightly sanding the walls can help remove any rough spots or contaminants and increase the adhesion of the paint. However, too much sanding can damage the texture, so it is important to be gentle and proceed with caution. |
Techniques for Painting Over Textured Surfaces Successfully
Painting over a textured surface can be a difficult task, especially for those with minimal experience in painting as well as expert painters. With proper preparation and technique, achieving a professional-looking result is possible.
• Assessing The Textured Surface
Before starting, it’s essential to evaluate the condition of the wall or ceiling. Ensure that the surface is clean and free of any loose debris or dust.
This can be done using a vacuum cleaner or damp cloth. Additionally, assess the durability and adherence of the existing texture. If it is flaking or crumbling, it may need to be removed or repaired before painting.
In some cases, you might need to apply a test patch to determine whether the paint will adhere well to the surface or if it will cause the texture to dissolve or soften. To do so, simply try painting a small area of the wall and monitor its response to the paint.
If you’re unsure about the stability of the surface, it’s always best to consult with a professional who can offer tailored advice. You might also find some useful guidance from the Paint Quality Institute on specific textured surface issues.
• Choosing The Right Paint And Tools
Selecting the right paint product is essential for ensuring a smooth finish on a textured surface. When it comes to textured walls, it is recommended to use paint specifically designed for such surfaces.
These paints usually have higher viscosity and better adhesion properties. Many professionals suggest using acrylic or latex-based paint, which tends to be more forgiving and less prone to cracking or chipping.
As for the tools, it’s essential to choose the correct roller and brush for your specific type of texture. For rougher textures, opt for a roller with a thicker nap (3/4 inch to 1 inch), whereas for finer textures, a lower nap roller (3/8 to 1/2 inch) should suffice.
When it comes to brushes, select a high-quality, soft-bristled brush that allows you to cut in the edges and paint small areas where a roller may not fit.
• Proper Surface Preparation
Before commencing with painting, ensure that the textured surface is properly prepared. Here are some essential steps to follow when preparing a textured surface for painting:
– Cleaning The Surface
Clean the wall thoroughly, removing all dust, dirt, and cobwebs. A damp cloth, vacuum cleaner, or an air compressor can be utilized for this task. Ensure the surface is dry before proceeding to the next step.
– Repairing Damage
Examine the surface for any cracks, holes, or other damage that may need fixing. Fill all imperfections using a suitable patching compound or lightweight joint compound. Be sure to follow the product’s instructions and allow for proper drying time before continuing.
Once the filler has dried, sand it lightly with fine-grit sandpaper, ensuring that the surface is smooth and blends evenly with the surrounding texture.
– Primer Application
Applying a primer before painting is highly recommended, as it helps to create a uniform base for the paint and improves adhesion.
Choose a high-quality acrylic or latex primer, preferably with a stain-blocking formula if the textured surface has any watermarks or stains.
Apply the primer with a roller, ensuring even coverage, and let it dry according to the manufacturer’s instructions.
• Painting Techniques
Once the textured surface has been prepped, it’s time to begin painting. Here are some general tips for painting over textured surfaces:
– Cutting In Edges
Using a soft-bristled brush, cut in the edges around the room’s corners, as well as the window and door frames. This requires maintaining a steady hand and applying paint carefully to avoid any excess or drips.
– Roller Painting
When painting with a roller, aim to apply the paint in a consistent and even manner. Roll the paint in a W shape or zig-zag pattern, working in small sections to avoid streaks or uneven coverage.
It is important to maintain a wet edge as you paint, to ensure a smooth finish. This is achieved by overlapping the edges of each section slightly while the paint is still wet.
– Multiple Coats and Drying Time
For best results, apply at least two coats of paint, allowing each coat to dry thoroughly before applying another.
This ensures an even finish and allows any irregularities in the first coat to be corrected. Remember to follow the drying time indicated on the paint can.
– Clean Up
Once the final coat of paint has dried, carefully remove any painter’s tape and touch up any areas that require additional paint.
Finally, thoroughly clean your brushes and rollers, store them properly, and dispose of the used paint cans responsibly.
• Final Thoughts
Painting over a textured surface can be a challenging yet rewarding project. You can achieve a professional-looking result with the proper application of knowledge, techniques, and patience.
Ensure you plan and prepare well, choose the correct paint and tools, and follow the tips provided in this guide, and you’ll be well on your way to a successful painting project.
Step | Description |
|---|---|
1 | Clean the surface thoroughly, removing any dust or debris. |
2 | Ensure the surface is dry and free of any moisture or mildew. |
3 | Apply a primer to the textured surface, ensuring a smooth and even coverage. |
4 | Allow the primer to dry completely, following the manufacturer’s instructions on the drying time. |
5 | Apply the paint to the primed surface using a brush, roller, or sprayer, depending on the desired finish. Be sure to use a paint that is compatible with textured surfaces. |
6 | Allow the paint to dry completely, then assess if a second coat is necessary for proper coverage. |
7 | Apply any additional coats as needed, allowing each coat to dry completely before applying the next. |