Surface Preparation: How To Keep It Dry
When it comes to surface preparation, one key factor often overlooked is keeping the area dry. Worry not, as we are here to share some tried and tested methods to help you maintain the optimal dryness level during the process.
Surface preparation: how to keep it dry:
To maintain dryness during surface preparation, ensure proper humidity control, use appropriate drying techniques like air drying, heat drying, or vacuum drying, select moisture-limiting surface preparation methods, focus on surface selection and pre-treatment, and practice proper storage and handling of materials. These steps are critical for optimal results in painting, construction, and manufacturing industries.

Discover the secrets of maintaining a dry surface while improving your DIY skills! We have a treasure trove of tips, techniques, and expert advice on proper surface preparation. Read on and say goodbye to moisture troubles!
Contents
- 1 Maintaining Dryness in Surface Preparation
- 2 Essential Steps for Effective Surface Preparation
- 2.1 • Understanding Surface Contamination
- 2.2 • Cleaning the Surface
- 2.3 • Removing Grease and Oil
- 2.4 • Eliminating Rust and Scale
- 2.5 • Stripping Previous Coatings and Paint
- 2.6 • Addressing Mold, Mildew, and Organic Growth
- 2.7 • Ensuring Proper Surface Profile and Adhesion
- 2.8 • Final Inspection and Cleaning
- 3 Discover the 9 Vital Steps in Surface Preparation
- 3.1 • Step 1: Identifying the Surface Material
- 3.2 • Step 2: Assess the Condition of the Surface
- 3.3 • Step 3: Repair and Restore the Surface
- 3.4 • Step 4: Clean the Surface
- 3.5 • Step 5: Sand and Abrade the Surface
- 3.6 • Step 6: Remove Dust and Debris
- 3.7 • Step 7: Prime the Surface
- 3.8 • Step 8: Mask and Protect Adjacent Surfaces
- 3.9 • Step 9: Maintain Proper Environmental Conditions
- 4 Exploring Top Surface Preparation Techniques
- 5 Four Key Methods for Pre-Adhesive Surface Preparation
Maintaining Dryness in Surface Preparation
• Introduction
Surface preparation is a crucial step in various industries, such as painting, construction, and manufacturing, among others. Ensuring that the surface to be treated remains dry is vital to achieving optimal results.
• Understanding the Importance of Dry Surface Preparation
Although surface preparation methods may vary depending on the application, the need for a dry surface remains constant throughout different industries. Regardless of the intended surface treatment to be applied, moisture can wreak havoc on the final results.
Moisture can cause coatings to blister, adhesion problems, and even affect the integrity of the material being treated. Therefore, it is imperative to keep the surface dry during the preparation phase.
– The Drying Step in Surface Preparation
Some processes, such as abrasive blasting, pressure washing, or chemical cleaning, often involve the use of water or other solvents in the cleaning stage.
After these processes, the surface must be thoroughly dried before moving on to the next step. This step ensures the proper bond between the surface and the applied treatment.
• Methods to Keep Surfaces Dry
1. Humidity Control
Client environments can significantly impact surface moisture levels. As a result, it is essential to monitor and control the humidity (and temperature) in your preparation area.
Installing a dehumidifier or air conditioning unit can help maintain optimal humidity levels. Ideally, keep the relative humidity below 50% to prevent excess moisture from affecting surfaces.
2. Controlled Drying Techniques
After cleaning the surface with water or other solvents, ensure the surface is adequately dried before proceeding further. Depending on the material being prepared, there are various methods for drying. Some examples include:
- Air drying: For some surfaces, air drying may be sufficient, but remember to consider the humidity levels in the environment. You can use fans or blowers to expedite the drying process.
- Heat drying: Utilizing heat, such as infrared lamps or heat guns, can help speed up the drying process on specific surfaces. Be mindful of the materials being treated to prevent overheating or damage.
- Vacuum drying: This technique involves pulling a vacuum to evaporate the moisture from the surface. It can be very effective for delicate, porous, or difficult-to-reach surfaces.
3. Selecting the Right Surface Preparation Techniques
Choose surface preparation techniques that do not introduce moisture or limit moisture introduction. For instance, using an abrasive blasting method with a dry abrasive instead of using water-based methods could reduce the need for additional drying.
4. Surface Selection and Pre-treatment
Select materials that are less prone to moisture retention. Additionally, invest time in properly pre-treating surfaces, such as removing any existing coatings, oils, and contaminants. This attention to detail will aid in preventing moisture-related issues during the surface preparation process.
5. Proper Storage and Handling
Ensure materials and surfaces are stored in a controlled environment with suitable humidity levels before and after surface preparation.
This practice will reduce the risk of unwanted moisture introduction. Properly cover and protect materials when transferring them from one location to another to avoid moisture exposure.
• Integral Practices for Success
To achieve and maintain a dry surface during the preparation phase, a systematic and proactive approach to moisture control is necessary.
I recommend employing proper humidity control, selecting appropriate drying techniques, carefully choosing surface preparation methods, focusing on surface selection and pre-treatment, and practicing proper storage and handling of materials.
By following these recommendations, you will be well on your way to a successful project with a thoroughly prepared and dry surface. Remember, a successful project outcome begins with meticulous attention to detail at the earliest stages of the process.
Step | Description |
|---|---|
1 | Inspect the surface for any visible moisture or dampness. |
2 | Use a moisture meter to check for any hidden moisture within the surface. |
3 | If moisture is detected, use a dehumidifier or fan to dry the area completely. |
4 | Clean the surface using a dry, nonabrasive cloth to remove dust and debris. |
5 | Apply a moisture-resistant primer or sealer to the surface to prevent moisture penetration. |
6 | Ensure proper ventilation in the area to prevent condensation and maintain a dry environment. |
7 | Regularly inspect and maintain the surface to ensure it remains clean and dry. |
Essential Steps for Effective Surface Preparation
Proper surface preparation is critical to ensure the durability and longevity of various applications, such as painting, coating, and adhesive bonding.
• Understanding Surface Contamination
When dealing with any surface, it’s crucial to identify and remove contaminants that can negatively affect the job. Common contaminants include:
- Dust, dirt, and debris
- Grease and oil
- Rust and scale
- Previous coatings and paint
- Mold, mildew, and organic growth
To achieve the best results, it’s crucial to understand the nature of each contaminant and the appropriate steps for its removal.
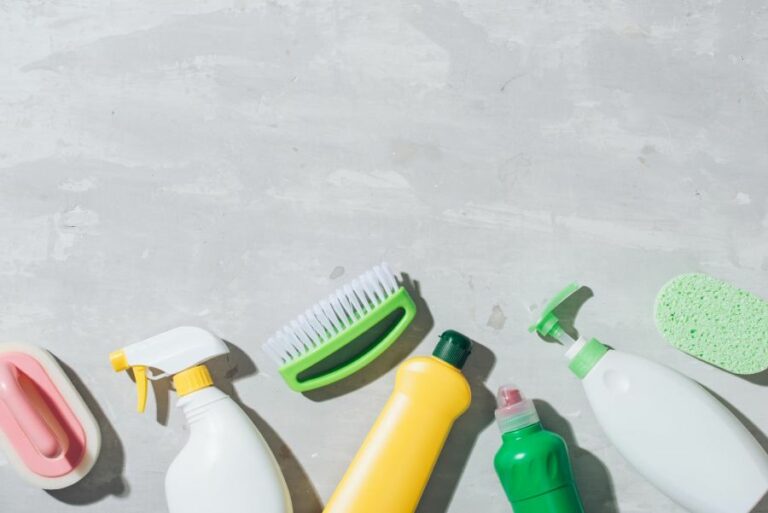
• Cleaning the Surface
The first step in proper surface preparation is cleaning the surface to remove any dirt, dust, or debris. For most surfaces, a thorough sweep or vacuum will suffice. In cases where stubborn dirt or grime is present, a detergent or degreaser may be used to break down the contamination.
– Recommendation: Choosing the Right Cleaning Agent
Select a cleaning agent that is appropriate for the surface being prepared. For example, a mild detergent is suitable for most surfaces, while a degreaser is necessary for oily or greasy surfaces. Always follow the manufacturer’s directions for dilution and application.
The Environmental Protection Agency offers a Safer Choice program to help identify environmentally friendly cleaning products.
• Removing Grease and Oil
If the surface is contaminated with grease or oil, it’s essential to thoroughly clean it with a degreaser or similar cleaning agent. Failure to remove these contaminants can result in poor adhesion, blistering, and other issues with the applied product.
– Recommendation: Use a Water-Based Degreaser
Water-based degreasers are effective at breaking down grease and oil while being less harmful to the environment. Always rinse the surface with clean water after using a degreaser and ensure the surface is dry before proceeding with further preparation.
• Eliminating Rust and Scale
For metallic surfaces, rust and scale can lead to poor adhesion and premature failure of the coating or adhesive. In cases of heavy rust or scale, consider using a wire brush, sandpaper, or abrasive blasting to remove the contamination.
For lighter rust, a rust converter can be applied to chemically convert rust into a more stable compound.
– Recommendation: Protecting Bare Metal
When removing rust and scale, it’s essential to apply a protective primer or rust-inhibiting paint to prevent future corrosion and ensure a durable finish.
• Stripping Previous Coatings and Paint
Old or peeling paint can negatively impact the adhesion and appearance of new coatings. Use paint strippers, scrapers, or abrasive techniques to remove all loose and failing paint. Always follow the manufacturer’s guidelines for proper use and disposal of paint strippers.
– Recommendation: Selecting the Right Paint Stripper
When choosing a paint stripper, consider the type of surface and the existing paint. For example, some strippers are designed specifically for wood or masonry, while others are suitable for multiple surfaces.
The US Department of Health and Human Services provides guidelines on safely removing lead-based paint.
• Addressing Mold, Mildew, and Organic Growth
The presence of mold, mildew, or other organic growth can lead to poor adhesion and surface discoloration. Use a mixture of water and bleach (typically one part bleach to three parts water) to kill and remove organic growth.
Rinse the surface thoroughly with clean water and allow it to dry before continuing with the preparation process.
– Recommendation: Preventing Future Growth
To minimize future mold and mildew growth, consider using a mold-resistant primer or adding a mildewcide to the paint or coating is applied.
• Ensuring Proper Surface Profile and Adhesion
Once all contaminants have been removed, it’s essential to ensure that the surface has the appropriate texture or profile for proper adhesion.
For some surfaces, this may involve sanding or otherwise abrading the surface to provide a rough texture for the product to adhere to paint, coating, or adhesive. Perform a small adhesion test to ensure proper bonding.
Follow the manufacturer’s instructions for proper surface preparation and consult their technical support for assistance if needed.
• Final Inspection and Cleaning
Before applying the desired product, perform a final inspection of the surface to ensure all contaminants have been removed and the appropriate texture or profile has been achieved. If any additional cleaning is required, be sure to allow the surface to dry thoroughly before the application.
– Recommendation: Documenting Surface Preparation
To ensure consistent results and adherence to best practices, consider documenting the steps taken for surface preparation. This documentation can be helpful for future projects or to record the processes followed for a particular job.
By carefully following these steps and recommendations, you’ll be well on your way to achieving proper surface preparation, leading to a more successful and durable application.
| Steps for Proper Surface Preparation |
|---|
| 1. Clear the surface of any furniture, decorations, and fixtures |
| 2. Remove any loose dirt or debris by sweeping or vacuuming the surface |
| 3. Clean the surface with a suitable cleaning solution to remove grease, dirt, and dust |
| 4. Rinse the surface with clean water and allow it to dry completely |
| 5. Repair any cracks, holes, or damaged areas by filling them with an appropriate filler material |
| 6. Sand the surface to remove any rough spots or old paint and to promote adhesion of the new coating |
| 7. Prime the surface with a suitable primer to seal any porous areas and provide a uniform surface for the topcoat |
| 8. Allow the primer to dry according to the manufacturer’s instructions before applying the topcoat |
Discover the 9 Vital Steps in Surface Preparation
Proper surface preparation is the key to achieving exceptional durability and a crisp finish when painting, applying coatings, or simply maintaining an existing surface. This comprehensive guide will outline the nine crucial steps to consider when preparing surfaces for various types of projects.
• Step 1: Identifying the Surface Material
First and foremost, it is crucial to identify the specific material of your surface. This knowledge is important as it directly influences the type of preparation techniques and products suitable for use. There are several common materials, including:
- Wood
- Metal
- Concrete
- Plaster
- Drywall
For more information on the specific characteristics of these materials, consult resources such as The US Department of Energy or organizations like the American Concrete Institute.
• Step 2: Assess the Condition of the Surface
Next, carefully examine the surface’s condition to determine the extent of cleaning or repairs needed. Look out for:
- Dirt and grime
- Peeling or flaking paint
- Rust or corrosion
- Cracks, dents, or holes
- Mildew or mold growth
- Loose or damaged screws or nails
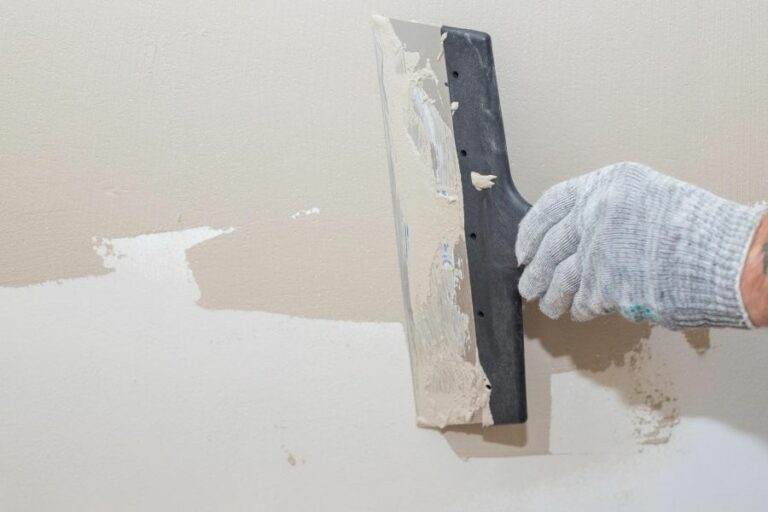
• Step 3: Repair and Restore the Surface
Address any surface damage, making sure to select the appropriate repair technique for the material involved. Some common repair methods include:
- Sanding or scraping off damaged paint or rust
- Caulking cracks or replacing damaged sections
- Treating mold-infested areas with a mold-killing solution
- Hammering down or replacing protruding nails or screws
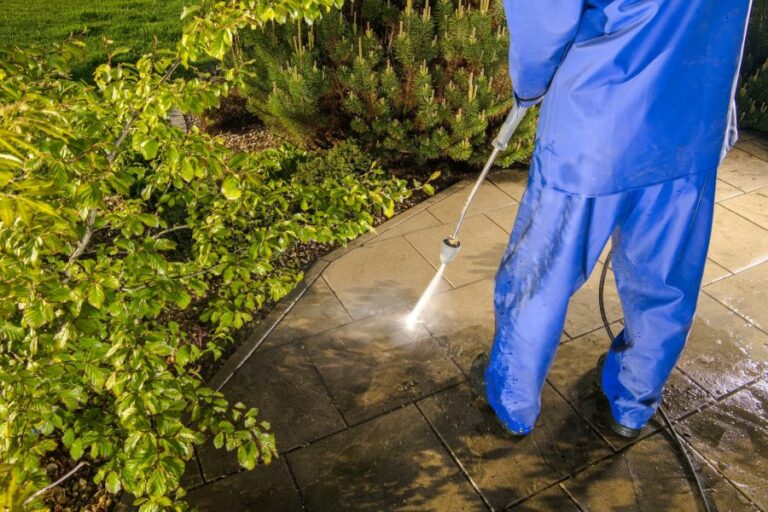
• Step 4: Clean the Surface
A thoroughly clean surface ensures a strong bond between the paint or coatings and the substrate. Cleaning methods vary depending on the material and level of dirt or grime, but some common options include:
- Wiping down with a damp cloth or sponge
- Using a mild detergent or degreaser
- Applying a solvent, such as mineral spirits, for stubborn stains or residues
- Pressure washing outdoor surfaces, like concrete or wood decks
• Step 5: Sand and Abrade the Surface
Sanding or abrading is essential to create a smooth, even surface that promotes adhesion. A variety of tools and materials can be employed, including:
- Sandpaper or sanding sponges (coarse, medium, or fine grit)
- Steel wool or abrasive pads
- Power sanders or grinders
- Chemical strippers or compounds for removing paint or coatings
As you work, check the surface frequently for evenness and make certain not to over-sand or damage the material.
• Step 6: Remove Dust and Debris
Once the surface is sufficiently sanded or abraded, it is important to remove any lingering dust or debris that could compromise the finish. Use methods such as:
- Vacuuming with a brush attachment
- Wiping down with a tack cloth or damp rag
- Employing a blower or air compressor (for outdoor projects)
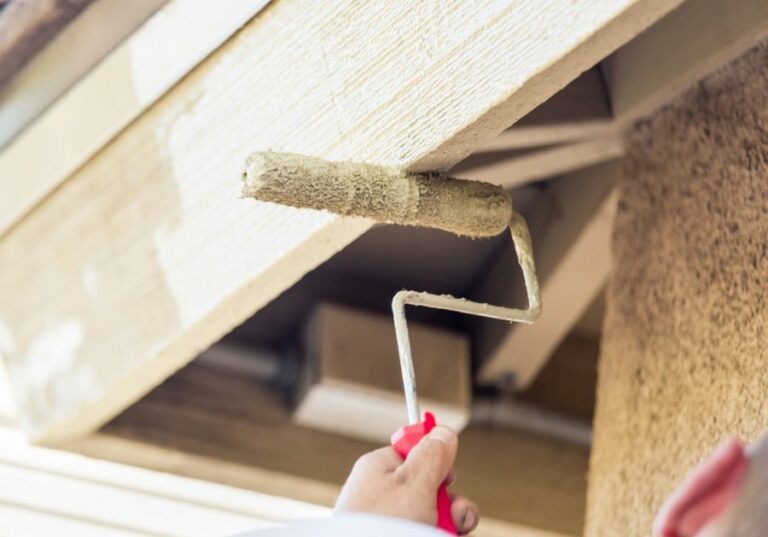
• Step 7: Prime the Surface
Applying a primer is essential for achieving a consistent, well-bonded finish. Primers vary depending on the type of material, desired finish, and paint or coating to be used. Generally, a quality primer should:
- Properly adhere to and seal the surface
- Enhance paint or coating adhesion
- Provide added moisture and stain resistance
- Minimize peeling, blistering, or other paint failures
Always follow the manufacturer’s recommendations for proper application and drying times.
• Step 8: Mask and Protect Adjacent Surfaces
To ensure a clean, precise job, carefully apply masking tapes and protective materials, such as plastic sheeting or drop cloths, to shield adjacent surfaces from paint or coatings.
• Step 9: Maintain Proper Environmental Conditions
Lastly, ensure the working environment is conducive to a successful application or coating process. Consider factors like temperature, humidity, and air movement, all of which can impact drying times, adhesion quality, and overall project outcomes.
Keep in mind that proper surface preparation will ultimately result in a more professional, durable finish. Taking the time to understand and follow these nine crucial steps will ensure a successful application, whether you are painting, coating, or simply maintaining your surfaces.
Step | Description |
|---|---|
1 | Surface assessment |
2 | Remove loose materials |
3 | Cleaning the surface |
4 | Material selection |
5 | Application of surface treatment |
6 | Remove surface defects |
7 | Apply a primer or sealant |
8 | Let the surface dry properly |
9 | Surface inspection and quality control |
Exploring Top Surface Preparation Techniques
Surface preparation is a vital step in ensuring the longevity and quality of any coating or treatment applied to a material, particularly in industrial settings. One of the most widely used techniques for surface preparation is abrasive blasting.
• Understanding Abrasive Blasting
Abrasive blasting, also known as sandblasting or grit blasting, is a process that involves using a high-velocity stream of abrasive material to forcibly remove contaminants, coatings, or imperfections from a surface. This method is effective in preparing surfaces made of metal, concrete, wood, glass, and plastic.
The type of abrasive material utilized depends on the purpose of the surface preparation and the characteristics of the surface. Some common abrasives include but are not limited to, sand, glass beads, steel shot, walnut shells, and aluminum oxide.
– Applications of Abrasive Blasting
Abrasive blasting is utilized in various industries for different purposes. Some primary applications include:
- Cleaning and rust removal: Removing dirt, grease, and rust from surfaces before applying paint or other coatings.
- Deburring: Eliminating burrs and sharp edges from machined parts, improving functionality and safety.
- Paint and coating removal: Stripping paint or other coatings to refurbish or repair a surface.
- Surface profiling: Enhancing the surface’s roughness or texture to improve the adhesion of coatings.
- Peening: Strengthening metal surfaces by generating compressive stress, reducing the risk of fatigue failure.
– Types of Abrasive Blasting
There are several types of abrasive blasting techniques, depending on factors such as the abrasive material used, the method of propelling the abrasive, and the surface being treated.
- Dry abrasive blasting: The abrasive material is propelled by compressed air, making it a suitable method for treating a wide range of surfaces.
- Wet abrasive blasting: Water is mixed with abrasive material, helping to reduce dust and heat generation.
- Vacuum blasting: This method uses a vacuum system to collect dust and abrasive material, reducing environmental contamination.
- Wheel blasting: In this technique, a wheel is used to propel the abrasive material, making it suitable for treating large surfaces or preparing batch loads of parts.
- Micro-abrasive blasting: This process uses fine abrasive materials and precise nozzles, allowing for pinpoint accuracy in treating small or delicate surfaces.
• Advantages of Abrasive Blasting
There are numerous benefits to using abrasive blasting for surface preparation. Some notable advantages include:
- Speed and efficiency: Abrasive blasting is often quicker and more effective as compared to other methods, such as manual scraping or chemical treatments.
- Uniformity: This technique ensures an even surface finish and consistent results across the entire treated surface.
- Versatility: Abrasive blasting is suitable for various materials and surface conditions, making it a one-stop solution for multiple industries.
- Eco-friendliness: Many abrasive materials can be recycled, reducing waste and the environmental impact of surface preparation.
• Disadvantages and Precautions in Abrasive Blasting
Despite its numerous advantages, there are certain disadvantages and precautions to consider when employing abrasive blasting:
- Health hazards: Inhalation of abrasive dust particles can lead to respiratory issues and other health risks. Proper personal protective equipment (PPE) should be worn by operators, and appropriate ventilation systems should be in place.
- Surface damage: Some abrasive materials can etch or change the surface properties of certain materials, compromising their integrity. Careful selection of abrasive material and technique is essential.
- Noise pollution: The high-velocity nature of abrasive blasting generates considerable noise, which can be harmful to operators and bystanders. Sound-controlled environments and hearing protection are recommended.
- Dust pollution: Abrasive blasting can generate dust, contaminating the surrounding environment. Proper containment and disposal are essential to minimize the impact.
As a practical recommendation, always consult with experienced professionals before choosing an abrasive blasting method for a specific application. The Sandia National Laboratories guidelines for selecting abrasive blasting methods is an excellent resource to refer to when making informed decisions.
To sum up, the abrasive blasting technique is a versatile and effective method for surface preparation in various industries.
Understanding the different types of abrasive blasting, their applications, and the advantages and disadvantages associated with them will enable users to determine the most suitable method for their specific needs.
Technique | Explanation |
|---|---|
Cleaning | Removal of oil, grease, dirt, and other contaminants from the surface. |
Abrasive Blasting | Using abrasives to remove rust, scale, paint, and other surface contaminants. |
Chemical Treatments | Applying chemicals to the surface to remove contaminants or prepare the surface for coatings. |
Mechanical Methods | Manual or power tool cleaning, grinding, or wire brushing to remove surface contaminants. |
High-Pressure Water Cleaning | Using high-pressure water to remove surface contaminants and prepare the surface for coatings. |
Most Common Technique: | Abrasive Blasting |
Four Key Methods for Pre-Adhesive Surface Preparation
In order to achieve a strong bond between two surfaces using adhesives, proper surface preparation is essential. In my experience, there are four main ways to prepare a surface before using an adhesive. These methods are cleaning, abrasion, chemical pre-treatment, and using adhesion promoters.
• 1. Cleaning: Removing Contaminants and Debris
The first step in preparing a surface for an adhesive is cleaning. This step is crucial for removing dirt, dust, grease, or any other contaminants that may interfere with the adhesive’s ability to bond. The cleaning process can involve several methods:
– Use a Solvent
Using a solvent, such as isopropyl alcohol, is an effective way to remove most contaminants from a surface. To use this method, soak a clean, lint-free cloth with the solvent and wipe the surface gently. You may need to repeat the process several times to ensure the surface is completely clean.
– Mild Detergent
In some cases, using a mild detergent and water may be sufficient for cleaning the surface. Gently scrub the surface with a soft brush, and then rinse thoroughly with water to remove all traces of detergent.
– Rinse with Compressed Air
For hard-to-reach areas or intricate parts, using compressed air to clean a surface can be advantageous. After applying solvent or detergent, blow off the surface using compressed air to remove any remaining contaminants.
Link recommendation: For more information on cleaning surfaces, visit the U.S. National Library of Medicine ToxNet database for guidelines on the handling of various cleaning solvents.
• 2. Abrasion: Increasing Surface Roughness
When the surface is thoroughly cleaned, you may need to increase its roughness to promote better adhesion. Rougher surfaces provide more surface area, allowing the adhesive to achieve a stronger bond. There are several methods to increase surface roughness.
– Sanding or Abrading
Using sandpaper or another abrasive material, gently sand the surface to create small scratches. This process will increase the surface area available for the adhesive to bond. Be sure to choose the right grit size for the material you are working with, and clean the surface after sanding to remove any dust.
– Abrasive Blasting
For larger surfaces or industrial applications, abrasive blasting (e.g., sandblasting or bead blasting) can efficiently create surface roughness.
This method involves using compressed air to propel abrasive particles at the surface, increasing their roughness. It is essential, though, to work with appropriate equipment and safety measures.
• 3. Chemical Pre-Treatment: Enhancing Adhesion at a Molecular Level
Chemical pre-treatments involve using specific chemicals to modify the surface, creating a more favorable environment for the adhesive. Here are some common chemical pre-treatments:
– Etching
Etching involves using an acid or other chemicals to dissolve a thin layer of the surface, creating micro-roughness that promotes better adhesion. This method is commonly used for preparing metal surfaces.
– Plasma Treatment
Plasma treatment involves using ionized gas to modify the surface at a molecular level. This technique can increase wettability or surface energy, improving the adhesion properties of the material.
Link recommendation: For more information on plasma treatment, check out the American Chemical Society’s collection of studies on its applications.
• 4. Adhesion Promoters: Enhancing Adhesive Performance
The final step in preparing a surface for an adhesive is applying an adhesion promoter. Adhesion promoters are substances you can apply to the surface to improve the performance of the adhesive.
– Primers
Primers are typically applied to a surface before applying the adhesive, improving the bond between the surface and the adhesive. The choice of primer will depend on the materials you are working with and the adhesive being used.
– Coupling Agents
Coupling agents, such as silanes, work as a bridge between the surface and the adhesive, enhancing the bond strength at the molecular level. They are commonly used in applications involving glass or ceramic materials.
In conclusion, preparing a surface for the use of adhesives involves cleaning, abrasion, chemical pre-treatment, and using adhesion promoters. By following these steps, you will greatly improve the adhesion properties and bond strength, ensuring a successful outcome for your project.
Remember to always follow safety guidelines and consult respective datasheets for the materials and adhesives being used.