How To Paint Water-Repellent Wood Preservative, What Pros Say
Are you ready to give your outdoor wooden surfaces the ultimate protection? Look no further, as we have just the solution for you, applying a water-repellent wood preservative. In this discussion, we will walk you through the essential steps, tips, and guidance to ensure a perfect and long-lasting finish on your wooden surfaces, enhancing their durability and appearance.
How to paint water-repellent wood preservative:
To paint water-repellent wood preservativE, select the appropriate type (oil-based, water-based, or copper-based) based on your wood and desired finish. Clean and repair the wood surface, then sand it to ensure proper adherence. Apply the preservative evenly with a brush or sprayer, following the manufacturer’s instructions. Allow it to dry, apply a compatible topcoat if needed, and maintain the wood through regular inspection and cleaning.

Curious about applying water-repellent wood preservative to your outdoor furniture or deck? Dive into our comprehensive guide and learn the best techniques, tools, and tips for effective, long-lasting protection.
With our step-by-step instructions, you’ll extend the life of your wood surfaces in no time. Read on and master the art of wood preservation!
Contents
- 1 Applying Water-Resistant Wood Preservative: A Guide
- 2 Is Painting Over Wood Preservative Possible?
- 3 Painting Over Water-Repellent Surfaces: Can You Do It?
- 4 Top Wood Preservatives to Use Prior to Painting
- 5 Pre-Painting Wood Waterproofing Techniques
Applying Water-Resistant Wood Preservative: A Guide
Painting water-repellent wood preservative is an essential step to protect and prolong the lifespan of your wooden structures. These easy-to-follow steps and expert tips will ensure your project is a resounding success.
• Selecting the Right Wood Preservative
Before you begin, its crucial to select the right water-repellent wood preservative. This decision depends on the type of wood, exposure to the elements, and the desired finish.
– Oil-Based Preservatives
Oil-based preservatives like linseed oil penetrate wood deeply, providing water resistance and nourishment. They are ideal for outdoor use and work well on rough-sawn timber.
– Water-Based Preservatives
Water-based preservatives are less toxic and easier to clean up. They dry quickly, are non-flammable, and provide good protection against fungi and insects.
– Copper-Based Preservatives
Copper-based preservatives provide excellent protection against wood-destroying insects and fungi. They are ideal for pressure-treated wood and can be painted or stained.
• Preparing the Wood Surface
Proper surface preparation is crucial for a durable and long-lasting finish.
– Clean the Wood
Use a stiff brush or a pressure washer to remove any loose dirt, debris, and old loose finish. Follow the cleaning with a mild detergent and water solution to remove mold, mildew, and algae.
– Repair Wood Damage
Inspect the wood for any cracks, holes, or splinters. Fill small holes and cracks with wood filler. Repair larger defects by removing damaged wood and replacing it with fresh wood.
– Sand the Wood
Sanding is essential to ensure the wood preservative adheres well and the finish is smooth. Start with a coarse grit sandpaper and work down to a finer grit. Be sure to sand in the direction of the wood grain.
• Applying the Water Repellent Wood Preservative
Follow the manufacturer’s instructions on the application method and drying times. Observe the recommended coverage rates, which are typically between 200-400 square feet per gallon.
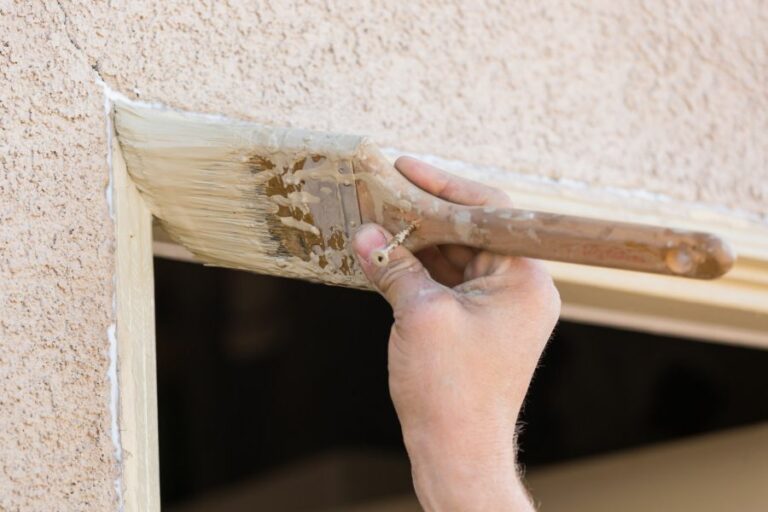
– Brush Application
Using a high-quality natural bristle brush, apply the preservative evenly across the wood surface. Work in the direction of the wood grain, ensuring full coverage on all sides and end-grain.
– Spray Application
Use a low-pressure garden sprayer to apply the preservative to the wood surface. Hold the nozzle 8-12 inches away from the surface and apply an even coat. Use a brush to smooth out any runs or drips.
– Drying and Curing
Allow the water-repellent wood preservative to dry according to the manufacturer’s instructions. Typically, drying can take up to 48 hours, depending on the ambient temperature and humidity. For best results, avoid applying the preservative in direct sunlight or during periods of high humidity.
• Applying a Topcoat (Optional)
Some water-repellent wood preservatives can be left as a final finish, while others may require an additional topcoat for UV protection and enhanced durability.
– Choose the Right Topcoat
Select a topcoat that’s compatible with your chosen wood preservative. Popular options include acrylic latex paint and oil-based stains. Check the preservative’s label for topcoat compatibility.
– Apply the Topcoat
Follow the manufacturer’s instructions for topcoat application. Common methods include brushing, rolling, or spraying. Apply a minimum of two coats, allowing appropriate drying time between coats.
• Maintenance and Annual Inspection
Regular inspection and periodic maintenance will ensure your wood remains protected and in good condition.
– Inspect Your Wood
Check for any signs of damage, discoloration, or peeling finish. Address any issues promptly to prevent further deterioration.
– Clean and Reapply the Preservative
If necessary, clean your wood surfaces using the same method described earlier and reapply the water repellent wood preservative as needed.
By following these expert recommendations and step-by-step instructions, you can successfully paint water-repellent wood preservatives and protect your wood from damage caused by water, fungi, and insects.
Regular maintenance and inspection will keep your wooden structures looking great and standing strong for years to come.
Step | Description |
|---|---|
1 | Choose the right water-repellent wood preservative for your project. |
2 | Prepare the wood surface by sanding it and cleaning it of any dirt, dust, or debris. |
3 | Apply the wood preservative according to the manufacturer’s instructions. This may involve brushing, spraying, or rolling on the product. |
4 | Allow the wood preservative to dry as per the recommended drying time on the product label. |
5 | If required, apply additional coats for better protection, allowing for drying time in between each coat. |
6 | Once the wood preservative is fully dry, paint the wood with suitable paint for outdoor use, ensuring the paint is compatible with the wood preservative applied. |
7 | Allow the paint to dry thoroughly before using the wood in your construction or outdoor project. |
Is Painting Over Wood Preservative Possible?
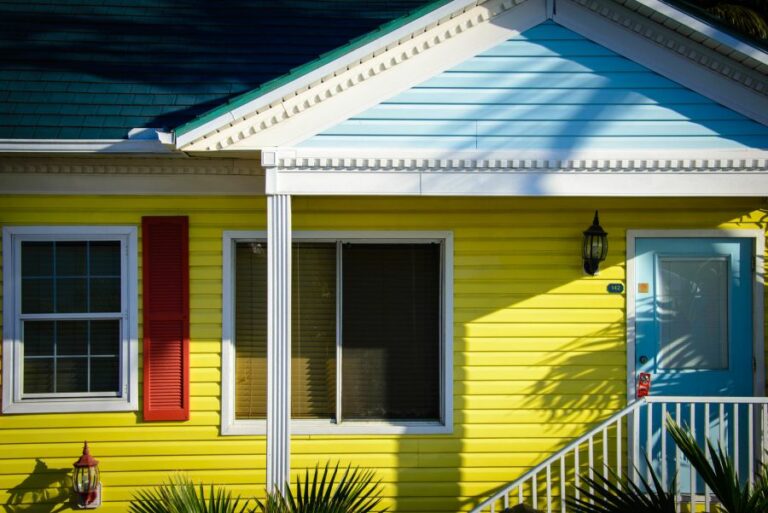
Painting on wood is a popular method to enhance the appearance of furniture, fences, or even a house exterior. However, preserving the wood from damage and environmental factors is just as crucial.
A combination of these two tasks leads us to a common query – can you paint on wood preservative? The answer depends on several factors, including the type of wood preservative and paint used, as well as the correct preparation techniques.
• Understanding Wood Preservatives
Wood preservatives are chemical solutions that protect the wood from degradation or damage caused by insects, fungal decay, and moisture.
There are various types available, showcasing different properties, which determine whether you can paint over them or not. Three of the most common wood preservatives include:
– Water-Based Preservatives
These preservatives are water-soluble and provide an excellent base for paint. They are commonly used on outdoor wood surfaces like fences and decks due to their long-lasting protection against decay and weathering.
– Oil-Based Preservatives
Considered more durable than water-based alternatives, oil-based preservatives soak deep into the wood’s fibers, offering excellent resistance to moisture and insects. However, their greasy nature means that the paint does not adhere well to their surface.
– Solvent-Based Preservatives
As with oil-based preservatives, solvent-based options also provide excellent protection against decay and insects but create issues when attempting to paint over them.
These preservatives are made from harsh chemicals that might mix and react with paint over time, causing premature degradation of the finish.
• Choosing the Right Preservative and Paint
To ensure successful painting on wood preservatives, select a water-based preservative compatible with your chosen paint. Confirm that the paint is designed for outdoor use and is suitable for application on wood surfaces.
For best results, use a high-quality acrylic latex paint offering excellent adhesion, durability, and resistance to weathering. These paints also dry quickly, reducing the risk of dirt or debris sticking to the paint surface.
• Preparing the Wood Surface
Proper surface preparation is crucial for a long-lasting and professional-looking paint job. Follow these essential steps to prepare your wood for painting:
– Clean the Surface
Remove any dirt, grease, or mildew from the wood surface using a mixture of warm water and mild detergent. Rinse the surface thoroughly with clean water and allow it to dry completely.
– Apply Wood Filler
Examine the wood surface for any holes, cracks, or imperfections. Fill these areas with a suitable wood filler and let it dry according to the manufacturer’s instructions. Once dried, sand the surface smoothly to ensure a seamless finish when painted.
– Sanding the Wood
Smooth and even the surface by lightly sanding the entire piece of wood using fine-grit sandpaper (150-220). Ensure you sand in the direction of the grain to avoid creating noticeable scratches. Wipe down the surface with a tack cloth to remove any sanding dust.
– Apply the Wood Preservative
Following the manufacturer’s recommendations, apply a water-based preservative to the wood surface. Allow the treatment to dry fully – this may take between 24 and 48 hours, depending on humidity and temperature conditions.
• Painting Over Wood Preservative
Once the wood surface is adequately prepared and the preservative has dried, follow these guidelines for painting:
– Prime the Surface
To ensure proper paint adhesion and a longer-lasting finish, apply a high-quality, exterior-grade primer on the wood surface. This step is especially crucial when painting light-colored paint over a darker preservative, as it improves coverage and results in fewer coats needed.
– Paint Application
After allowing the primer to dry, apply the acrylic latex paint using a high-quality brush or roller. Apply even, thin coats and allow each layer to dry before adding another. Generally, two or three coats of paint are recommended to achieve a uniform finish.
– Seal the Paint
For added protection, consider applying a clear sealer over the painted surface. A water-based sealer prevents moisture penetration and ensures the paint lasts longer.
• Conclusion
Painting on wood preservatives is possible with the right preparation, product selection, and application techniques. Using a water-based preservative and high-quality acrylic latex paint, you can enhance the appearance and durability of your wooden structures while keeping them safe from decay, insect damage, and the elements.
For additional information on wood protection, visit the USDA Forest Service website, which offers resources regarding wood preservation and treatment.
Question | Answer |
|---|---|
Can you paint on wood preservative? | Yes, you can paint on wood preservative, but you must ensure that the wood preservative is fully dry and follow the manufacturer’s guidelines for compatibility with paint. It is recommended to use a primer and a high-quality paint for better adhesion and durability. |
Painting Over Water-Repellent Surfaces: Can You Do It?
Painting over water-repellent surfaces often poses a challenge due to their unique characteristics.
• Understanding Water Repellent Surfaces
Water-repellent surfaces are designed to repel water, primarily to protect substrates from moisture damage. These surfaces can be found in various areas, such as external walls, roofing materials, and basements.
They usually have a waxy or oily film that causes water to bead and run off, making it difficult for paint to adhere.
Understanding the composition and characteristics of the water-repellent surface to be painted is essential before proceeding with the application of any paint products.
– Compatibility of Paint Products with Water Repellent Surfaces
Using the right type of paint is crucial when painting over water-repellent surfaces. The paint product must be compatible with the repellent and have strong adhesion properties to ensure a proper bond. In general, there are two primary types of paint: water-based (latex) and oil-based (alkyd) paints.
Latex paints are not recommended for use on water-repellent surfaces. The water in the paint may be repelled by the substrate, causing poor adhesion and resulting in peeling or flaking paint.
Oil-based paints have a higher success rate when used on water-repellent surfaces. They tend to adhere better and are more resistant to moisture.
However, it is worth noting that not all oil-based paints are suitable in this scenario and that specific products explicitly designed for water-repellent surfaces may be required.
– Surface Preparation
Proper surface preparation is vital for successful painting over water-repellent surfaces. A clean and well-prepared surface will allow for better paint adhesion and ultimately, a longer-lasting and visually appealing finish.
- Cleaning: Begin by thoroughly cleaning the surface using a mild detergent and a soft-bristled brush to remove dirt, grime, and any loose or flaking paint. Rinse the surface and allow it to dry completely before proceeding.
- Sanding: Lightly sand the surface with medium-grit sandpaper to roughen the water-repellent film and improve paint adhesion. Be sure to remove any sanding dust before painting.
- Primer: A high-quality oil-based primer, specially formulated for water-repellent surfaces, might be necessary to ensure proper paint adhesion. Ensure that the primer is compatible with the chosen paint product and follow the manufacturer’s instructions for application.
• Selecting the Right Paint Products
Many paint products are suitable for use over water-repellent surfaces, both in terms of compatibility and durability. Choosing products from reputable manufacturers and checking the labels for information on usage and recommended surfaces is advisable.
Some manufacturers offer specialized products designed for use on water-repellent surfaces or challenging substrates like concrete or brick. These products might include paints, primers, or additives that improve adhesion and durability.
The Paint Quality Institute provides helpful information on selecting paint products and understanding the differences between various paint formulations. The website also offers tips on surface preparation and application methods, which is beneficial for those considering painting over water-repellent surfaces.
• Application Tips
When applying paint over water repellent, it is essential to use proper application techniques to ensure a successful outcome. Consider these tips for a satisfactory application:
- Choose the right tools: Use high-quality brushes or rollers designed for use with oil-based paints to achieve even coverage and minimize brush or roller marks.
- Apply thin coats: Rather than applying one thick coat of paint, apply multiple thin coats to ensure proper adhesion, even coverage, and a smooth finish.
- Allow proper drying time: Follow the manufacturer’s instructions for drying and recoating times. Ensuring that each coat is thoroughly dry before applying the next coat will help improve adhesion and overall paint durability.
- Adequate ventilation: Ensure proper ventilation when using oil-based paint products, as they often produce strong fumes.
• Maintaining the Painted Surface
Once the paint has been successfully applied to the water-repellent surface and has dried completely, it is essential to maintain the painted surface to ensure its longevity. Regularly inspect the area for signs of damage or peeling and address any issues promptly to prevent more extensive damage.
Cleaning is an essential aspect of maintaining painted surfaces. Gently wash the area with a mild detergent and a soft-bristled brush to remove dirt and grime. Rinse thoroughly and allow the surface to dry completely.
In conclusion, painting over water-repellent surfaces can be a challenging task. However, with thorough surface preparation, careful selection of compatible paint products, and proper application techniques, it is possible to achieve a long-lasting and visually appealing finish.
Considering the tips and recommendations provided in this article will increase the likelihood of a successful outcome when painting over water-repellent surfaces.
| Can you paint over water repellent? |
|---|
| Yes, you can paint over water repellent, but it is essential to prepare the surface properly and use appropriate paint for better adhesion and durability. The surface should be clean, dry, and free from any loose or flaking materials. Using a primer specifically designed for masonry surfaces can also help improve the adhesion of the paint to the water-repellent surface. |
Top Wood Preservatives to Use Prior to Painting
A quality wood preservative can prolong the life of your wooden structures and surfaces, protect them from decay, and ensure a smooth finish when you decide to paint.
• The Importance of Wood Preservation
Wood is susceptible to decay, damage, and insect infestation, which can lead to costly replacements or repairs. A proper wood preservation treatment will prevent these issues and keep your wooden surfaces looking their best.
• Types of Wood Preservatives
There are several types of wood preservatives, each with its own purpose and application. Some common types include:
– Water-Based Preservatives
These preservatives are non-toxic, eco-friendly, and easy to apply. They offer excellent moisture resistance and protect against decay, fungi, and insects.
One popular water-based preservative is the Bora Care solution, which contains borate-based chemicals to protect against wood-destroying organisms.
– Solvent-Based Preservatives
Solvent-based wood preservatives contain active ingredients that are dissolved in oil or organic solvents. They penetrate deeply into the wood, providing long-lasting protection against decay, fungi, and insects.
A popular solvent-based preservative is copper naphthenate, which is known for its durability and resistance to moisture.
– Oil-Based Preservatives
Oil-based preservatives, like linseed oil or tung oil, provide natural protection against moisture, decay, and insect damage.
They also enhance the wood’s appearance, giving it a glossy or satin finish. However, these preservatives may not be the best option if you intend to paint over them, as they can cause adhesion issues.
• Choosing the Best Wood Preservative Before Painting
It is essential to select the right wood preservative based on the type of wood you have and the desired finish. Here are some expert recommendations for the best wood preservatives for various situations:
– For Exterior Wood
For outdoor wood surfaces exposed to harsh weather conditions, a solvent-based preservative is recommended. Wolman CopperCoat Green is an excellent choice, as it contains copper naphthenate, which offers long-lasting protection against decay, fungi, and insects.
– For Hardwood Furniture
Hardwood furniture requires a long-lasting preservative that enhances its appearance. An oil-based product like Watco Danish Oil will provide adequate protection while giving your furniture a beautiful finish.
– For Softwood Surfaces
Softwood surfaces, like pine, can be damaged easily. Using a water-based wood preservative, such as Thompson’s WaterSeal, will protect against moisture and decay without affecting the wood’s natural appearance.
– For Interior Wood
For wood surfaces inside your home that will not be exposed to moisture, a water-based preservative like Minwax Wood Finish is an excellent option. It dries quickly, leaves a clear finish, and is easy to clean up.
• Application Tips
Before applying any wood preservative, clean the wood surface to remove dirt, mold, or mildew. Use a wood cleaner or a mild detergent, as well as a brush or sponge, to ensure thorough cleaning. Make sure the wood is completely dry before applying the preservative.
When applying the preservative, follow the manufacturer’s instructions for the recommended number of coats and drying times. Always apply the preservative with a brush, roller, or spray, depending on the product’s specifications.
• Final Thoughts
In conclusion, choosing the best wood preservative before painting is critical for protecting your wooden structures and surfaces from decay and damage. Keep in mind the type of wood you are working with, the desired finish, and whether the surface will be exposed to moisture or other harsh conditions.
Follow the application tips provided in this article, and your wooden surfaces will be well-preserved, protected, and ready for painting.
Rank | Product Name | Type |
|---|---|---|
1 | Water-based acrylic wood primer | Primer |
2 | Oil-based wood primer | Primer |
3 | Wood preservative and treatment (e.g. Copper Naphthenate or Borate) | Preservative |
4 | Wood conditioner (for softwoods) | Pre-treatment |
5 | Wood filler | Filler |
Pre-Painting Wood Waterproofing Techniques
Wood is a versatile and widely-used material, but it has one major limitation: it is susceptible to water damage. To protect the wood from moisture and preserve its structural integrity, it is essential to waterproof it before painting.
• Why Waterproofing is Important
Waterproofing wood provides a protective barrier against water infiltration and helps to extend the life of the wood. When water infiltrates wood, it can cause rot, warping, and swelling, which can lead to structural issues and damage the painted surface.
By waterproofing wood before painting, you create a durable foundation that helps the paint adhere better and last longer.
• Step 1: Choose the Right Wood
Selecting the right type of wood is the first step in ensuring it will be protected against water damage. Some wood species are naturally water-resistant, like cedar, redwood, and teak.
However, if you are using a type of wood that is prone to moisture absorption, it is crucial to take steps to waterproof it.
For more information on selecting wood types, you can visit The U.S. Forest Service to learn about the characteristics of different wood species.
• Step 2: Prepare the Wood Surface
Before waterproofing the wood, it is essential to prepare the surface properly. Start by sanding the wood to remove any rough edges and splinters. Use fine-grit sandpaper in a circular motion, ensuring a smooth and even surface. This will enable the waterproofing material to adhere to the wood evenly.
After sanding, clean the wood with a damp cloth to remove any dust and debris. Be sure to allow the wood to dry completely before moving on to the next step.
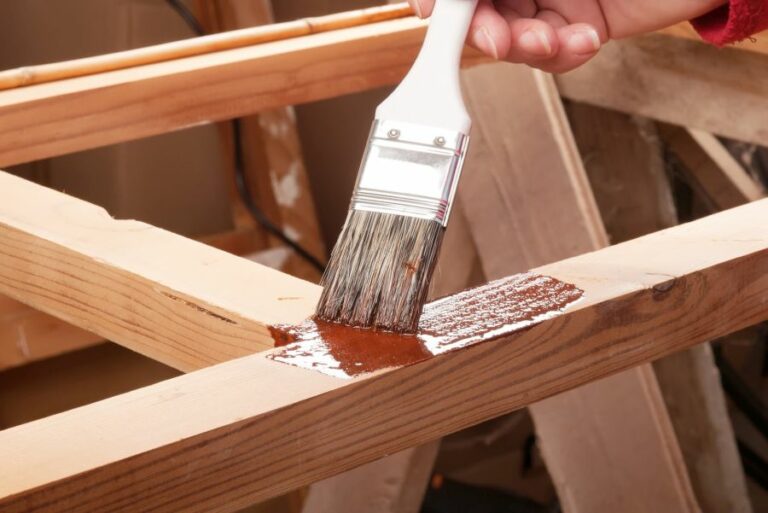
• Step 3: Apply a Wood Preservative
Before applying a waterproofing agent, consider using a wood preservative. A wood preservative is a chemical solution designed to protect wood from fungal and insect damage. This additional layer of protection can significantly extend the life of the wood and help prevent rot.
When selecting a wood preservative, choose a product that is compatible with the type of wood you are using and one that can be painted over.
Apply the wood preservative according to the manufacturer’s instructions, typically by brushing or spraying it onto the wood surface. Let the preservative dry fully before proceeding to waterproof.
• Step 4: Select a Waterproofing Material
There are several waterproofing materials available, and the best option will depend on your specific project requirements. Some popular choices include:
- Waterproof primers: These primers are specifically designed to seal and protect the wood from water damage. They penetrate the wood surface, providing a barrier against moisture. Select a waterproof primer that is compatible with the paint you plan to use.
- Sealants: Waterproof sealants are typically applied after the primer and before the paint. They create a transparent barrier that helps to keep moisture out. Choose a sealant specifically designed for wood, and ensure it is compatible with your chosen paint.
- Waterproof paint: Some paints are specifically formulated to provide waterproof protection. They contain additives that help to repel water and seal the wood surface. Make sure to select a paint labeled as waterproof, water-repellent, or water-resistant for this purpose.
• Step 5: Apply the Waterproofing Material
Follow the manufacturer’s instructions, applying the waterproofing material evenly to the wood surface. Use a paintbrush or roller, ensuring the entire surface is covered. Pay particular attention to areas where water is most likely to infiltrate, like joints and end grains.
Allow the waterproofing material to dry according to the manufacturer’s recommended drying time. This can vary widely, so it is essential to refer to the product label.
• Step 6: Apply the Paint
Once the waterproofing material is fully dried, it’s time to paint the wood. Be sure to select a high-quality paint that is compatible with the waterproofing material used. Apply the paint evenly, paying attention to any areas that may be more susceptible to water damage.
• Final Thoughts
Waterproofing wood before painting is a critical step in ensuring the longevity and structural integrity of your project. By following these steps and using the appropriate materials, you can create a water-resistant barrier that will protect your wood from moisture and extend the life of your paint job.
Step | Description |
|---|---|
1 | Inspect the wood for any damage or rot. Repair or replace any damaged sections. |
2 | Sand the surface of the wood to create a smooth and even surface for the waterproofing treatment and paint. |
3 | Apply a wood preservative or water repellent to the clean, dry surface of the wood. Follow the manufacturer’s instructions for application and drying times. |
4 | Apply a coat of primer to the wood’s surface. This helps create a better bond between the paint and the wood and increases the overall durability of the paint job. |
5 | Paint the wood with high-quality, water-resistant paint. Apply at least two coats, allowing each coat to dry fully before proceeding to the next. |
6 | Consider applying a final protective sealer or varnish over the paint for added protection and durability. |