Waterproof Wood Paint And Preservative Application
Waterproof wood paint and preservative application may seem daunting, but worry not! You can confidently protect your wood surfaces from water damage and decay with the right guidance and techniques. As experts in the field, we have come up with a detailed discussion on the step-by-step process, ensuring that you will have no trouble in achieving the desired outcome.
Waterproof wood paint and preservative application:
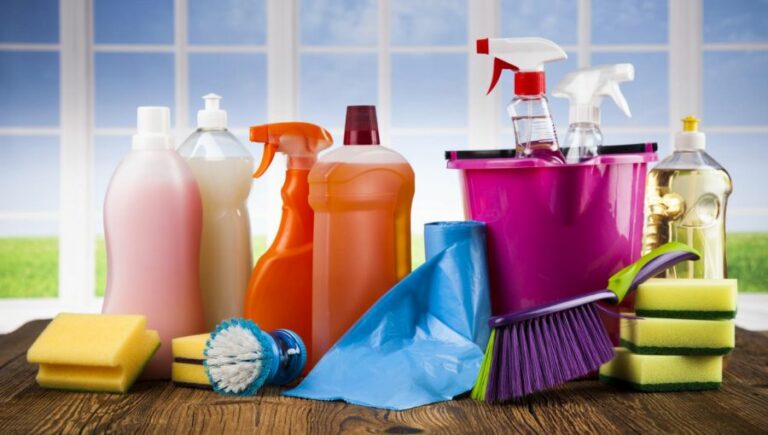
Waterproofing wood protects it from moisture, rot, and mold. Use water-based sealants, oil-based sealants, stains, varnishes, or wood preservatives depending on the wood type, exposure, and desired aesthetics. Prepare the surface by cleaning, treating rotted areas, filling cracks, and sanding. Apply thin, even coats as instructed, allow proper drying time, and maintain regularly.

Discover the secrets to choosing the right waterproof wood paint and preservative, as well as expert techniques for applying them effectively. We have much more to share, so read on and ensure your wood surfaces are beautifully protected, long-lasting, and resistant to water damage.
Contents
- 1 Wood Waterproofing: Applying Paint and Preservative
- 2 Methods to Seal Wood for Waterproofing Purposes
- 3 Painting Wood and Ensuring Waterproof Coverage
- 4 Techniques to Waterproof Sealed Paint on Wood
- 5 Top Treatments for Effective Wood Waterproofing
Wood Waterproofing: Applying Paint and Preservative
• Importance of Waterproofing Wood
Waterproofing wood is essential to protect it from moisture, which can lead to rot, mold, and eventual deterioration. A well-applied waterproof wood paint or preservative can extend the life of wooden structures, outdoor furniture, and decking.
Untreated wood can quickly succumb to the elements, which can be costly and time-consuming to repair.
• Types of Waterproof Wood Paint and Preservatives
Many products are available for waterproofing wood, each with its unique properties and application methods. Some of the most common types include:
1. Water-Based Sealants
These sealants are usually acrylic or latex-based and are known for their ease of application and low odor. They can protect the wood from water damage, mildew, and UV rays. However, they may not be as durable as oil-based sealants and may require more frequent reapplication.
2. Oil-Based Sealants
Oil-based sealants provide more durable and longer-lasting protection compared to water-based sealants. They can penetrate deeply into the wood, providing strong resistance to moisture, mold, and UV damage.
3. Stains and Varnishes
Stains and varnishes contain pigments and polymers that provide both waterproofing and a desired color or finish. They can enhance the natural beauty of the wood while providing protection from the elements. Many stains and varnishes also contain UV inhibitors to shield wood from sun damage.
4. Wood Preservatives
Wood preservatives are chemical treatments that protect wood from rot, decay, and insect damage. These treatments work by penetrating into the wood rather than forming a protective barrier on the surface.
Some preservatives can be painted on, while others require dipping or pressure treating the wood.
• Selecting the Right Product
Consider the following factors when choosing the best waterproof wood paint or preservative:
- Type of Wood: Softwoods, like pine and cedar, are more porous and may require heavier-duty sealants or preservatives. Hardwoods, like oak and teak, are more naturally resistant to the elements and may only need a stain or varnish for added protection and aesthetics.
- Exposure to Elements: Outdoor structures or items exposed to harsh weather conditions or constant moisture may require stronger, more durable products.
- Application Method: Some products require multiple coats, while others require only one. Be sure to read the product instructions and consider your desired application process when selecting a product.
- Aesthetics: Consider whether you want to maintain the natural look of the wood, enhance its color or grain, or achieve a specific finish when choosing a product.
• Preparing Wood for Waterproofing
Properly preparing the wood before applying a waterproof coating or preservative will ensure a longer-lasting and more effective treatment. Here are some steps to follow:
- Clean the Surface: Remove dirt, debris, mold, mildew, or previous coatings from the wood surface. This may require a combination of scrubbing, power washing, or sanding.
- Treat Rotted Wood: Remove any rotted or decayed areas and treat the surrounding healthy wood with a wood preservative or stabilizer to prevent further decay.
- Repair Cracks and Holes: Fill any cracks, holes, or knots in the wood using a wood filler or putty. Sand the surface smooth after the filler has dried.
- Sand the Surface: Sand the wood surface with a medium or fine-grit sandpaper to enhance adhesion and create a smooth, even finish. Be sure to sand in the direction of the wood grain.
- Remove Dust: Wipe or vacuum away any remaining dust or debris from the sanding process before applying your selected product.
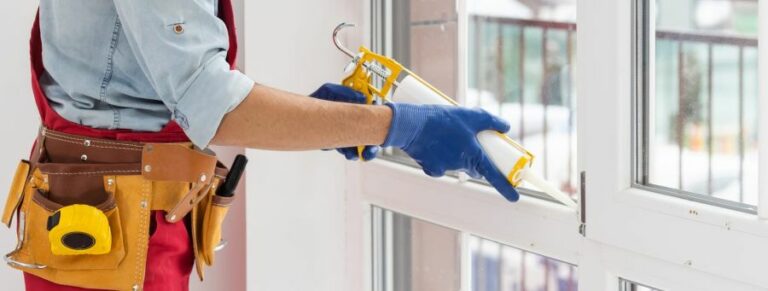
• Application Techniques and Tips
Follow these general tips and techniques when applying waterproof wood paint or preservatives:
- Follow Manufacturer Instructions: Each product has its unique set of application instructions. Always follow the manufacturer’s recommendations for the best results.
- Use the Correct Tools: Some products may require specific brushes, rollers, or sprayers for optimal application. Having the right tools will help ensure an even and thorough coating.
- Apply Thin, Even Coats: Avoid applying thick coats or overloading the wood with the product. This can lead to uneven drying, poor adhesion, and a weakened, unattractive finish. Instead, apply multiple thin coats, allowing each coat to dry before applying the next.
- Allow Adequate Drying Time: Be sure to follow the product’s recommended drying times before exposing the wood to moisture or additional coats. Rushing the drying process can hinder the effectiveness of the waterproof treatment.
- Regular Maintenance: Periodically inspect the wood for signs of wear or damage and reapply a protective coating as needed.
By following these guidelines, you can effectively waterproof your wood surfaces and ensure longer-lasting protection from the elements.
Proper application of waterproof wood paint or preservatives will not only save time and resources but also extend the life and beauty of your wooden structures, outdoor furniture, and decking.
Methods to Seal Wood for Waterproofing Purposes
Waterproofing wood can be essential in ensuring the longevity and durability of the material. Whether you’re working on a wooden boat, a piece of outdoor furniture, or simply looking to protect your wooden deck, sealing wood effectively is crucial.
• Oil-Based Seals: Penetrating and Long-Lasting
One of the most common methods to seal wood involves using oil-based products. Some popular choices include linseed oil, tung oil, and Danish oil. These oils penetrate deep into the wood, providing excellent protection against moisture and water damage.
– Linseed Oil
Both raw and boiled linseed oil can be used to waterproof wood. While raw linseed oil is natural and offers a rich, warm finish, it takes a long time to dry. Boiled linseed oil, on the other hand, dries more quickly and is perfect for those looking for a faster alternative.
Apply the oil in thin layers with a brush or cloth, allowing each application to dry before reapplying. A minimum of three coats is recommended for optimal protection.
– Tung Oil
Tung oil is another effective oil for sealing the wood. Derived from the seeds of the tung tree, this natural oil provides a glossy, water-resistant finish. To apply tung oil, first, remove any dirt and debris from your wood.
Then, use a clean, soft cloth to rub the oil evenly onto the wood. Allow it to dry and reapply as needed until you achieve the desired finish.
– Danish Oil
Danish oil, a blend of tung oil, linseed oil, and varnish, is a popular choice due to its satin finish and ease of use. To apply, wipe the oil onto your wood surface with a clean cloth and let it dry for around 15-20 minutes.
Afterward, wipe away any excess oil and allow the surface to dry for a minimum of 12 hours. Additional coats can be added as desired.
• Varnishes: A Glossy, Protective Finish
If you’re looking for a more traditional method to waterproof wood, varnishes are an excellent choice. They dry to form a layer over the wood, protecting it from water damage. Marine varnish, exterior varnish, and polyurethane are popular types of varnishes available.
– Marine Varnish
As the name implies, marine varnish is designed to provide heavy-duty protection against water, making it ideal for boats and other marine applications. To achieve the best results, apply several thin coats with a brush, allowing the varnish to dry between each coat.
– Exterior Varnish
For outdoor furniture, decks, and other exterior wood applications, exterior varnish is a solid choice. This type of varnish offers UV protection, which helps prevent color fading from sun exposure. Apply with a brush and allow ample time for each coat to dry.
– Polyurethane
Polyurethane is a durable, water-resistant finish that can be found in both oil-based and water-based varieties. To apply, use a high-quality brush to ensure a smooth, even coat.
Allow adequate drying time between coats, and keep in mind that water-based polyurethane dries more quickly than its oil-based counterpart.
• Paint: A Colorful, Lasting Solution
Another way to make your wood waterproof is by applying high-quality exterior paint. This can be a particularly attractive option for those looking to add a burst of color to their projects.
When selecting paint, look for products that offer a waterproof or water-resistant formula. Be sure to prepare the wood surface properly before painting by cleaning and sanding as necessary. Apply a primer, followed by a minimum of two coats of paint, allowing each coat to dry thoroughly.
• Epoxy: A Tough, Versatile Sealant
Epoxy sealants, available in both liquid and putty forms, provide a strong barrier against moisture and water damage. This versatile option is ideal for sealing gaps, joints, and cracks in wooden structures. To use epoxy, mix the resin and hardener according to the manufacturer’s instructions.
Apply the mixture to the desired areas and allow it to cure fully before exposure to water.
• Final Thoughts
In conclusion, there are several effective methods to waterproof wood, including oil-based products, varnishes, paints, and epoxies. Consider your specific project requirements and aesthetic preferences when selecting the best option for your needs.
Painting Wood and Ensuring Waterproof Coverage
• Understanding the Basics
Before diving into the process, it is essential to understand why waterproofing wood is necessary. Wood is often exposed to moisture, especially when used outdoors for furniture, decking, or siding. Moisture can cause wood to warp, rot, and discolor over time.
To maintain the look and strength of wood, it is crucial to waterproof it, and a common question arises: Can one paint wood and then waterproof it?
The answer is yes. Painting and waterproofing your wood can provide a protective barrier to extend its lifespan and improve its appearance.
• Preparing the Wood for Painting
To ensure the best outcome, prepare the wood before painting.
– Clean the Surface
Remove any dirt, debris, or existing paint from the wood surface. You can use a scraper or sandpaper to remove old paint and a stiff brush or cloth to clean dirt.
– Sand the Surface
Sand the wood to achieve a smooth, even surface. Start with coarse-grit sandpaper (60 to 80 grit) and work your way up to fine-grit sandpaper (120 to 220 grit).
– Fill in Gaps
If there are any gaps or cracks in the wood, use a wood filler to fill them in. Follow the manufacturer’s instructions and allow it to dry before sanding the surface smooth.
– Apply a Primer
A primer prepares the wood surface for paint by improving adhesion and providing a consistent base for the paint. Choose a primer designed for the specific type of wood you are working with and the type of paint you plan to use. Follow the manufacturer’s instructions for application and drying time.
• Painting the Wood
Once the wood surface is prepared, it’s time to paint.
– Choose the Right Paint
Select a paint specifically designed for use on wood. There are two main types of paints:
- Oil-based paints: Offer a durable, long-lasting finish but have a longer drying time and may require a solvent for cleanup.
- Water-based paints (latex or acrylic): These paints are quick-drying and easy to clean up with soap and water.
For outdoor wood, choose a paint labeled for exterior use. It will provide better protection against the elements.
– Apply the Paint
When applying paint, use a quality brush or roller that is the appropriate size for the job. Apply even, consistent strokes with each pass. Usually, two to three coats of paint are recommended for optimal results, allowing each coat to dry before applying the next.
• Waterproofing the Painted Wood
After the paint has dried, it’s time to waterproof the wood. There are several waterproofing products available, such as varnishes or sealants. Based on personal experience, here are some recommendations:
– Use a Clear Waterproof Sealant
A clear sealant allows the paint color to show through while providing a protective waterproof barrier. Some sealants also offer UV resistance, which protects the paint color from fading due to sun exposure.
Apply the sealant according to the manufacturer’s instructions, typically using a brush or roller. You may need to apply multiple coats for maximum protection.
– Opt for a Varnish
Varnishes are another option for waterproofing painted wood. They come in various finishes, including matte, satin, and glossy. Select a varnish that complements the paint finish for the best aesthetic results.
Apply the varnish using a brush or roller, following the manufacturer’s instructions. Several coats may be necessary for optimal waterproofing.
• Maintaining the Waterproof Finish
Over time, the waterproof finish may wear down and require maintenance to maintain its effectiveness.
- Inspect the wood regularly: Check for any signs of wear, fading, or damage to the paint and waterproofing layers.
- Clean the surface: Dirt and debris can accumulate on the surface, leading to damage or reducing the effectiveness of the waterproofing layer. Clean the surface as needed with a gentle cleanser and water, then rinse and allow it to dry.
- Reapply the waterproof finish: If the waterproof layer shows signs of wear, reapply a new coat to ensure continued protection.
By following these steps and regularly maintaining the wood surface, you can successfully paint and waterproof wood to prolong its appearance and function, no matter the application.
Step | Description |
|---|---|
1 | Choose the right paint and waterproofing product for your wood project. |
2 | Prepare the wood by sanding it smoothly, cleaning any dirt and dust, and allowing it to dry properly. |
3 | Apply a primer to the wood to help the paint adhere better and improve coverage. |
4 | Paint the wood with the chosen paint, following the manufacturer’s instructions for application and drying time. |
5 | Apply the waterproofing product according to the manufacturer’s instructions, ensuring proper coverage and drying time. |
6 | Inspect the wood for any missed spots or places that may need additional waterproofing, and fix them as needed. |
Techniques to Waterproof Sealed Paint on Wood
Sealing paint on wood is a crucial step in any woodworking project that will be exposed to moisture.
Whether it’s outdoor furniture, a wooden deck, or interior projects in damp areas like bathrooms and kitchens, sealing paint on wood will extend the life of your project and ensure that it stays in good condition for years to come.
• Choose the Right Waterproof Paint
The first step in making wood waterproof is to choose the right type of paint. For exterior wood, opt for a paint that is specifically designed for outdoor use. These paints have added ingredients that help protect the wood from moisture, UV damage, and the elements.
Acrylic latex paint is a popular choice, as it adheres well to wood and offers excellent waterproofing properties.
For interior jobs, choose a paint that is moisture-resistant and suitable for use in damp environments. Again, acrylic latex paint is an excellent choice for these projects.
Before you begin painting, make sure to thoroughly clean, sand, and prime the wood surface to ensure proper adhesion.
• Apply Multiple Coats
Applying multiple coats of paint will not only give you a durable and even finish but will also provide better waterproofing protection. Typically, two to three coats of paint should be sufficient for most projects.
Start with a thin, even base coat and allow it to dry completely. This may take anywhere from a few hours to overnight, depending on the specific paint, so be sure to check the manufacturer’s instructions.
Once the base coat is dry, lightly sand the surface with fine-grit sandpaper (e.g., 220-grit) to ensure proper adhesion of the subsequent coats.
Allow each coat to dry thoroughly before applying the next one. This will help prevent issues such as bubbling, peeling, or cracking.
• Use a Waterproof Sealer
A clear waterproof sealer is a crucial component in making your painted wood surface waterproof. These sealers are designed to penetrate the paint and wood surface, creating a protective barrier that locks out moisture, thereby preventing damage and decay.
There are many types of waterproof sealers available, including water-based and oil-based polyurethane, spar urethane, and acrylic clear coats. Each has its pros and cons, so consider your specific project and personal preferences when choosing a sealer.
For example, water-based polyurethane is easy to clean up, dries quickly, and has a lower odor compared to oil-based versions. However, oil-based polyurethane offers better durability and has a warmer, amber hue that can enhance the wood’s natural appearance.
Spar urethane is specifically designed for outdoor use and provides excellent UV and moisture protection, making it a popular choice for sealing exterior wood projects.
Whichever sealer you choose, it’s essential to apply it correctly. Follow these steps to ensure optimal results:
- Preparation: As with paint, proper surface preparation is crucial. Once the paint is completely dry, lightly sand the surface with fine-grit sandpaper to remove any imperfections and create a smooth surface for the sealer to adhere to. Wipe away any dust with a tack cloth or damp rag.
- Application: Apply the sealer using a high-quality brush, foam brush, or sprayer, following the manufacturer’s instructions. Use long, even strokes, and overlap slightly to ensure full coverage. Be vigilant in preventing drips and puddles, as these can create an uneven finish.
- Drying: Allow the sealer to dry completely before applying additional coats if required. Again, refer to the manufacturer’s instructions for the recommended drying time and the number of coats necessary for optimal protection.
- Finishing: Once the final coat of sealer has dried, lightly sand the surface one last time with fine-grit sandpaper to remove any imperfections and create a smooth, even finish. Wipe away any dust with a tack cloth or damp rag.
By following these steps and using the appropriate materials, you can effectively seal paint on wood to create a waterproof surface that will stand the test of time.
Step | Description |
|---|---|
1. Choose the right paint | Select acrylic or oil-based paint that is designed for wood to ensure durability and water resistance. |
2. Prepare the surface | Clean and sand the wood surface to create a smooth and even base for the paint. |
3. Apply a primer | Use a suitable primer to improve the adhesion of the paint and provide additional protection. |
4. Paint the wood | Apply the paint using even strokes, and allow it to dry according to the manufacturer’s instructions. |
5. Apply a sealant | Choose a water-resistant sealant, such as a polyurethane coating or a spar varnish, and apply according to the instructions. |
6. Allow the sealant to dry | Leave the wood to dry completely for the time specified by the sealant manufacturer. |
Top Treatments for Effective Wood Waterproofing
Waterproofing wood is an essential aspect of woodworking projects. It prevents damage from moisture, increasing the life and durability of wooden items.
• Why Waterproof Wood
Water is a natural enemy of wood. When wood absorbs water, it swells and warps, leading to structural damage and degradation. Waterproofing wood is crucial to maintain its integrity, appearance, and longevity.
By applying the appropriate waterproofing treatment, you can protect your wood from the negative effects of water exposure.
• Wood Waterproofing Methods
There are several methods to waterproof wood:
- Sealers
- Stains
- Paints
- Oil-based/Water-based treatments
– Sealers
Sealers are among the most popular and effective methods to waterproof wood. Sealers are typically transparent and coat the wood with a water-resistant barrier. They prevent water absorption and can help the wood last longer. Some sealers also contain UV protectants to shield wood from sun damage.
Types of Sealers
There are mainly two types of sealers:
Water-Based Sealers
Water-based sealers are eco-friendly and dry rapidly. They offer excellent protection against moisture and are considered a low-VOC option. The best water-based sealers have a high percentage of solids, such as resins and additives, to maintain a durable finish.
Solvent-Based Sealers
Solvent-based sealers dry slower but penetrate more deeply into the wood. They usually contain chemicals like petroleum distillates and mineral spirits. Solvent-based sealers often provide a more durable finish than water-based ones.
– Stains
Stains provide added benefits of color and water resistance. They are available in different colors and finishes, offering both aesthetic appeal and waterproofing protection. An important point to consider is that stains require more frequent reapplication compared to sealers.
Types of Stains
There are three types of stains:
Water-Based Stains
Water-based stains dry quickly and are eco-friendly, as they have low VOCs. They offer excellent waterproofing qualities and are easy to clean up.
Oil-Based Stains
Oil-based stains feature penetrating oils that sink deep into the wood fibers, providing a long-lasting, water-resistant finish. They require more time to dry and may need multiple coats, but the water-repellent properties make oil-based stains worth considering for outdoor wood projects.
Gel Stains
Gel stains have a thicker consistency that allows for better control during application. They work great for vertical surfaces and create a consistent color saturation without drooping or runny edges.
– Paints
Exterior-grade paints provide a dependable waterproofing treatment. Painting wood with high-quality, waterproof paint creates a barrier that protects from water infiltration. Choose paint specifically designed for outdoor use, which often includes mildew and UV-resistant additives.
– Oil-Based/Water-Based Treatments
Both oil-based and water-based treatments can protect wood from moisture, insects, and fungus. However, they must be chosen based on the type of wood and the intended use.
Linseed Oil
Linseed oil is a popular natural oil treatment for wood. It penetrates deeply and protects wood by creating a water-resistant barrier. However, it tends to darken the wood color.
Tung Oil
Tung oil is another natural option derived from the Tung tree. It dries hard and forms a water-resistant, protective layer on wood surfaces. It is also very durable, making it ideal for outdoor wood projects.
Water-Based Treatments
Water-based treatments utilize acrylic resins and other waterborne ingredients, creating a waterproof barrier while allowing the wood to breathe. These treatments emit fewer VOCs, dry faster, and offer excellent water resistance.
• Wood Preparation for Waterproofing
Before applying any waterproofing treatment, proper wood preparation is crucial. First, sand the surface of the wood to create a smooth surface for better penetration and adhesion of the waterproofing treatment. The next step is to clean the wood surface, removing any dust, dirt, or debris.
Finally, ensure the wood is dry before moving to the application phase.
• Application Techniques
When applying waterproofing treatments, use the appropriate tools and follow the product’s instructions. Common methods include:
- Brush: A brush provides a very controlled application, allowing you to fill in any gaps and detailed areas.
- Roller: A roller offers a faster application over large surfaces while maintaining consistent coverage.
- Sprayer: A sprayer enables quick, even application, best suited for larger projects with multiple pieces.
• Maintenance and Reapplication
Regular maintenance is essential to ensure your wood remains waterproof. Inspect and clean your wood objects regularly. Reapply treatments as needed based on the products and manufacturers’ recommendations.
• Conclusion
Waterproofing wood is a critical aspect of wood preservation and protection. By choosing the most appropriate waterproofing treatment and following the correct application techniques, you can ensure the longevity and beauty of your wooden objects.
Consider factors like your wood type, intended use, and environmental factors when selecting the best treatment for your needs.
Method | Description | Pros | Cons |
|---|---|---|---|
Sealant | A clear or tinted liquid that protects wood from moisture. | Easy to apply, penetrates deeply, creates a waterproof barrier. | May need to be reapplied every few years, can darken wood over time. |
Stain | A pigmented finish that adds color while protecting wood from moisture and UV rays. | Can provide waterproofing while also adding color and enhancing wood grain. | Not as effective as sealant for waterproofing, may need reapplication more often. |
Paint | A thick, opaque coating that provides a strong waterproof barrier and adds color. | Very effective at waterproofing, can last for many years before needing reapplication. | Hides wood grain, can be more difficult to apply. |
Oil | A natural oil that penetrates into the wood fibers to protect them from moisture. | Easy to apply, enhances wood grain, creates a durable finish. | Not as strong a waterproof barrier as sealant or paint, may need more frequent reapplication. |