Surface Prep: Mold And Mildew Removal
Dealing with mold and mildew can be a daunting task, but fear not! We’re here to help guide you through the process of removing these unsightly and potentially harmful substances from your surfaces. By taking proper precautions and using the right techniques, we can eliminate mold and mildew from your home, thus improving its appearance and overall air quality.
Surface prep: mold and mildew removal:
To prepare a surface for mold and mildew removal, first, identify the affected area and extent of growth. Use protective gear, HEPA filter vacuum, and proper ventilation while cleaning. Apply a mold remediation solution, scrub the surface, rinse, and dry. Prevent regrowth by maintaining ventilation, repairing leaks, controlling humidity, and regular cleaning.

Discover the secrets to effectively removing mold and mildew from various surfaces in your home or workplace. Learn about preventive measures, safety tips, and the best techniques and products for successful removal. Don’t let these pesky invaders take over; read on to regain control and bring back cleanliness!
Contents
- 1 Eliminating Mold and Mildew: Surface Preparation Techniques
- 2 Mold and Mildew Removal Prior to Painting: Methods & Tips
- 3 Effective Methods to Destroy Mold Spores on Various Surfaces
- 4 Top Strategies for Mold and Mildew Eradication and Prevention
- 5 Importance of Removing Mildew Before Applying Paint
Eliminating Mold and Mildew: Surface Preparation Techniques
Mold and mildew are common household problems that can cause significant health issues if not addressed properly. Proper surface preparation is crucial to ensuring that mold and mildew are effectively removed and prevented from returning.
• Identifying Mold and Mildew
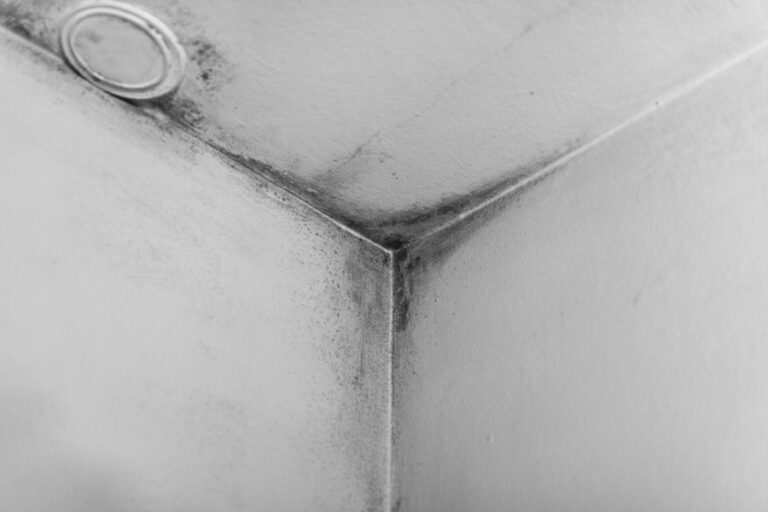
Before beginning the removal process, it is essential to identify the presence of mold and mildew. Mold is characterized by its fuzzy or slimy appearance and various colors like black, green, or white. Mildew, on the other hand, is typically white or gray and appears powdery.
Both can be found in damp, humid spaces and are often a result of water leaks, poor ventilation, or flooding.
The Environmental Protection Agency (EPA) is a great resource for further information on mold identification and prevention.
• Safety Precautions
When dealing with mold and mildew, it’s crucial to take appropriate safety precautions. Before starting any mold removal, ensure to:
- Wear personal protective equipment (PPE) such as gloves, goggles, and a mask to protect skin, eyes, and lungs from mold spores.
- Use a HEPA-filter-equipped vacuum to prevent the release of mold spores into the air.
- Ventilate the area to reduce the risk of mold spores spreading to other parts of the home.
• Tools and Materials
To effectively remove mold and mildew, gather the following tools and materials:
- Protective gear (gloves, mask, goggles)
- Mold remover (commercial solutions, bleach, hydrogen peroxide, or vinegar)
- Scrub brush or sponge
- Bucket
- Warm water
- Soft cloth or paper towels
- Vacuum with a HEPA filter
- Dehumidifier or fans (optional)
• Mold and Mildew Removal Process
Follow these steps for effective mold and mildew removal:
– Step 1: Assess the Area
Identify the extent of mold and mildew growth in the area. If it covers more than 10 square feet, it is recommended to contact a professional for mold remediation.
– Step 2: Prepare the Area
Before cleaning, remove any items in the affected area to prevent cross-contamination. Vacuum the area carefully using a HEPA filter vacuum to reduce airborne mold spores.
– Step 3: Apply the Cleaning Solution
Choose a mold remediation solution, such as commercial mold removers or natural options like vinegar, hydrogen peroxide, or bleach.
Keep in mind that bleach should never be mixed with ammonia or other chemicals, as it can result in toxic fumes. Always follow the manufacturer’s instructions when using any cleaning products.
– Step 4: Scrub the Affected Surface
Using a scrub brush or sponge, scrub the affected surface until you remove all visible mold and mildew growth. Be sure to wear protective gear while scrubbing to avoid contact with mold spores and cleaning chemicals.
– Step 5: Rinse and Dry
After cleaning, thoroughly rinse the area with warm water and wipe clean with a soft cloth or paper towel. Ensure the area is completely dry, as moisture can contribute to mold regrowth. Use a dehumidifier, fans, or natural ventilation to speed up the drying process if necessary.
• Preventing Mold and Mildew Regrowth
Once mold and mildew have been removed, it’s essential to take steps to prevent their return. Here are some tips for maintaining a mold-free living space:
- Improve ventilation, particularly in damp areas such as bathrooms and basements.
- Repair any leaks or water damage promptly.
- Keep indoor humidity levels below 60%, using a dehumidifier if necessary.
- Regularly clean surfaces in high-humidity spaces to prevent mold and mildew buildup.
- Ensure proper bathroom and kitchen exhaust fan usage.
In conclusion, effective surface preparation is key to successful mold and mildew removal. By following the steps outlined in this article, you can ensure a clean and healthy living environment free from these unwanted intruders.
Remember to follow best practices for preventing mold and mildew regrowth, as maintenance is crucial to keeping your living space clean and safe for years to come.
Mold and Mildew Removal Prior to Painting: Methods & Tips
Mold and mildew can not only cause health problems but can also damage your walls and ceiling. Before you can apply a fresh coat of paint, it is important to properly remove any mold and mildew buildup to ensure a clean, durable paint job.
• Assessing the Extent of Mold and Mildew
Identify areas affected by mold and mildew to gauge the extent of cleaning needed. If the mold is extensive or if you are sensitive to mold, it’s advisable to consult a professional for proper removal.
The Environmental Protection Agency (EPA) provides useful guidelines to help you decide whether to consult a professional EPA Mold Remediation.
• Gather the Supplies and Safety Equipment
Before starting the mold and mildew removal, gather the necessary supplies and safety gear. Recommended cleaning agents include:
- Bleach
- Water
- TSP (Trisodium Phosphate)
Safety equipment includes:
- Gloves
- Goggles
- Respirator mask
- Protective clothing
• Prepare the Work Area
Clear the work area by removing or protecting your furniture, carpets, and other belongings. Cover them with plastic sheets and secure them with tape. This prevents mold spores from spreading and settling on other surfaces during the cleaning process.
• Mixing the Cleaning Solutions
Create a bleach solution by mixing one part bleach with three parts water, ensuring that the bleach is sufficiently diluted. For TSP, follow the manufacturer’s instructions on the packaging to create the appropriate solution.
• Apply the Cleaning Solution
Wearing protective gear, apply the bleach solution using a sponge or cloth to the affected areas. Make sure not to scrub too hard, as this can damage the surface and release mold spores into the air. Allow the solution to sit for a few minutes before rinsing with clean water.
Replace the bleach solution with the TSP solution, working in small areas. The TSP is a powerful cleaning agent that helps remove any remaining mold and mildew and prepares the surface for painting. Rinse the treated surfaces thoroughly with water.
• Dry and Prepare the Area for Painting
Mold and mildew thrive in moist environments; therefore, it is essential to thoroughly dry the cleaned surface before painting. Use fans and dehumidifiers to expedite the drying process. Make sure the area is completely dry before proceeding to paint.
• Final Inspection and Repairs
Inspect the surfaces for any signs of mold or mildew. If any are visible, repeat the cleaning process. In some cases, extensive damage may require repairs like replacing drywall, plaster, or wood. Ensure the surfaces are smooth and continue to patch any visible cracks or holes, then sand them.
• Take Preventive Measures
Before painting, it’s advised to use a mold-resistant primer to create a barrier that prevents mold and mildew from developing. Once you’ve applied the primer and allowed it to dry, you can proceed with your chosen paint. Look for paint labeled as “mold-resistant” for added protection.
Lastly, If you use a proper cleaning technique and take preventive measures after the process, your home will not only look visually appealing, but you will also help maintain a healthy living environment, free from mold and mildew.
Step | Description |
|---|---|
1. Prepare the Area | Remove any furniture or items from the area to make the cleaning process easier. Lay down a plastic sheet or tarp to protect your floor from any dripping or splashes during the cleaning process. |
2. Wear Protective Gear | Wear gloves, a mask, and goggles to protect yourself from inhaling mold spores or irritating your skin with cleaning chemicals. |
3. Mix Cleaning Solution | Create a solution of 3 parts water and 1 part bleach in a bucket. This solution will help remove the mold and mildew from the surface. |
4. Apply Solution | Using a sponge, cloth, or soft brush, apply the bleach solution to the moldy areas. Allow the solution to sit for about 20 minutes to break down the mold and mildew. |
5. Scrub the Surface | After letting the solution sit, use a sponge or brush to scrub the mold and mildew away gently. Be sure to clean the entire surface thoroughly. |
6. Rinse the Surface | Use clean water to rinse the area, removing any leftover cleaning solution and debris. Make sure to remove all traces of mold, mildew, and cleaning solution from the surface. |
7. Dry the Surface | Use a clean cloth or towel to dry the surface after rinsing. Ensure the area is completely dry before proceeding to paint. |
8. Apply Mold-Resistant Primer | Before painting, apply a layer of mold-resistant primer to the surface. This will help prevent mold and mildew from growing in the future. |
9. Paint the Surface | Once the primer is dry, you can proceed to paint the surface as desired. |
Effective Methods to Destroy Mold Spores on Various Surfaces
Mold is a common household problem that can lead to health issues and damage to your property. Knowing how to effectively kill mold spores on surfaces is vital for maintaining a clean and healthy living environment.
• Understanding Mold Spores
It is essential to understand that mold spores are microscopic and naturally present in the air, both indoors and outdoors. They are capable of surviving on various surfaces, including walls, furniture, and textiles.
Once these spores find a suitable environment with moisture, warmth, and a food source, they can grow and multiply. Therefore, to effectively kill mold spores, you must remove the conditions that promote their growth.
• Natural Mold-Killing Solutions
– Vinegar
A popular natural choice for cleaning mold is vinegar. It is non-toxic, affordable, and has excellent mold-killing properties. To use vinegar, simply pour undiluted white distilled vinegar into a spray bottle and apply it to the affected area. Wait for an hour, then wipe away the mold using a damp cloth.
– Baking Soda
Another natural alternative for killing mold is baking soda. To use this method, mix a quarter tablespoon of baking soda with water in a spray bottle, ensuring that it dissolves fully.
Spray this solution on the moldy surface and scrub with a brush. Rinse the area with water and reapply the baking soda solution if the mold is still visible.
– Hydrogen Peroxide
A 3% hydrogen peroxide solution can be an effective, non-toxic mold killer. To use this method, apply the solution to the moldy area, either with a spray bottle, sponge, or cloth. Let it sit for 10 to 15 minutes, then scrub away the mold. Make sure to rinse with water to remove any residual hydrogen peroxide.
• Commercial Mold-Killing Products
– Concrobium Mold Control
Concrobium Mold Control is a popular commercial mold-killing product, often recommended by professionals. This product eliminates existing mold and prevents future mold growth, making it a powerful mold control solution.
To use Concrobium Mold Control, spray the product onto the affected surface and allow it to dry.
– Mold Armor Instant Mold & Mildew Stain Remover
Mold Armor Instant Mold & Mildew Stain Remover is a powerful bleach-based product designed to kill mold spores and eliminate mold stains. Spray this solution on the desired area and allow it to sit for a few minutes before rinsing or wiping clean.
– RMR-86 Instant Mold Stain & Mildew Stain Remover
Another popular commercial mold-killing product is RMR-86 Instant Mold Stain & Mildew Stain Remover. This fast-acting formula is particularly useful for addressing stubborn mold stains on various surfaces, including wood, concrete, and tiles.
Apply the product according to the manufacturer’s instructions, and always ensure proper ventilation when using strong chemicals.
• Additional Tips for Preventing Mold
- Regularly inspect your home for signs of water leaks, damaged pipes, or high humidity levels.
- Use a dehumidifier in damp areas, such as basements, to reduce moisture and discourage mold growth.
- Clean up spills and address water damage as soon as possible to prevent mold growth.
• Personal Protective Equipment
When addressing mold problems, it is essential to protect yourself from potential health hazards. The recommended personal protective equipment (PPE) includes gloves, goggles, and an N95 mask or respirator.
Make sure to also use protective clothing and dispose of it properly after completing any mold removal tasks.
• Conclusion
Effectively killing mold spores on surfaces requires a combination of using appropriate mold-killing agents and addressing the underlying issues that promote mold growth. Both natural and commercial products can be effective solutions, depending on your specific needs and personal preferences.
Additionally, always make sure to use proper personal protective equipment to protect yourself from potential health risks. By following these guidelines, you can maintain a clean and mold-free living environment.
Top Strategies for Mold and Mildew Eradication and Prevention
• Identifying Mold and Mildew
Mold and mildew are types of fungi that thrive in damp and humid conditions. Mold can appear as black, green, or even blue patches on walls, ceilings, and other surfaces, while mildew usually looks like a thin, white, or gray film.
Both can cause not only damage to your home but also health problems if not dealt with promptly.
• Safety Precautions
Before tackling mold and mildew removal, it is essential to take safety precautions. Wear rubber gloves, a mask, and goggles to protect yourself from contact with the fungi and inhaling spores.
Always ensure the area is well-ventilated during the cleaning process, and clear the room of any furniture or personal belongings that might be affected.
• Simple Cleaning Solutions
For small areas of mold or mildew, a simple cleaning solution can often do the trick. Mix a cup of water and a cup of white vinegar in a spray bottle.
Shake the mixture well, and spray it onto the affected area. Allow the solution to sit for 10-15 minutes, then scrub the mold away with a brush or cloth. If necessary, rinse the area with clean water and dry it thoroughly. This technique is especially effective on tile, glass, and other non-porous surfaces.
• Hydrogen Peroxide Solution
Another effective cleaning solution can be made using hydrogen peroxide, a common household item that can kill mold and mildew on various surfaces, including porous materials like wood and fabric.
To create a hydrogen peroxide solution, mix one-part hydrogen peroxide with two parts water in a spray bottle. Apply the solution to the affected area and let it sit for 10-15 minutes before scrubbing with a brush or cloth. Rinse the area with clean water and dry it thoroughly.
• Using Bleach
In some cases, bleach may be necessary to remove mold and mildew. However, it should be used with caution, as it can damage surfaces, bleach colors, and release harmful fumes. Use bleach only in a well-ventilated area, and never mix it with other cleaning chemicals.
To create a bleach solution, mix one cup of bleach with a gallon of water. Use a sponge or cloth to apply the solution to the affected area, allowing it to sit for 10-15 minutes. Scrub the mold and mildew away, rinse the area with clean water, and dry it thoroughly.
Remember, bleach cannot penetrate porous surfaces like wood, so it may not be the best solution for every situation.
• Baking Soda
Baking soda is another natural alternative for removing mold and mildew. It is effective on both porous and non-porous surfaces while being gentle on materials and safe for use.
To create a baking soda solution, mix one-part baking soda with four parts water in a spray bottle. Shake the mixture well and apply it to the mold or mildew. Scrub the area with a brush or cloth, then rinse with clean water and dry thoroughly.
• Commercial Mold and Mildew Removal Products
There are numerous commercial mold and mildew removal products available on the market. These products typically contain strong chemicals designed to kill mold and mildew effectively. While they can be useful, it’s essential to follow the manufacturer’s instructions and safety guidelines.
Always wear protective gear and ensure proper ventilation when using these products.
• Preventing Future Mold and Mildew Growth
After successful mold and mildew removal, take steps to prevent future growth. This may include fixing any water leaks or moisture problems, ensuring adequate ventilation, using a dehumidifier in high-humidity areas, and routinely cleaning surfaces prone to mold and mildew growth.
By following these steps, you can effectively remove mold and mildew from your home and prevent future growth. Remember, addressing mold and mildew as soon as you spot it is crucial, not only for the health of your home but for your own health as well.
Method | Description |
|---|---|
1. Vinegar | Spray undiluted white vinegar on the moldy area and let it sit for an hour. Wipe the area clean with water and let it dry. |
2. Baking Soda | Mix baking soda with water to form a thick paste. Apply the paste to the moldy area and let it sit for 10-15 minutes. Scrub the area with a brush and rinse with water. |
3. Hydrogen Peroxide | Spray a 3% hydrogen peroxide solution on the moldy area and let it sit for 10 minutes. Scrub the area to remove the mold and mildew, then wipe with a damp cloth. |
4. Tea Tree Oil | Mix a teaspoon of tea tree oil with a cup of water in a spray bottle. Spray the solution on the moldy area and let it sit without rinsing. Wipe the area with a cloth to remove the mold and mildew. |
5. Bleach | Mix a solution of one cup of bleach with a gallon of water. Use a sponge or brush to apply the solution to the moldy area. Let it sit for 15 minutes and rinse with water. Note: Only use bleach in well-ventilated areas and do not mix it with other cleaning products. |
Importance of Removing Mildew Before Applying Paint
To ensure the durability and longevity of any paint job, it is essential to remove mildew before painting. Mildew is a common problem on surfaces, such as walls and ceilings, especially in damp areas. It is a type of fungus that feeds on organic matter and thrives in damp, warm, and poorly ventilated areas.
• Negative Effects of Mildew on Painted Surfaces
Mildew can have several adverse effects on painted surfaces. These include:
1. Aesthetic Problems
Mildew causes unsightly dark stains and may even cause painted surfaces to appear dirty or discolored. These stains can be visible through the newly applied paint if the mildew is not properly removed prior to painting.
2. Structural Damage
Although mildew might not be as destructive as mold, it can still cause damage to the underlying substrate, weakening the material and leading to potential structural problems.
3. Health Hazards
Mildew can pose health risks, especially for individuals with asthma, allergies, or compromised immune systems. Removing it before painting ensures a safer living environment.
4. Adhesion Issues
Mildew can cause adhesion problems for paint, leading to peeling or chipping paint. Properly removing mildew before painting allows for better paint adhesion and a longer-lasting paint job.
5. Recurring Mildew Growth
If mildew is not removed before painting, it may continue to grow beneath the paint, leading to recurring mildew problems and staining.
• Best Practices for Removing Mildew Before Painting
To ensure that mildew is effectively removed before painting, follow these expert recommendations:
1. Identify the Source of Moisture
The first step in removing mildew is to identify and address the source of moisture contributing to its growth. This may include leaks, poor ventilation, or high humidity. Fixing the moisture problem will help prevent future mildew growth after painting.
2. Use Protective Equipment
When removing mildew, it is important to wear proper protective gear, such as gloves, safety goggles, and a mask. This equipment helps reduce the risk of exposure to harmful spores and irritants.
3. Clean the Surface
Clean the surface thoroughly with a solution of mild detergent and water to remove any dirt, dust, and grease. This step is crucial, as it helps to eliminate any additional contaminants that may interfere with the mildew removal process.
4. Apply a Mildew Treatment Solution
After cleaning the surface, apply a mildew treatment solution or a mildewcide. This may include a commercially available product or a homemade solution, such as a mixture of water and bleach.
It is essential to follow the manufacturer’s recommendations for the application of the mildew treatment product.
5. Scrub the Surface
Use a stiff bristle brush to vigorously scrub the surface, ensuring the mildew treatment solution penetrates deep into the substrate. This will help loosen and remove the mildew spores.
6. Rinse Thoroughly
After scrubbing, rinse the surface thoroughly with clean water to remove any remaining mildew treatment solution and loosen mildew spores.
7. Dry the Surface
Allow the surface to dry completely before painting. This may take several days, depending on the weather and humidity levels. Painting on a damp surface can lead to paint adhesion problems and recurrent mildew growth.
8. Use Mildew-Resistant Paint
After the surface is completely dry, it is recommended to use a mildew-resistant paint or primer to help prevent future mildew growth. These products contain special additives that inhibit the growth of mildew on painted surfaces.
• Conclusion
In conclusion, removing mildew before painting is a critical process that ensures the durability and longevity of the paint job while maintaining a healthier living environment.
By identifying the source of moisture, using protective equipment, cleaning the surface, applying a mildew treatment solution, scrubbing, rinsing, and allowing the surface to dry, you can effectively remove mildew and minimize the risk of it reoccurring.
Lastly, the use of mildew-resistant paint products will further enhance the paint’s ability to withstand mildew growth.

