Interior Paint: Surface Treatment Tips. What Pros Say
Are you tired of staring at the same dull walls of your home? Well, look no further! We’re here to provide expert guidance and surface treatment tips for interior paint transformations. With my helpful advice and practical techniques, you’ll soon have your living space looking fresh and new, making it the envy of all your neighbors.
Interior paint: surface treatment tips:
For an impeccable interior paint job, choose appropriate tools for the surface type, clean the surface thoroughly, and repair imperfections before priming. Sand the surface before applying paint, and use specific techniques for wood, drywall, and metal surfaces. Address special conditions like water stains, chalking, and mildew before painting.

Unleash your inner artist and transform your living space with our expert tips on interior paint surface treatments! Read on as we reveal the secrets to achieving that perfect professional finish. Don’t let your walls be dull; let them speak volumes about your personality and taste.
Contents
- 1 Tips for Interior Painting: Surface Preparation Techniques
- 2 Optimal Methods for Preparing Surfaces to Paint
- 3 Expert Wall Preparation Techniques by Professional Painters
- 4 Ensuring Surface Protection During the Painting Process
- 5 Cleaning Techniques Post-Interior Painting Work
Tips for Interior Painting: Surface Preparation Techniques
As an experienced professional in interior painting, I have encountered various surfaces that require special attention and preparation before painting.
• Choosing the Right Paint Tools
First, let’s start with choosing the right paint tools. The types of tools you use depend on the type of surface you are painting and whether it’s a smooth, textured, or uneven surface.
– Smooth Surfaces
For smooth surfaces, I highly recommend using a high-quality roller or brush. Rollers provide a smooth and consistent finish, while brushes are great for cutting in around trim and tight spaces.
– Textured Surfaces
For textured surfaces, you may need special tools such as a textured roller, stucco roller, or a unique brush designed for textured surfaces. These tools allow for the proper application of paint and help maintain the texture of the surface.
• Surface Preparation
Proper surface preparation is crucial to achieving a professional finish with your paint job. Here are some key tips to consider during the preparation process.
– Cleaning the Surface
Before starting any paint job, it is important to clean the surface thoroughly. Dirt, dust, and grease can cause paint to adhere poorly and can result in an uneven and unattractive finish. Use a mild detergent and warm water to clean the surface, and allow it to dry completely before proceeding.
– Repairing Imperfections
Repairing imperfections such as cracks, holes, and dents is essential to creating a smooth and consistent finish. Use a putty knife to apply a patching compound, making sure to follow the manufacturer’s instructions.
After the compound has dried, sand the area smoothl and wipe away any dust with a tack cloth.
– Priming the Surface
Priming the surface is a crucial step in ensuring proper paint adhesion and preventing common paint problems, such as peeling, cracking, and blistering.
Choose a high-quality primer that is specifically designed for the type of surface you are painting, and apply it evenly with a brush or roller, following the manufacturer’s recommendations.
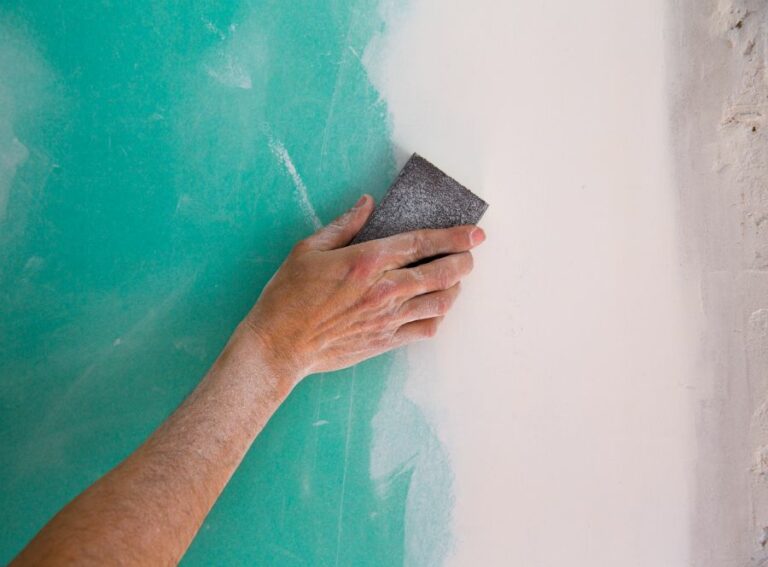
– Sanding
For a smooth and professional finish, sanding the surface is a must. Begin by using medium-grit sandpaper to remove any rough spots or imperfections, and then follow up with fine-grit sandpaper for a smooth finish. Wipe away any dust with a tack cloth before applying your paint.
• Painting Techniques for Different Surfaces
Applying paint to different surfaces requires specific techniques to achieve a consistent and professional result.
– Wood Surfaces
When painting wood surfaces, always work with the grain and use long, even strokes. Be sure to sand any exposed wood surfaces before applying primer and paint to provide better paint adhesion and improve the overall look of the finished project.
– Drywall
For drywall surfaces, use a brush to cut in around trim, corners, and edges. Then, use a roller to apply paint in a “W” pattern, blending each section as you move along. This helps to reduce visible roller marks and provides a seamless finish.
– Metal Surfaces
Before painting metal surfaces, prepare the area by sanding, priming, and cleaning. When applying the paint, use a brush or roller, making sure to apply thin, even coats, allowing each coat to dry before applying the next one.
• Handling Special Surface Conditions
Some surfaces may present unique challenges that require special handling or treatment.
– Water Stains
To treat water stains, first, determine the source of the moisture and fix any underlying issues. Afterward, prime the area with a stain-blocking primer and allow it to dry before applying the topcoat.
– Chalking
Chalking is a powdery substance that can develop on the surface of paint over time. To address chalking, clean the surface with a non-abrasive detergent and rinse thoroughly. Allow the surface to dry before priming and painting.
– Mildew
Mildew can be a serious problem on surfaces, especially in moist environments. Before painting, remove any visible mildew with a solution of bleach and water, following safety precautions. Allow the surface to dry completely, then apply a quality primer and paint.
In conclusion, proper surface treatment and selection of appropriate tools are fundamental in achieving an impeccable interior paint job.
By following these tips and recommendations, you can achieve a professional finish that not only looks great but also lasts for many years to come.
Optimal Methods for Preparing Surfaces to Paint
Good preparation is essential when it comes to achieving a professional and long-lasting paint finish. This article will look at the best practices for preparing surfaces for various types of paint jobs.
Whether you are painting your home’s exterior or refinishing furniture, follow these expert tips for the best results.
• Importance of Proper Surface Preparation
Inadequate preparation of surfaces is a common reason for paint problems such as peeling, blistering, and poor adhesion. Therefore, it is crucial to understand the necessary steps to take for successful paint adhesion and ensure a long-lasting, flawless paint finish.
• Cleaning and Degreasing
The first step in preparing surfaces for paint is cleaning and degreasing. Dirt, dust, and grease can prevent paint from adhering properly, leading to a less-than-perfect final result.
- Cleaning: Remove loose dirt and dust from the surface using a soft brush, cloth, or vacuum cleaner. You can also use a mild detergent and water solution to clean the surface thoroughly. Make sure to rinse the surface well to remove any soap residue.
- Degreasing: For surfaces with grease or oil build-up, use a degreaser specifically designed for the task, such as trisodium phosphate (TSP). Make sure to follow the manufacturer’s instructions for mixing and applying the degreaser. Rinse the surface thoroughly after degreasing, and allow it to dry completely.
• Removing Old Paint and Imperfections
Old, peeling, or chipping paint must be removed to provide a stable surface for the new paint. Here, we will discuss various techniques for removing old paint and repairing surface imperfections.
- Scraping and Sanding: To remove old, loose paint, use a paint scraper or a wire brush, followed by sanding with medium-grit sandpaper (80-120 grit) to smooth the surface. Always wear a suitable mask to protect yourself from dust.
- Chemical paint removers: For stubborn paint, you can use chemical paint removers. Follow the manufacturer’s instructions for application and removal, always wearing gloves and eye protection.
- Power tools: Electric sanders and paint removal tools can make it easier to remove old paint and smooth the surface. Be aware that using power tools may create dust, so be sure to wear a proper mask and work in a well-ventilated area.
- Repairing imperfections: Fill holes, gaps, and cracks with an appropriate filler, following the manufacturer’s instructions. Let the filler dry completely, then sand the surface to achieve a smooth finish.
• Surface Sanding and Smoothing
Sanding is a critical step in a surface preparation that ensures excellent paint adhesion and smooth results. Here are some tips for proper sanding techniques:
- Sanding technique: Sand the surface using medium-grit sandpaper (80-120 grit), and then progress to finer-grit sandpaper (180-220 grit) for a smooth finish. Always sand in the direction of the grain when working on wood surfaces.
- Dust removal: After sanding, remove all dust and residue from the surface using a clean, damp cloth or vacuum cleaner. Make sure the surface is completely dry before proceeding to the next step.
• Priming the Surface
Applying a primer is crucial for ensuring a uniform and long-lasting paint finish. Primers prepare the surface for paint by sealing porous surfaces, promoting adhesion, and providing a base for the paint to bond.
- Choosing the primer: Select a primer appropriate for the type of paint you plan to use (e.g., an oil-based primer for oil-based paint, latex primer for latex paint). Some surfaces may require specific primers, such as masonry primer for concrete or metal primer for metallic surfaces.
- Primer application: Apply the primer following the manufacturer’s instructions using a brush, roller, or sprayer. Pay attention to coverage and allow the primer to dry for the recommended time before applying the paint.
• Final Thoughts on Surface Preparation
In conclusion, proper surface preparation is the key to achieving professional and long-lasting painting results. By following the steps outlined in this guide, you can ensure that your paint job will look flawless and stand the test of time.
Remember to keep safety in mind throughout the process, wear protective gear, and work in well-ventilated areas. With care and attention to detail, you can successfully prep any surface for a beautiful paint finish.
Step | Description |
|---|---|
1. Clean the surface | Remove dirt, grease, and dust by washing the surface with a mild detergent and water. Rinse thoroughly and let the surface dry completely. |
2. Remove any loose paint or old wallpaper | Use a scraper or a wallpaper removing solution to remove any peeling paint or old wallpaper, ensuring that the surface is smooth and free of any debris. |
3. Fill holes and cracks | Use a putty knife and suitable filler or spackle to fill in any holes and cracks in the surface. Allow it to dry, then sand it smooth using sandpaper. |
4. Sand the surface | Smooth the entire surface using sandpaper (typically 120- to 150-grit), ensuring that the surface is free of any bumps or imperfections. |
5. Remove sanding dust | Wipe the surface with a damp cloth or use a vacuum cleaner with a soft brush attachment to remove any sanding dust left behind. |
6. Apply a primer (if necessary) | Apply an appropriate primer to the surface, if necessary, to improve paint adhesion and coverage. Allow the primer to dry according to the manufacturer’s instructions. |
7. Tape off any areas that should not be painted | Use painter’s tape to cover any edges or areas that should not be painted, such as trim, fixtures, or windowsills. |
Expert Wall Preparation Techniques by Professional Painters
Painting is an essential part of maintaining and improving the aesthetic appeal of a building. However, successful painting projects do not revolve around applying paint; they require thorough preparation.
• The Essentials of Wall Preparation
Wall preparation is a critical stage for professional painters, as it has a direct impact on the final outcome. Properly prepped walls ensure a smooth and even finish, reduce blemishes, and enhance paint adhesion. The primary stages of wall preparation include:
- Inspection and assessment
- Cleaning the surface
- Repairing flaws
- Sanding (optional)
- Priming
– Inspection and Assessment
Before starting any wall preparations, professional painters inspect and assess the walls. Their objective is to identify issues such as cracks, water damage, mold, peeling paint, or other imperfections that need fixing before applying paint.
With decades of experience, the Painting and Decorating Contractors of America (PDCA) recommends a comprehensive inspection to ensure successful paint application.
– Cleaning the Surface
Dust, dirt, and grease accumulate on walls over time, and these can negatively impact paint adhesion. Professionals use various methods to clean walls, depending on the existing conditions. Typical cleaning solutions include:
- Water and mild detergent for general dirt
- Trisodium phosphate (TSP) for heavy grease and stubborn stains
- Mold and mildew removers for addressing mold growth
It is essential to rinse the walls thoroughly with clean water and allow them to dry before proceeding to the next step.
– Repairing Flaws
After cleaning the walls, professional painters address any flaws or damages on the surface. Some common repairs include:
- Filling small holes, cracks, and dents with spackling compound
- Using joint compound to fix larger holes and damaged drywall
- Re-caulking windows and doors to prevent air and moisture infiltration
- Repairing or replacing damaged trim and molding
Allow the filler or joint compound to dry, then use fine-grit sandpaper to smooth the patched areas, ensuring a seamless blend with the rest of the surface.
– Sanding (Optional)
Sanding is an optional but highly recommended step in wall preparation. It is especially crucial when painting over glossy surfaces, as it helps increase paint adhesion.
Professionals typically use fine-grit sandpaper (120-grit or higher) to lightly sand the walls, focusing on rough and uneven areas. After sanding, it is essential to remove the dust with a tack cloth or vacuum cleaner.
– Priming
The final step in wall preparation is the application of the primer. Primers seal the surface, promote adhesion, and prevent common issues such as flashing uneven sheen and color bleeding.
Professional painters usually choose the appropriate primer based on the existing wall conditions and the chosen paint product. Some common types of primers are:
- All-purpose primers for new drywall or previously painted surfaces
- Oil-based primers for covering water stains and severe discolorations
- Mold and mildew-resistant primers for areas with a high risk of mold growth
Once the primer is dry, the walls are ready for painting.
• Safety Measures During Wall Preparation
Working with chemicals, sanding, and repairing flaws may expose professional painters and other occupants to potential hazards. To ensure safety, they follow these guidelines:
- Wear personal protective equipment, such as gloves, goggles, and dust masks
- Ensure proper ventilation when using chemicals or sanding
- Follow the manufacturer’s instructions for using cleaning solutions, primers, and other products
- Dispose of paint waste and cleaning materials responsibly, according to local regulations
• Conclusion
Whether it’s for residential or commercial projects, professional painters prioritize wall preparation to guarantee a smooth, uniform, and long-lasting paint job.
By investing time and effort in wall inspection, cleaning, repairs, sanding, and priming, they deliver outstanding results, improving the appearance and value of any property.
Ensuring Surface Protection During the Painting Process
Keeping surfaces clean and damage-free is an essential part of any painting job. In this article, we will discuss how to protect surfaces when painting, ensuring a neat and professional result.
• Importance of Surface Protection
Before we delve into the various methods and materials available for protecting surfaces, it’s crucial to understand why this step is so essential.
By taking the time to prep the area and safeguard surfaces, you significantly reduce the likelihood of mistakes and subsequent cleanups. Moreover, surface protection helps to:
- Prevent paint spills and splatters from damaging floors, furniture, and other belongings
- Make the painting process more manageable and less stressful
- Ensure a more efficient, clean, and professional finish
• Choosing the Right Protective Materials
Several materials can be used to protect surfaces from paint. Each has its advantages and is suited to specific situations. Some of the most popular surface protection materials include:
– Plastic Sheeting
Plastic sheeting is a versatile option for covering various surfaces, such as floors, furniture, and counters. It’s waterproof, lightweight, and easy to spread out or fold up when not in use.
Recommended Use: Plastic sheeting is ideal for protecting large areas, such as floors and furniture, but not recommended for use on stairs or uneven surfaces, as it can cause slipping hazards.
– Drop Cloths
Drop cloths are readily available and come in various materials, such as canvas, plastic, or paper. They can be easily laid out on floors or draped over furniture and provide a reasonable level of protection against spills and splatters.
Recommended Use: Drop cloths are suitable for lower-traffic areas or when there is a lower risk of paint spills.
– Painter’s Tape
Painter’s tape is a must-have for protecting your surfaces when painting. It’s a low-adhesion tape that is explicitly designed for securing edges and creating clean lines when painting.
Recommended Use: Painter’s tape is excellent for securing protective materials, such as plastic sheeting or drop cloths, and for creating sharp paint lines on surfaces like walls and trim.
– Rosin Paper
Rosin paper is a red or brown, heavy-duty paper that can be laid out on floors to protect against paint spills. It’s more durable than traditional paper, making it less likely to tear or become damaged during the painting process.
Recommended Use: Rosin paper is perfect for covering hard surface flooring, such as wood or tile, where potential slipping hazards or petroleum-based products aren’t a concern.
• Properly Applying Protective Materials
– Step 1: Clear the Area
Before laying down any protective materials, first, clear the painting area of all furniture, rugs, and other items. If you cannot move them completely out of the space, group them in one spot and cover them with a drop cloth or plastic sheeting.
– Step 2: Sweep and Vacuum
Ensure that all surfaces are clean before applying protective materials. Sweep or vacuum the floor to remove any dust, dirt, or debris that might cause slipping or compromise adhesion.
– Step 3: Lay Down Floor Protection
Starting with the floor, unroll or spread out your chosen protective material. For drop cloths or plastic sheeting, make sure they extend slightly beyond the edges of the painting area. For rosin paper, unroll it in a continuous strip, taping each seam to prevent shifting.
– Step 4: Secure Edges
Using painter’s tape, secure the edges of your protective material to the baseboards or walls. This not only keeps the floor protection in place but also helps prevent paint from seeping underneath.
– Step 5: Protect Furniture and Fixtures
Cover furniture, appliances, and other fixtures with drop cloths or plastic sheeting, securing them with painter’s tape if necessary. Remember to protect vertical surfaces such as walls, trim, and doors with tape, especially around edges and corners.
• Additional Tips and Tricks
- When using plastic sheeting, anchor the edges with heavy objects such as paint cans or tools to prevent them from shifting.
- Ensure you have enough protective materials on hand for the entire duration of the project.
- Wear shoe covers to prevent tracking paint and dirt onto your protective materials.
- Replace or adjust protective materials as needed to maintain an effective barrier throughout the painting process.
By following the guidelines outlined in this article, you can effectively protect surfaces when painting, ensuring a clean and professional result. For additional resources on painting best practices, visit the U.S. Environmental Protection Agency website.
Step | Description |
|---|---|
1 | Remove all furniture, fixtures, and decorations from the room if possible. If not, move them to the center of the room and cover them with drop cloths or plastic sheeting. |
2 | Use painter’s tape to mask off any areas that should not receive paint, such as baseboards, trim, door and window frames, and light switches. |
3 | Cover the floor with drop cloths or plastic sheeting, ensuring that all areas are well protected. Tape down the edges to secure them in place. |
4 | Use a paint shield, which is a large, flat, plastic or metal tool that can be held against a surface to protect it from being painted. |
5 | Use a steady hand and carefully apply paint near protected surfaces, being careful not to let the brush or roller touch them. |
6 | After the paint has dried, carefully remove the painter’s tape, ensuring not to damage the surface or paint. |
Cleaning Techniques Post-Interior Painting Work
As a professional painter, I understand that completing a high-quality interior painting job doesn’t end with the last brush stroke. Properly cleaning up the work area and disposing of materials plays a crucial role in ensuring a safe, clean, and pleasant environment.
• Organizing and Removing Tools
The first step in cleaning up after interior painting is organizing and removing tools to create a clean and safe work area. I recommend following these steps:
- Clean paintbrushes and rollers: Rinse brushes and rollers thoroughly in water (for water-based paints) or paint thinner (for oil-based paints), then use a brush comb to remove any remaining paint. Allow the brushes and rollers to dry completely before storing them.
- Dispose of empty paint cans: Remove and discard any dried paint residue from empty paint cans. Recycle the cans if your local recycling program accepts them. For more information on recycling paint cans, visit the U.S. Environmental Protection Agency (EPA) website.
- Store partially full paint cans: Seal the lids tightly to prevent air infiltration and prolong the paint’s shelf life. I recommend using a rubber mallet to tap the lids securely into place.
- Wrap up drop cloths: Carefully fold up the drop cloths to avoid spreading paint and dust around the room. If the cloths are reusable, clean them before storing them away.
- Put tools away: Once everything is clean and dry, store the brushes, rollers, paint trays, and any other tools in a dry, protected area.
• Cleaning and Repairing Surfaces
After removing the tools from the work area, the next step is to clean and repair any surfaces affected by the interior painting process.
- Wipe down surfaces: Using a damp cloth or sponge, wipe down painted walls, trim, and other surfaces to remove any dust, dirt, or paint splatters. Be sure to wring out the sponge frequently to avoid spreading dirt around the room.
- Inspect for paint drips and runs: Check the painted surfaces for any drips or runs that may have occurred during the painting process. If needed, use a damp cloth or fine-grit sandpaper to gently smooth out any imperfections, taking care not to damage the paint finish.
- Clean and touch-up fixtures: Examine electrical outlets, switch plates, vent covers, and other fixtures for any paint splatters or residue. Carefully clean or touch up these areas as needed.
- Repair any damage: If there is any damage to the room’s surfaces caused by the painting process, patch and repair these areas. This may include filling nail holes, caulking gaps, or repairing damaged drywall.
• Final Clean-Up and Waste Disposal
Once the room is clean and the surfaces are in good condition, it’s time for the final clean-up and waste disposal.
- Sweep and vacuum: Start by sweeping the floors to remove any dust, debris, or paint chips. Then, use a vacuum cleaner with a soft brush attachment to thoroughly clean the floors, paying close attention to corners and baseboards.
- Clean the air: If paint fumes are still lingering in the room, consider using an air purifier or cracking open a window to help ventilate the space.
- Dispose of hazardous materials: Properly disposing of hazardous materials, such as paint thinner or solvents, is essential for both environmental and personal safety. To learn how to properly dispose of these materials in your area, consult the EPA’s hazardous waste disposal guide.
- Donate or recycle leftover paint: If there is still a significant amount of paint left in the can, consider donating it to a local school, community center, or nonprofit organization. Alternatively, many communities have paint recycling programs that accept leftover paint. To find a paint recycling center near you, visit Earth911.
• Final Thoughts
Cleaning up after interior painting involves more than just putting away tools and sweeping the floors. Taking the time to clean and repair surfaces, properly dispose of waste, and ensure a safe environment will help maintain the room’s appearance and promote a healthier living space.
By following these expert tips, you can clean up like a pro and enjoy the results of your interior painting project for years to come.
Step | Instructions |
|---|---|
1 | Remove all painter’s tape and drop cloths from the room. Be careful not to spread any paint drippings that may be on the tape or clots. |
2 | Clean paint brushes and rollers thoroughly with warm, soapy water, making sure all paint residue is removed. Allow them to air dry completely before storing. |
3 | Wipe down all surfaces, such as door knobs, light switches, baseboards, and moldings, with a clean, damp cloth to remove any remaining paint or dust. |
4 | Vacuum the floor using a brush attachment to remove any dust and debris. Follow up with a damp mop to remove any remaining dirt and grime. Allow the floor to dry completely. |
5 | Properly dispose of any leftover paint or empty paint cans, following the guidelines of your local waste management facility. |
6 | Return furniture and decor items to their original placement in the room. Take the opportunity to clean and dust each item before returning it to the space. |