Importance Of Surface Preparation For A Long-Lasting Paint Job
When it comes to achieving a long-lasting, professional-looking paint job, one key element is often overlooked: surface preparation. However, proper surface preparation is absolutely essential for ensuring that your paint adheres well, looks its best, and stands the test of time. Luckily, with the right knowledge and techniques, you can become a pro at surface prep and achieve stunning results every time you paint.
Importance of surface preparation in achieving a long-lasting paint job:ong>
Surface preparation is crucial in achieving a durable, high-quality paint job as it ensures proper paint adhesion, prevents peeling, bubbling, and cracking and enhances the overall appearance. The process involves cleaning, repairing, sanding, and priming surfaces before applying paint, contributing to the longevity of the paint finish.

Surface preparation is the secret to a long-lasting paint job. It determines the paint’s adhesion, durability, and overall look. Read on as we uncover crucial steps, techniques, and tips to achieve the flawless, long-lasting finish your property deserves. You don’t want to miss this!
Contents
- 1 Achieving Durable Paint Jobs: The Significance of Surface Preparation
- 2 The Crucial Role of Surface Preparation in Painting Success
- 3 Exploring Surface Preparation Techniques for Painting Projects
- 4 The Objective of Surface Preparation in Construction Works
- 5 Preparing Paint for Application: Identifying Essential Coating Sequences
Achieving Durable Paint Jobs: The Significance of Surface Preparation
Surface preparation plays a vital role in ensuring a high-quality, long-lasting paint job. This process involves cleaning, repairing, and priming surfaces before applying paint, which contributes to the overall durability of the finish.
• An Essential Step for a Durable Paint Finish
One of the primary determinants of a paint job’s longevity is the quality of its adhesion to the underlying surface. Proper surface preparation ensures that paint adheres correctly, which ultimately leads to a more resistant and longer-lasting finish.
Additionally, surface preparation helps to prevent issues like peeling, bubbling, and cracking, all of which can shorten the lifespan of a paint job. A well-prepared surface also ensures an even and consistent appearance, enhancing the overall aesthetics of the final result.
• Common Surface Preparation Methods
There are various methods employed to prepare surfaces before painting. Here are some of the most commonly utilized techniques:
– Cleaning
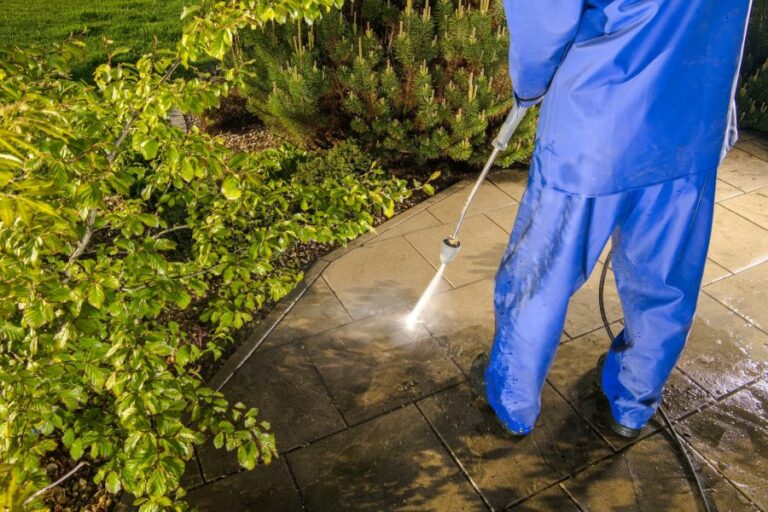
- Pressure washing: A high-pressure water spray is used to remove dirt, loose paint, and other debris from exterior surfaces. Pressure washing is not suitable for delicate surfaces and may require additional cleaning methods for optimal results.
- Chemical cleaning: Involves applying a chemical cleaner, such as trisodium phosphate (TSP), to remove grease, mildew, and other contaminants from surfaces. Always follow the manufacturer’s instructions and safety guidelines when using chemical cleaners.
– Repair
- Filling and patching: Small holes, cracks, and other surface imperfections should be filled using a suitable patching compound. Sanding is necessary to ensure a smooth, even surface once the compound has dried.
- Replacing damaged materials: Severely damaged or deteriorated areas may need to be entirely replaced before painting, particularly in instances of rot or extreme weather damage.
– Sanding
- Hand sanding: Smoothing surfaces by hand using sandpaper or a sanding block. This method is ideal for small or intricate surfaces.
- Power sanding: Utilizing an electric sander to smooth surfaces. Power sanders are better suited for larger surface areas or when removing multiple layers of paint.
– Priming
- Applying primer: A primer is used to provide a uniform surface for the paint to adhere to, reducing the likelihood of issues like the paint being absorbed unevenly. A primer may not always be necessary, but it is a crucial step when dealing with porous, stained, or glossy surfaces.
• Tips for Effective Surface Preparation
– Choose the Right Tools
Make sure you have the proper tools and materials for the job. High-quality brushes, rollers, scrapers, and sandpaper will help to ensure a thorough and effective preparation process.
– Be Diligent with Repairs
Take your time when making repairs, as rushing through this step can lead to issues once the paint is applied. Make sure all cracks, holes, and damaged areas are adequately addressed before moving on to the next step.
– Test Paint Compatibility
When dealing with an existing paint job, it’s essential to ensure that the new paint will be compatible with the existing finish. Incompatibility can lead to adhesion issues and a shorter paint lifespan. The U.S. General Services Administration provides guidance on testing paint compatibility.
– Don’t Skimp on Primer
While it may be tempting to skip priming, especially on surfaces where the existing paint is in good condition, it is crucial for long-lasting results. Priming not only improves adhesion but can also help to prevent issues like stains and color bleeding.
• A Worthwhile Investment
In conclusion, surface preparation is essential to achieving a long-lasting, high-quality paint job. Dedicating time and effort to the process can ensure a more durable and attractive result.
The Crucial Role of Surface Preparation in Painting Success
Proper surface preparation is a crucial first step for any successful painting project. It’s the key to achieving a durable and beautiful finish that will stand the test of time. By following a few essential steps, you can ensure that your paint job is aesthetically pleasing and long-lasting.
• The Purpose of Surface Preparation in Painting
Surface preparation involves the removal of dirt, grease, loose paint, and other contaminants from a surface before applying new paint. Ensuring the surface is clean and free of these materials creates a more suitable base for the paint to adhere to.
This allows for a stronger bond between the paint and the surface, ultimately resulting in a more durable and longer-lasting paint job.
– Effects of Inadequate Surface Preparation
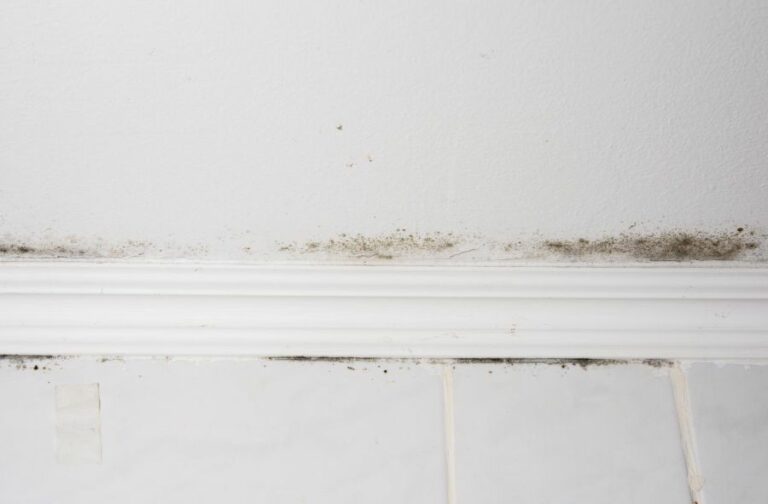
Neglecting proper surface preparation can lead to undesirable results such as peeling, flaking, and uneven coverage of the paint. A poorly prepared surface will not provide the ideal conditions for the paint to adhere, causing it to exhibit poor adhesion or even fail altogether.
This can be costly and time-consuming, as additional work is needed to correct errors or to redo the entire project.
• Key Steps in Surface Preparation
Various steps must be taken to ensure proper surface preparation, depending on the specific material, the environmental conditions, and the type of paint being applied. Below are some general recommendations for surface preparation across different types of surfaces.
– Cleaning the Surface
A crucial starting point for any painting project is to thoroughly clean the surface. This involves removing all dirt, dust, grease, and other contaminants that could interfere with the paint’s adhesion.
One effective way to clean a surface is to use a high-pressure water jet (pressure washer), which can help remove tough stains and dirt from surfaces such as concrete, brick, and wood.
Alternatively, use warm, soapy water and a scrub brush to clean the surface, paying close attention to any areas with built-up dirt or grime.
Remember to allow the surface to dry completely before moving on to the next step. This prevents the paint from becoming diluted or absorbing moisture, which can cause blistering and peeling over time.
– Sanding and Scraping
Once the surface is clean and dry, it’s time to sand or scrape away any loose or peeling paint. Sanding helps create a smooth, even surface that allows the paint to adhere more effectively.
Depending on the surface material and the type of paint being applied, different grits of sandpaper can be used to achieve the desired results.
For wooden surfaces, medium-grit sandpaper (80-120 grit) is suitable for removing old paint and smoothing the surface. On the other hand, metal surfaces may call for a finer grit (180-220 grit) to avoid scratching the surface while removing rust and old paint.
Scraping is another method that can be used to remove loose or peeling paint, particularly on exterior surfaces. A putty knife or a paint scraper can be used to gently chip away any loose paint, taking care not to damage the underlying surface.
– Repairing the Surface
After cleaning and sanding, take the time to repair any cracks or damage that are present on your surface. For smaller repairs, use a putty knife and spackle or wood filler to fill in any holes, dents, or cracks.
Once the filler has dried, sand the area smoothly to blend it seamlessly with the surrounding surface.
For larger repairs or more complicated damage, it may be necessary to consult a professional to ensure the surface is correctly repaired before proceeding with the painting process.
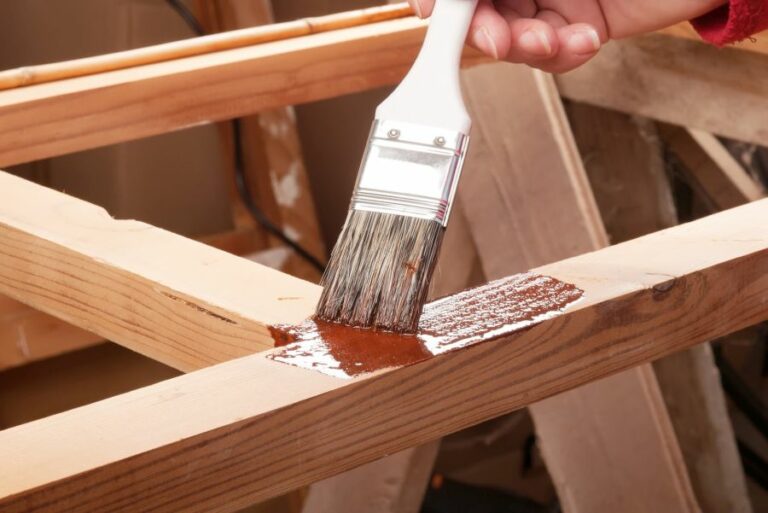
– Applying a Primer
One of the most critical steps in surface preparation is applying a primer to the clean, repaired surface. A primer serves as a base coat, creating a barrier between the surface and the paint, ensuring better adhesion and uniform coverage.
Selecting the right primer for your specific surface and paint type is crucial. Consult with a professional or a paint supplier to determine the appropriate primer for your project.
• In Conclusion
Effective surface preparation is a crucial first step in any successful painting project. By taking the time to properly clean, sand, repair, and prime your surface, you are not only ensuring a durable and long-lasting paint job but also contributing to the overall aesthetic appeal of your project.
Remember, investing time and effort into proper surface preparation is a critical part of achieving a professional-looking and long-lasting paint job. By following these recommendations, you can avoid costly mistakes and ensure the success of your painting project.
Exploring Surface Preparation Techniques for Painting Projects
Surface preparation for painting is the crucial first step in ensuring the success of your painting project.
It involves a series of processes that must be carried out on the substrate (i.e., the material to be painted) before applying paint to improve the adhesion of the paint, enhance its durability, and achieve a flawless finish.
• The Importance of Surface Preparation
A meticulous surface preparation guarantees not just an aesthetically pleasing result but also provides long-lasting protection to the substrate. Properly prepared surfaces significantly reduce the risk of paint failure, such as peeling, cracking, and blistering.
According to the NACE (National Association of Corrosion Engineers) International, around 80% of paint failures are attributed to inadequate surface preparation. Therefore, investing time and effort into preparing your surfaces can save you from costly rework and maintenance in the future.
• Methods of Surface Preparation
There are various methods of surface preparation for different substrates and environments. Here are some of the most common techniques used in both residential and industrial painting projects:
– Cleaning
The primary step in surface preparation is cleaning the substrate to remove dirt, grease, oil, and other contaminants that can affect the adhesion of the paint.
This process can be as simple as using a brush and soapy water to clean the surface or involve more advanced techniques such as pressure washing or steam cleaning for larger surfaces.
– Degreasing
Degreasing is the process of removing oil, grease, or other organic compounds from a surface before applying paint. Various solvents or chemical cleaners can be used for proper degreasing, but it’s essential to choose a suitable cleaner based on the substrate’s material and the type of contaminants present.
Always follow the manufacturer’s instructions for use and allow the surface to dry completely before proceeding to the next step.
– Hand Tool Cleaning
For smaller projects, such as residential repainting, hand tool cleaning is often sufficient to remove loose rust, paint, mill scale, or other debris from the surface. Wire brushes, sandpaper, or scrapers can be used to mechanically clean the area to be painted, providing an acceptable level of surface cleanliness.
– Power Tool Cleaning
Power tool cleaning is a more efficient method, utilizing equipment like grinders, sanders, or needle guns. These tools are excellent for medium-sized paint jobs or preparing surfaces with more significant existing paint or corrosion problems.
Keep in mind that, in some cases, this method could cause damage to the substrate, so it’s essential to operate the tools carefully.
– Abrasive Blasting
Abrasive blasting, also known as sandblasting, is an aggressive surface preparation method primarily used in commercial and industrial applications.
This technique involves projecting abrasive particles such as sand, steel shot, or glass beads at the substrate’s surface at high speeds, removing existing coatings, rust, and other contaminants.
Abrasive blasting produces a rough texture, allowing the paint to adhere better to the substrate. It’s crucial to choose the appropriate blasting media and pressure settings, to avoid substrate damage.
– Chemical Treatment
In some instances, chemicals are used to remove existing coatings or rust from a surface. Chemical paint strippers, phosphoric acid-based solutions, or alkaline cleaners can be applied to the substrate to loosen the existing paint, making it easier to remove using a scraper or brush.
When using chemical treatments, always take safety precautions like wearing protective gear and proper ventilation, and dispose of the waste responsibly.
• Best Practices for Surface Preparation
To ensure the success of your painting project, follow these recommendations:
- Choose the appropriate surface preparation method: Consider factors like the substrate materials, environmental conditions, and the desired quality and longevity of the paint job when selecting the surface preparation method.
- Follow safety precautions: Whether using hand tools or engaging in abrasive blasting, always prioritize safety. Wear protective gear, ensure proper ventilation when dealing with chemicals, and follow the manufacturer’s guidelines for equipment use.
- Inspect the surface: Before and after surface preparation, thoroughly inspect the substrate for damage or areas that may require additional attention. This will prevent potential problems from becoming bigger issues in the future.
- Allow for drying time: After cleaning or treating the surface, always allow for adequate drying time before applying paint. This will prevent moisture-related problems like paint blistering or premature failure.
The Objective of Surface Preparation in Construction Works
• Importance of Surface Preparation
Surface preparation plays a pivotal role in the success of construction projects. It sets the foundation for the finished structure’s durability, functionality, and aesthetics. Inadequate surface preparation could lead to numerous issues, such as poor adhesion, reduced longevity, and increased long-term costs.
As a result, understanding the key aspects and purposes of surface construction is essential for professionals and individuals involved in construction projects.
• Achieving a Clean and Stable Surface
The first and foremost purpose of preparing surface construction is to achieve a clean, stable, and even surface. Any traces of dirt, debris, grease, or dust can severely impact the adhesion and longevity of construction materials.
A clean surface ensures that the applied materials, such as paint, adhesives, or sealants, are effectively bonded to the substrate.
– Degreasing and Cleaning the Surface
Degreasing the surface is an essential step in surface preparation, especially in industrial environments that are susceptible to oil, grease, and other contaminants.
Various cleaning methods, such as solvent cleaning, detergent cleaning, or high-pressure water cleaning, can be employed depending on the extent and nature of the contaminants.
The Environmental Protection Agency (EPA) offers several resources on the best cleaning practices and standards for surface preparation.
– Removing Loose Materials and Defects
Any loose materials, such as old paint, rust, or unstable concrete, need to be removed to ensure a stable and uniform surface.
Several methods can be employed, including mechanical methods (e.g., sanding, grinding, or shot blasting), chemical methods (e.g., acid etching or rust converters), or a combination of both.
– Leveling and Smoothing the Surface
Another vital aspect of surface preparation is leveling and smoothing the surface. This entails filling any holes, cracks, or depressions in the substrate, which might impact the surface’s stability or lead to eventual structural issues.
Various products like fillers, leveling compounds, or resurfacing materials can be used depending on the substrate and desired finished surface.
• Ensuring Proper Adhesion
Proper adhesion is a critical aspect of surface construction, as it ensures that various construction materials will bond effectively to the substrate. Many factors influence adhesion, such as:
- Surface texture: Too smooth or too rough textures can lead to reduced adhesion of construction materials. Choosing the correct surface texture and applying appropriate surface treatments can help enhance adhesion.
- Moisture content: Excess moisture content in the substrate can result in poor adhesion, swelling of materials, or microbial growth. Ensuring the correct moisture content before applying construction materials is essential for achieving proper adhesion.
- Primers and bond coats: Applying primers or bond coats before applying construction materials can enhance adhesion significantly. These products serve as an intermediary layer between the substrate and construction materials, ensuring proper bonding.
• Enhancing Durability, Functionality, and Aesthetics
Well-prepared surface construction ensures that the finished structure will be more durable, functional, and visually appealing. The durability of the finished product is closely related to surface preparation, as poorly prepared surfaces can lead to:
- Moisture ingress
- Reduced lifespan of construction materials
- Poor resistance to weathering
- Discoloration or staining
Consequently, proper surface preparation helps reduce long-term costs associated with repair, replacement, or maintenance.
The functionality of the finished structure is highly dependent on the effectiveness of surface preparation. Well-prepared surfaces ensure that various construction materials perform optimally, thereby contributing to structural integrity and life safety.
Additionally, functional aspects like resistance to slip and fire are highly reliant on careful surface preparation.
Aesthetic considerations are equally important, as visually appealing structures can influence user comfort, productivity, and overall experience. Careful surface preparation facilitates the uniform application of decorative materials, resulting in visually pleasing structures with minimal defects.
• Final Thoughts
In conclusion, the purpose of preparing surface construction is to achieve clean, stable and even surfaces that enhance the finished structure’s adhesion, durability, functionality, and aesthetics.
Attention to surface preparation helps ensure a successful construction project and contributes to long-lasting and visually appealing results.
By following industry best practices and understanding the underlying principles of surface preparation, professionals and individuals involved in construction projects can significantly improve the likelihood of project success.
Preparing Paint for Application: Identifying Essential Coating Sequences
When it comes to painting, ensuring a smooth and long-lasting finish greatly depends on proper preparation.
As a painting expert with years of experience, I can confidently say that neglecting the steps involved in preparing both the surface and the paint can lead to unsatisfactory results, wasted time, and wasted resources.
• 1. Cleaning the Surface
Before applying paint to any surface, thorough cleaning must take place. This is because dust, dirt, and grime can affect the adhesion of the paint layers. By properly cleaning the surface, you create a smooth, clean canvas that will accept the paint more effectively.
For professional cleaning tips, refer to this EPA guide.
– Removing Loose and Peeling Paint
Any loose and peeling paint must be removed from the surface prior to the application of the new paint layer. This can be done using a paint scraper or a wire brush, depending on the type of surface and the severity of the problem. Removing these imperfections ensures a more uniform and stable coating.
– Cleaning Surfaces with Soap and Water
After removing any loose paint, clean the surface with mild soap and water. This step removes grease, dirt, and other contaminants that can negatively impact the paint application. Rinse the surface thoroughly and let it dry completely before proceeding with the painting process.
• 2. Primer Application
One critical aspect of preparing paint for application is the use of a suitable primer. Primers are essential because they help the paint adhere more effectively to the surface, ultimately leading to a more durable, long-lasting finish.
– Choosing the Right Primer
Select the appropriate primer based on the type of surface being painted and the paint being used. For instance, a latex-based primer is best used with latex paint, while an oil-based primer should be used with oil-based paint.
– Priming Techniques
I highly recommend using a roller or brush to apply primer, as this allows for better control over the coverage and thickness.
Remember to apply the primer evenly and smoothly, taking care not to oversaturate the surface. Once the primer is dry, lightly sand the surface for a smooth finish, ready for the paint application.
• 3. Diluting Paint Properly
When applying paint, the correct dilution is crucial to achieving a smooth, even finish. The paint must be thinned according to the manufacturer’s recommendations. Failure to dilute paint properly can result in an uneven appearance, longer drying times, and a lower-quality finish.
– Stirring the Paint Thoroughly
Before diluting the paint, be sure to stir it thoroughly to ensure that the pigments, binders, and solvents are evenly distributed. This process also helps in identifying any lumps that may affect the paint quality.
– Mixing Paint with Solvents
Once the paint has been stirred, add the recommended solvent (e.g., water for latex paint, mineral spirits for oil-based paint) and mix well. The ratio of paint to solvent should be based on the manufacturer’s instructions, as this will vary between brands and paint types.
• 4. Identifying Coating Sequences
Painting requires a specific order for applying different layers of coatings. By following the correct sequence, you enhance the paint’s durability and ensure an aesthetically pleasing finish.
– Priming Layer
As previously mentioned, the first layer to be applied is the primer. This layer ensures better adhesion of paint to the surface and enhances the overall durability and appearance of the painting project.
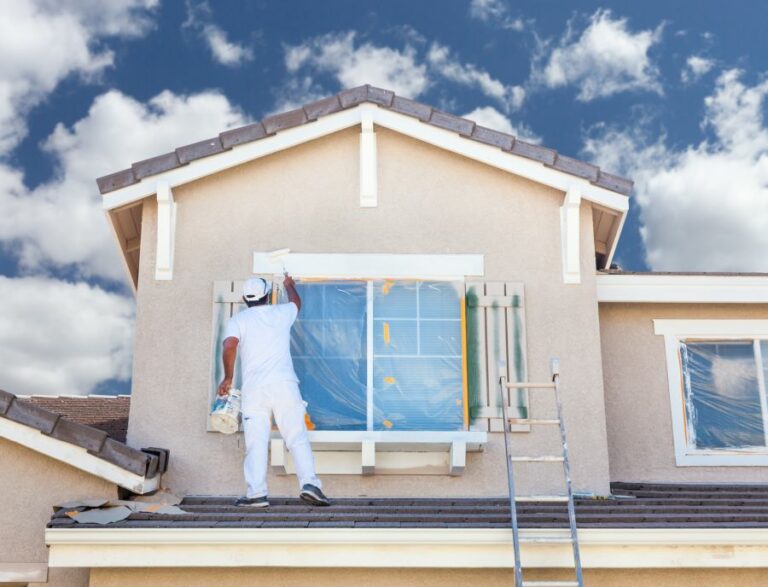
– Base Coat
The base coat is the main color applied to the surface, usually applied in two or more coats for an even finish. To ensure a professional result, I recommend using a brush for cutting-in (painting near the edges) and a roller for larger areas.
– Top Coat
In some situations, a top coat (or clear coat) may be required for added protection and durability. This transparent layer is applied after the base coat is completely dry and helps protect the paint from wear and tear, as well as providing extra glossiness or texture, depending on the desired finish.
In conclusion, proper preparation of paint and identifying the correct coating sequences are key components in achieving a successful painting project.
By taking the time to clean the surface, apply a suitable primer, dilute the paint correctly, and follow the recommended coating sequence, you can achieve a professional, long-lasting, and visually appealing result.
By following these guidelines, even amateur painters can attain expert results in their painting endeavors.