DIY Caulking & Sealing Uniform Paint Finish. What Pros Say
Are you tired of staring at those uneven paint finishes around your caulking and sealing? Worry no more! We have just the right DIY solution to help you achieve a uniform paint finish, and we’re excited to guide you through the process. With our expertise and foolproof tips, you can transform those messy edges into a beautiful, uniform look that will enhance the aesthetic appeal of your home.
Diy caulking & sealing: uniform paint finish:
DIY caulking and sealing involve preparing the surface, applying painter’s tape, using a caulk gun, smoothing the caulk, removing the tape, allowing the caulk to dry, priming, painting, and inspecting the work. Proper caulking and sealing produce a professional-looking, durable, and energy-efficient paint finish.

Discover expert tips and tricks to achieve that smooth, uniform paint finish when caulking and sealing your DIY projects. Our step-by-step guide will ensure professional results, leaving you feeling proud of your work. Read on to unlock the secrets of a flawless finish!
Contents
- 1 DIY Caulking Guide: Achieve a Smooth Paint Finish
- 2 Creating Your Own Caulking: A Step-by-Step Guide
- 3 Top Alternatives to Traditional Caulk Materials
- 3.1 • Weatherstripping: A Great Alternative for Insulation and Sealing of the Gaps
- 3.2 • Duct Tape: Ideal for Temporary Fixes
- 3.3 • Spray Foam: Perfect for Larger Gaps
- 3.4 • Silicone Sealants: An Ideal Solution for Wet Areas and High Temperatures
- 3.5 • Putty: An Excellent Choice for Paintable Surfaces
- 3.6 • In conclusion
- 4 Mastering the Art of DIY Caulking and Sealing
- 5 Explore Caulk Alternatives for Your DIY Projects
DIY Caulking Guide: Achieve a Smooth Paint Finish
Caulking and sealing are essential steps in ensuring a professional-looking paint job.
• Benefits of Proper Caulking and Sealing
Before we delve into the steps, let’s quickly go over some benefits of proper caulking and sealing:
- Durability: Properly sealing edges and gaps help the paint job last longer, as it prevents moisture and dust from getting underneath the paint.
- Efficiency: Caulking and sealing reduce drafts, which can lower your energy bills.
- Aesthetics: A uniform paint finish is much more visually appealing than one with visible gaps or uneven edges.
• Essential Tools and Materials
To get started, gather the following tools and materials:
- Caulk gun
- High-quality caulk (usually acrylic or silicone)
- Painter’s tape
- Utility knife
- Fine-grit sandpaper
- Clean, damp cloth
- Paintbrush or paint roller
- Primer
- Paint
• Step-By-Step Guide
1. Prepare the Surface
Before applying caulk or sealant, it’s essential to prepare the surface you’re planning to paint. This may involve:
- Removing any old caulk: Use a utility knife to carefully cut away old, peeling, or damaged caulk.
- Cleaning the surface: Use a clean, damp cloth to remove any dirt, dust, or debris.
- Sanding the surface: If necessary, lightly sand the area to ensure better adhesion for the caulk and paint.
2. Apply Painter’s Tape
Applying painter’s tape will help you achieve clean, crisp edges when caulking and painting. Make sure the tape is applied straight and smooth for best results.
3. Apply Caulk
Load your caulk gun and apply a consistent bead of caulk to the desired area. Try to keep a steady hand and even pressure on the trigger for a uniform bead. If you’re new to caulking, practice on a piece of scrap material before moving on to your project.
4. Smooth the Caulk
Use your finger or a specialized tool to smooth the bead of caulk, pressing it into the gap or seam. Be sure to remove any excess caulk to ensure a clean finish.
5. Remove Painter’s Tape
Once the caulk has been smoothed, remove the painter’s tape. Be careful not to touch or smear the fresh caulk as you remove the tape.
6. Allow the Caulk to Dry
It’s important to allow the caulk to dry completely before painting. Refer to the manufacturer’s instructions for the recommended drying time.
7. Prime the Surface
Applying a primer will help ensure better adhesion of the paint and can also help hide any color discrepancies. Choose a primer specifically designed for the type of paint you plan to use.
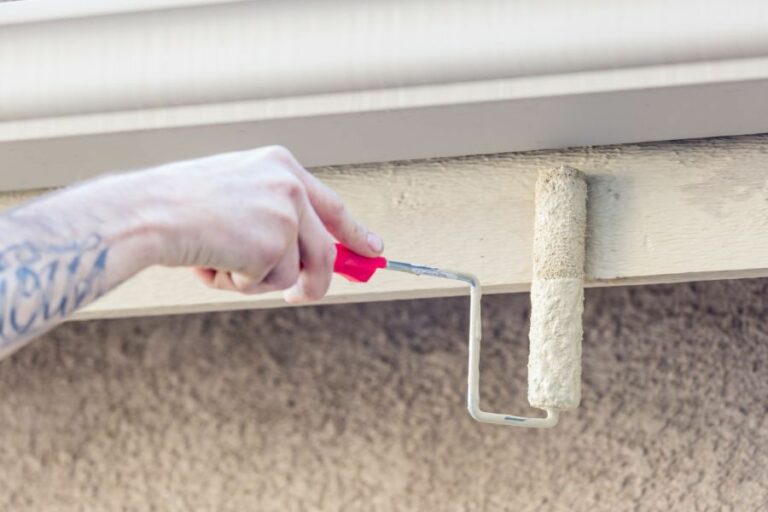
8. Paint the Surface
Once the caulk is dry and the surface has been primed, apply paint using either a brush or roller. Take your time and use even strokes for a professional-looking finish.
9. Inspect Your Work
After the paint has dried, inspect your work for any unevenness or touch-ups that may be needed. If necessary, lightly sand the area and reapply paint until the finish is uniform.
10. Clean Up
Be sure to dispose of used caulk tubes and other materials responsibly. Clean your tools thoroughly, following the manufacturer’s instructions.
• Conclusion
By following this step-by-step guide to DIY caulking and sealing, you can achieve a uniform paint finish that not only looks professional but also offers increased durability and energy efficiency.
For additional information and guidance, check out the U.S. Department of Energy’s guide on air sealing which provides invaluable tips and advice on sealing gaps and cracks to maximize energy efficiency.
Creating Your Own Caulking: A Step-by-Step Guide
Caulking is a crucial task in various household projects, sealing gaps and cracks around windows, doors, and other areas where air infiltration and water leaks might occur. Commercially available caulking products and specialized tools can be rather expensive or inaccessible.
• Benefits of Homemade Caulking
There are many advantages to crafting your own caulking mixture, some of which include:
- Cost-effective: Homemade caulking materials are considerably cheaper than commercially produced ones.
- Environmentally Friendly: Using natural ingredients for your caulking mixture reduces the carbon footprint associated with manufacturing and transporting commercial products.
- Customization: The ability to adjust the consistency and properties of your homemade caulking mixture to suit specific applications and preferences.
- Availability: Homemade caulking is an excellent alternative for those living in areas where commercial sealants are not readily available.
• Essential Ingredients for Homemade Caulking
There are various recipes for crafting homemade caulking mixtures, each requiring specific ingredients. Here are some of the most common components:
– Cornstarch
Cornstarch serves as a binding agent in the caulking mixture. It helps create a thick, cohesive substance that successfully seals gaps and cracks. Cornstarch can be purchased at your local grocery store or online.
– Vinegar
Used as a natural preservative, vinegar increases the shelf life of the caulking mixture. White vinegar is the most commonly used variety, and it can also be found at your local grocery store.
– Water
Water is the universal solvent, allowing all ingredients in the caulking mixture to combine smoothly. It aids in achieving the desired consistency for application and contributes to the curing process.
– Oil-based Clay
Oil-based clay ensures your homemade caulking mixture remains pliable and easy to use. It can be found at most art supply stores or purchased online.
• Crafting Your Homemade Sealant: A Step-by-Step Process
– Step 1: Determine the Right Consistency
The ideal consistency of your homemade caulking will depend on the specific application. For example, a thicker mixture is suitable for filling large gaps and cracks, while a thinner consistency is appropriate for smaller, more intricate areas. Understanding the right consistency for your needs is crucial for success.
– Step 2: Choose Your Recipe
Once you’ve determined the desired consistency, select a tried-and-tested recipe that includes the ingredients mentioned above. Adjustments can be made to these recipes to better suit your preferences, but be cautious not to compromise the efficacy of the caulking mixture.
– Step 3: Measure and Mix
Carefully measure and combine the ingredients, ensuring a thorough mix to produce a smooth, even mixture. It’s essential to avoid lumps and inconsistencies, as these will affect the final outcome of the caulking project.
– Step 4: Ensure Proper Storage
When storing your homemade caulking mixture, use an airtight container to maintain its freshness and longevity. Keep it in a cool, dry place away from direct sunlight.
• Application Tips and Techniques
– Use a Caulking Gun
Although it’s possible to apply homemade caulking using a makeshift tool, acquiring a caulking gun will significantly enhance your results. Caulking guns are relatively inexpensive and can be used with conventional caulking tubes, as well as refilled with your homemade sealant.
– Apply Even Pressure
When working with homemade caulking, evenly distribute the mixture along the desired area, ensuring a consistent bead of material. This might take some practice, as applying too much pressure can lead to an overly thick application or create air pockets within the sealant.
– Smooth the Caulk
After applying the caulking mixture, use a tool or your finger to smooth the bead and ensure a clean, professional finish. This step is essential to guarantee an adequate seal and the overall effectiveness of the caulking.
– Allow Adequate Drying Time
Patience is critical when working with homemade caulking. Allowing the sealant to dry and cure properly ensures the best results possible. Drying times can vary, so refer to your specific recipe for guidance.
• Final Thoughts
Homemade caulking can be a cost-effective and environmentally friendly alternative to commercial sealants. Understanding the right ingredients, recipes, and application techniques will lead to a successful and satisfying caulking project.
With proper storage, your homemade mixture can be kept on hand for future use, saving you both time and resources.
Top Alternatives to Traditional Caulk Materials
Caulk is a common material used in various tasks, such as sealing gaps, adhering surfaces, and waterproofing. Despite its popularity and usefulness, there might be situations where caulk is either unavailable or not suitable for a specific project.
• Weatherstripping: A Great Alternative for Insulation and Sealing of the Gaps
One of the main functions of caulk is to seal gaps, especially around windows and doors, to improve insulation for energy efficiency. Weatherstripping is an excellent alternative to caulk in this situation. It is easy to apply and can be removed without damaging the surfaces.
There are several types of weatherstripping available, including:
- Adhesive-backed foam tape: This can easily be cut to size and pressed onto the surface.
- V-strip: Made of plastic or metal, the V-strip is ideal for sealing gaps in movable joints like doors and windows.
- Door sweeps: For sealing gaps at the bottom of doors, door sweeps can be attached to create a barrier against drafts and insects.
• Duct Tape: Ideal for Temporary Fixes
While not a durable solution, duct tape can be a quick and easy temporary substitute for caulk in certain situations. The tape’s strong adhesive backing makes it useful for sealing small gaps or providing a temporary bond between surfaces.
However, bear in mind that duct tape is not waterproof, and its adhesive may deteriorate over time, making it less suitable for long-term applications.
• Spray Foam: Perfect for Larger Gaps
For larger gaps that caulk might have trouble effectively sealing, expandable spray foam is an excellent choice. Spray foam expands when it comes into contact with air, filling in gaps and providing an effective seal against drafts and moisture.
There are two main types of spray foam products available:
- Expanding foam: This type is ideal for filling large gaps and voids in walls, floors, and around pipes. It is not recommended for use around doors and windows, as its expansion may cause warping or hinder proper functioning.
- Low-expansion foam: Designed specifically for use around doors and windows, this type of foam expands less, reducing the risk of damage to frames and structures.
• Silicone Sealants: An Ideal Solution for Wet Areas and High Temperatures
Silicone sealants are an excellent alternative to caulking in areas exposed to moisture and high temperatures. They provide a mold-resistant, flexible, and durable seal, making them perfect for use in bathrooms, kitchens, and other high-moisture areas.
Silicone sealants come in a variety of types, such as:
- Acetoxy silicone: Suitable for nonporous surfaces like glass and metal. However, it is not recommended for use on natural stone, as it may cause staining.
- Neutral cure silicone: Compatible with a wider range of materials, including masonry and natural stone. It is slower to cure than acetoxy silicone but offers better adhesion and flexibility.
• Putty: An Excellent Choice for Paintable Surfaces
For projects where painting over the sealed areas is required, glazing or painter’s putty is a suitable alternative to caulk. It is typically made from linseed oil and has a thicker consistency than caulk, making it easier to mold and shape.
Putty is commonly used for sealing around windowpanes, filling nail holes in woodwork, and other minor repair jobs. However, it is not recommended in high-moisture or high-temperature areas due to its potential to soften and lose its shape.
• In conclusion
When caulk is not an option, there are numerous alternatives available, each with its benefits and drawbacks. Understanding the demands of your specific project and the materials involved will help you make the best choice for your particular situation.
Remember to always follow the manufacturer’s instructions and safety guidelines when using any alternative sealing materials, and consult with professionals if you have any doubts.
Mastering the Art of DIY Caulking and Sealing
Caulking is a vital part of maintaining your home and preventing problems such as water damage, mold, and pest intrusion.
As a homeowner, one question that may arise is whether caulking is a task you can perform yourself or if you should hire a professional. The answer is yes – you absolutely can do caulking by yourself!
• Understanding the Basics of Caulking
Before you begin, it’s essential to understand caulking’s purpose and role in your home. Caulking is a sealant that fills gaps and seals joints, usually between two materials or surfaces, to prevent leaks or drafts.
Materials used for caulking include silicone, latex, and polyurethane, each with its specific properties and applications.
• Preparing for Your Caulking Project
– Gather the Necessary Tools and Supplies
To start, collect the following tools and materials:
- Caulk gun
- Caulk of your choice (silicone, latex, or polyurethane-based)
- Razor blade or utility knife
- Painter’s tape
- Damp cloth or sponge
- Bucket with water
- Paper towels
– Choose the Right Type of Caulk
Selecting the appropriate caulking material for your project is crucial for durability and effectiveness. Two common types of caulk are silicone and latex:
- Silicone caulk is waterproof, flexible, and can withstand temperature fluctuations, making it ideal for bathroom, kitchen, and exterior applications.
- Latex caulk is paintable, easy to work with, and has good adhesion, which makes it suitable for interior areas like baseboards, window frames, and molding.
For more demanding projects, such as sealing gaps in masonry or high-traffic areas, a polyurethane-based caulk may be appropriate.
– Prepare the Surface
Before applying new caulk, you must remove any old or damaged caulk and clean the surface thoroughly.
Use a razor blade or utility knife to carefully cut away old caulk, taking care not to damage the surrounding materials. Once removed, clean the area with a damp cloth or sponge and allow it to dry completely.
• Caulking Techniques for a Professional Finish
Now that you have prepared the area and gathered the necessary tools, you can start applying new caulk. Follow these steps for a smooth, professional finish:
- Apply painter’s tape: To create clean, straight lines, apply painter’s tape along both edges of the joint or gap, leaving a small space for the caulk between the tape’s edges.
- Load the caulk gun: Cut the nozzle of the caulk tube at a 45-degree angle, ensuring the opening matches the size of the gap you’re sealing. Puncture the seal inside the nozzle with a long nail or the puncture tool on your caulk gun. Place the tube into the gun with the nozzle facing away from the trigger.
- Apply caulk: Hold the caulk gun at a 45-degree angle to the surface and gently squeeze the trigger to dispense the caulk, guiding the nozzle along the gap with steady pressure. Do not overfill the gap; it’s better to apply too little caulk initially and add more if necessary.
- Smooth the caulk: Wet your finger or a damp cloth and run it along the applied caulk, pressing it into the gap while removing excess caulk. For larger gaps, a plastic smoothing tool can be used.
- Remove the painter’s tape: While the caulk is still wet, carefully remove the painter’s tape, pulling it away from the joint at a 45-degree angle. This action will help create a clean, straight edge without smearing the caulk.
- Clean up: If you have excess caulk on your hands or tools, use a damp cloth or sponge to clean the area before it dries.
• Tips for a Successful Caulking Experience
- Choose the right time: Caulking should be done during mild, dry weather to allow the caulk to cure properly. Avoid applying the caulk in extreme temperatures, high humidity, or rain.
- Practice makes perfect: Do not worry if your first attempt is not perfect. Caulking is a skill that improves with practice. Try applying caulk on a scrap material before working on your project to build confidence.
- Clean and maintain your tools: Keep your caulk gun and other tools clean after each use to prolong their lifespan and ensure reliable performance.
- Monitor for wear and tear: Inspect your caulking work regularly and repair or reapply as needed. Caulking may need to be replaced every few years, depending on the material used and the project’s location.
In conclusion, caulking is a task you can undoubtedly do by yourself with the proper tools, materials, and technique. Following the steps outlined in this article and the helpful tips from our personal experience, you can achieve a professional finish and prevent costly water damage or drafts in your home.
| Can you do caulking by yourself? |
|---|
| Yes, you can perform caulking on your own if you have the necessary tools and knowledge to do so. This includes buying the appropriate type of caulk, having a caulking gun, and following proper application techniques to ensure a clean and durable result. |
Explore Caulk Alternatives for Your DIY Projects
Caulk is a popular and versatile material used for sealing gaps and joints, as well as for filling cracks and holes in various surfaces. Despite its benefits, there are some instances in which an alternative solution might be more suitable for a DIY project.
• 1. Weatherstripping Tape
Weatherstripping tape is a self-adhesive material that prevents drafts, moisture, and air infiltration. It is most commonly used around windows and doors but can work for various purposes in a DIY project.
– Benefits
- Easy to apply, remove, and replace
- Cost-effective
- Comes in various materials, such as vinyl, foam, and rubber
– Limitations
- Not suitable for large gaps or uneven surfaces
- May peel off over time due to exposure to sunlight and temperature changes
• 2. Foam Sealant
Foam sealant, often referred to as expanding foam, is an insulating material that expands and hardens when applied to gaps, cracks, and openings.
– Benefits
- Fills large and irregular-shaped gaps
- Provides insulation and reduces noise transfer
- Can be sanded, trimmed, and painted once cured
– Limitations
- Can be challenging to control the application
- Requires a dispenser gun, which can be an added expense
- May cause damage if over-expanded, as it exerts pressure on the surroundings
• 3. Rope Caulk
Rope caulk is a soft, flexible, and moldable material that comes in a rope-like form. It is often used to seal gaps around windows, doors, and other openings in homes.
– Benefits
- Easy to apply and remove
- Can be molded to fit irregular surfaces and gaps
- Reusable, making it cost-effective
– Limitations
- Not suitable for long-term use or permanent sealing jobs
- Not as durable or strong as other alternatives
- May not work well in high-temperature areas
• 4. Mortar
Mortar is a mixture of cement, sand, and water, which is used for bonding bricks, stones, and other building materials. It can also be used as an alternative to caulk in specific projects.
– Benefits
- Highly durable
- Provides a strong bond between surfaces
- Suitable for outdoor use
– Limitations
- Difficult to work with and requires proper mixing
- Requires time to set and cure
- Not suitable for surfaces prone to movement or expansion
• 5. Gasket Material
Various gasket materials can be used in specific DIY applications as an alternative to caulk. Gasket materials are typically made from rubber, cork, or a combination of the two and are used to provide an airtight and watertight seal between surfaces.
– Benefits
- Highly effective at creating a tight seal
- Can be used on irregular surfaces and for irregular-shaped gaps
- Often resistant to heat and chemicals, making them suitable for a wide range of applications
– Limitations
- Can be expensive, depending on the material
- May require additional tools and expertise to install
• 6. Putty
Putty is a moldable, clay-like substance that is often used to fill gaps, cracks, and holes in surfaces. There are various types of putty, such as plumber’s putty, painter’s putty, and glazing putty, each with its own unique properties and applications.
– Benefits
- Repairs small gaps and openings
- Can be painted and finished
- Easy to mold and shape
– Limitations
- Not suitable for large gaps or as a permanent sealing solution
- May dry out and crack over time
- Not recommended for areas exposed to water or moisture
– Conclusion
Caulk is a versatile material with numerous applications in DIY projects. However, it may not always be the most suitable choice for your specific needs.
By considering the alternatives mentioned in this article and their respective benefits and limitations, you can make an informed decision about the best material to use for your DIY project.