PWRP Application On Wooden Surfaces
Are you searching for the perfect PWRP application on wooden surfaces? Look no further, as we have the expertise and knowledge to assist you in achieving a flawless result. Our comprehensive guide will navigate you through the process, addressing essential factors and providing valuable insights, ensuring a long-lasting, aesthetically pleasing finish on your wooden surface.
PWRP application on wooden surfaces:
The PWRP process for wood surfaces involves inspection, pressure washing, drying and sanding, repairs, primer application, staining or painting, and applying a protective finish. By following these steps, you can restore and maintain the beauty and durability of wooden surfaces, ensuring professional results.

Dive into the world of PWRP applications on wooden surfaces as we explore its benefits, techniques, and versatility. Whether you’re a professional or a DIY enthusiast, keep reading to unlock the full potential of this innovative solution that can transform your wooden surfaces!
Contents
- 1 Applying PWRP on Wood Surfaces: A Guide
- 2 Is Behr Premium Plus Suitable for Wood?
- 3 Applying Enamel Paint on Wooden Surfaces
- 4 Choosing the Right Paint Type for Wood
- 5 Consequences of Painting Wood without Primer
Applying PWRP on Wood Surfaces: A Guide
PWRP (Pressure Washer, Repair, and Prime) is a vital process for restoring and maintaining the beauty and durability of wooden surfaces.
• Step 1: Thorough Inspection and Assessment
Before starting the PWRP process, it’s crucial to inspect and assess the wooden surface for any damages, such as cracks, splits, rot, or insect infestations. Ensure that you take note of these issues and address them before moving forward.
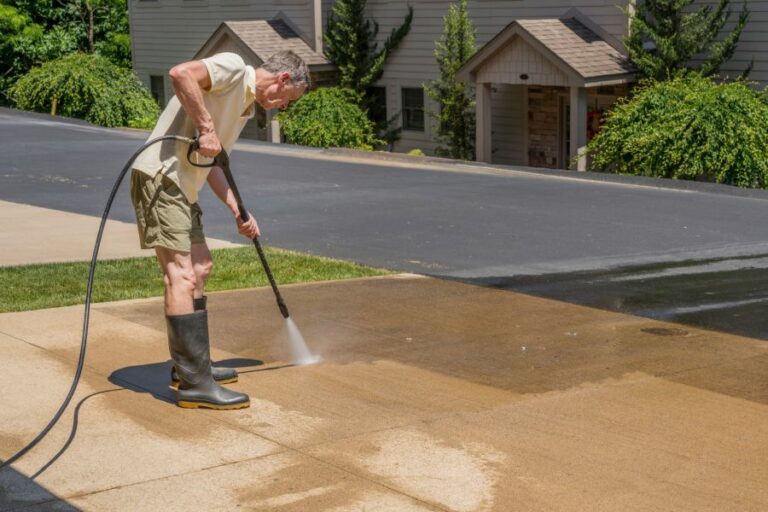
• Step 2: Pressure Washing
Pressure washing is the ideal method for cleaning and prepping wooden surfaces before any repair or priming work. Follow these steps to properly pressure wash the surface:
- Choose the right pressure washer: Opt for a unit with 2000-3000 PSI and a fan tip nozzle.
- Clear the area: Remove any furniture or obstacles from the surface.
- Protect surrounding plants: Cover nearby plants with a plastic sheet to shield them from the water spray.
- Test pressure: Start with a lower pressure setting and gradually increase it until the surface is clean without causing damage.
- Work methodically: Use a sweeping motion, maintaining a consistent distance from the surface.
Practice caution while using a pressure washer, as misusing it can cause damage to the wood.
• Step 3: Timely Drying and Sanding
After pressure washing, it is essential to allow the wood to dry completely. Depending on the climate and humidity, this may take between 48 to 72 hours. During this time, avoid subjecting the surface to weather elements, such as rain or direct sunlight.
Once the wood is dry, sand the surface to achieve a smooth finish. Use coarse sandpaper (80 to 100 grit) for rough wood, while for surfaces in good condition, opt for medium (150 grit) to fine (220 grit) sandpaper.
Consider using a random orbital sander for larger surfaces to save time and effort.
• Step 4: Repairing Damages
Upon completing the sanding process, address the damages identified in the initial inspection. For instance:
- Fill cracks and splits with wood filler or epoxy.
- Replace severely rotted or infested boards.
- Treat minor infestations using borate solutions and sealants.
- Sand-repaired areas to ensure uniformity and adhesion.
Take your time to repair the damages properly, as this is crucial in achieving long-lasting results.
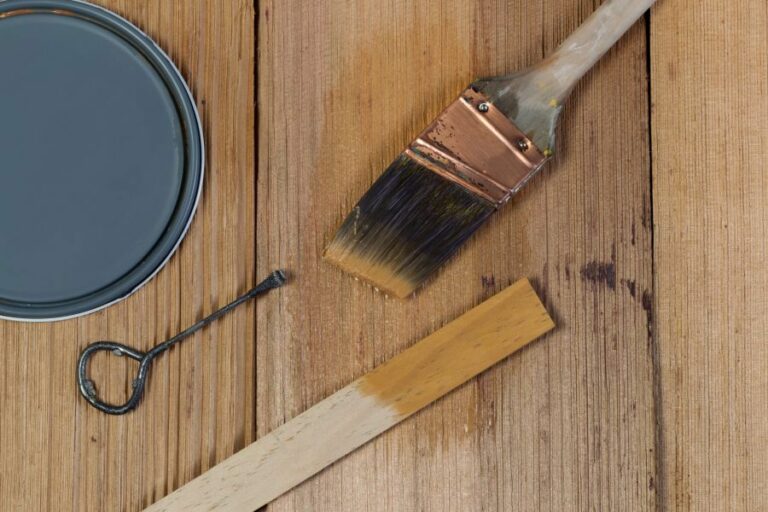
• Step 5: Primer Application
Before applying the primer, clean the surface of any dust, debris, or residue using a soft brush or compressed air. Choose a high-quality primer that is suitable for wooden surfaces, such as an oil-based or acrylic primer.
When applying the primer, use a natural bristle brush for oil-based products and a synthetic brush for acrylic primers.
Apply thin, even coats, working in the direction of the wood grain. Allow the primer to dry as per the manufacturer’s instructions, which may vary between 12 to 24 hours.
Add an extra layer of primer on areas with repairs or knots to ensure proper adhesion and coverage.
• Step 6: Applying Wood Stain or Paint
After the primer is dry, apply your desired wood stain or paint according to the manufacturer’s guidelines. In general, it’s best to opt for exterior-grade products that offer UV protection, as well as water and mildew resistance. This is crucial for the longevity of your wooden surfaces.
Similar to primer application, use appropriate brushes and follow the direction of the wood grain. Apply thin, even coats, with drying time between coats as recommended by the manufacturer.
Do a test patch on a hidden section of the surface to ensure the desired color and finish are achieved before full-scale application.
• Step 7: Applying the Protective Finish
Finally, seal your wooden surfaces using a protective finish, such as polyurethane, lacquer, or varnish. These finishes provide an extra layer of protection to the wood against moisture, UV rays, and wear and tear.
Again, use suitable, high-quality brushes for the application, and allow the finish to dry according to the manufacturer’s directions.
Opt for a satin or semi-gloss finish to ensure your wooden surfaces have a balanced appearance that highlights their natural beauty.
In conclusion, the PWRP process is crucial for maintaining and reviving wooden surfaces. By following this comprehensive guide and incorporating the expert recommendations, you’ll be well-equipped to tackle PWRP application on wooden surfaces, ensuring attractive and long-lasting results.
Is Behr Premium Plus Suitable for Wood?
Behr Premium Plus is a popular paint product that is known for its exceptional quality and finish. Homeowners and professional painters alike may wonder if it can be used on a wood surface. The answer is yes, Behr Premium Plus can be used on wood.
• Why Choose Behr Premium Plus for Wood?
Behr Premium Plus is formulated with a blend of high-quality ingredients, resulting in a paint that provides excellent coverage, durability, and long-lasting color retention.
Due to its versatility and performance, it is suitable for a wide range of surfaces, including wood, which requires special attention and protection.
– Mildew Resistance
Wood surfaces, particularly those exposed to moisture, are susceptible to mildew growth. Behr Premium Plus is formulated with mildew-resistant agents that help protect wood surfaces from this unwanted growth, ensuring a long-lasting and attractive finish without the need for frequent repainting.
– Easy Application
One of the remarkable features of Behr Premium Plus is its ease of application. The paint glides smoothly onto wood surfaces and provides a consistent finish with minimal brush marks, making it an ideal choice for both professional painters and DIY enthusiasts.
– Quick Drying Time
When working with wood surfaces, a quick drying time is essential to ensure a flawless finish. Behr Premium Plus has a fast-drying formula, allowing you to apply a second coat in as little as 2 hours, depending on the environmental conditions.
This fast drying time helps you complete your painting project efficiently and ensures your wood surface is protected as soon as possible.
• Preparing Wood Surfaces for Behr Premium Plus
Proper surface preparation is crucial for achieving desired results with Behr Premium Plus. Here are some recommendations on preparing wood surfaces before applying this paint.
– Cleaning the Surface
Start by cleaning the wood surface to remove dust, dirt, and any loose debris. You can use a vacuum or a soft-bristle brush for this purpose. For more thorough cleaning, you may use a mild detergent and water.
– Sanding
To ensure smooth, even application and proper adhesion of the paint, it is important to sand the wood surface. For previously painted surfaces, sanding can also remove any loose, flaking paint.
Use medium-grit sandpaper (120 to 150 grit) and sand in the direction of the wood grain. After sanding, wipe the surface clean with a tack cloth to remove sanding dust.
– Priming
For optimal paint adhesion and coverage, it is recommended to prime the wood surface before applying Behr Premium Plus.
Behr offers a range of primers suitable for different types of wood surfaces. Choose the appropriate primer based on your project’s specific requirements and follow the manufacturer’s instructions for application.
• Painting Wood Surfaces with Behr Premium Plus
After you have properly prepared the wood surface, it’s time to apply Behr Premium Plus. Here are some expert tips to guide you through the painting process.
– Stirring the Paint
Before applying the paint, make sure to stir it thoroughly to ensure an even consistency. This will help achieve better coverage and a smoother finish.
– Using the Right Tools
Choose high-quality paintbrushes, rollers, or sprayers for the best results with Behr Premium Plus. For most wood surfaces, a synthetic bristle brush or a high-density foam roller is recommended. If using a paint sprayer, follow the manufacturer’s instructions to ensure proper application.
– Applying the Paint
Apply Behr Premium Plus in thin, even coats to achieve a smooth, consistent finish. Avoid overloading your brush or roller to minimize drips and runs. If you need to touch up any areas after the paint has dried, use a small brush and feather the edges to blend the new paint with the existing paint.
– Drying and Recoating
Allow the paint to dry for at least 2 hours before applying a second coat, if necessary. To ensure a durable and long-lasting finish, it is recommended to apply at least two coats of Behr Premium Plus on wood surfaces.
• Maintaining Your Finished Wood Surface
To help prolong the life of your painted wood surface, regularly clean and maintain it. Remove dirt and dust with a soft-bristle brush, and clean stains or marks with a mild detergent and water solution.
If necessary, you can repaint the surface with Behr Premium Plus following the preparation and painting steps outlined above.
In conclusion, Behr Premium Plus is an excellent choice for wood surfaces, providing easy application, long-lasting durability, and exceptional finish quality.
By following the expert tips and recommendations provided in this article, you can ensure that your wood surface looks great and is protected for years to come.
Applying Enamel Paint on Wooden Surfaces
Enamel paint is a versatile and durable type of paint that can be applied on various surfaces, including wood.
• Types of Enamel Paints for Wood
Enamel paints come in various formulations, which are suitable for different applications on wood surfaces. The most common types of enamel paints include:
– Oil-Based Enamel Paints
Oil-based enamel paints have been used for decades due to their durability, excellent adhesion, and high gloss finish. These paints are ideal for wood surfaces that will be exposed to high levels of wear and tear, including furniture and trim.
Oil-based enamel paints typically take longer to dry, but provide a smooth finish and excellent leveling properties, particularly on wood surfaces.
– Water-Based Enamel Paints
Water-based enamel paints, also known as acrylic enamel paints, are an environmentally friendly alternative to traditional oil-based paints. They have a faster drying time, low odor, and easy cleanup with water.
These paints are ideal for wood furniture, cabinets, and trim. When properly applied, water-based enamel paints deliver a finish that closely resembles that of oil-based counterparts but with the advantage of reduced VOC emissions and easier cleanup.
– Alkyd Enamel Paints
Alkyd enamel paints are a type of oil-based paint with modified synthetic resins, which provide improved durability and faster drying times compared to traditional oil-based paints. These paints are suitable for wood surfaces that require a long-lasting finish with excellent leveling and sag resistance.
Alkyd enamel paints are most common in industrial and commercial applications due to their durability and ease of use.
• Advantages of Enamel Paint on Wood
There are several benefits to using enamel paint on wood surfaces, including:
- Durability: Enamel paints are known for their excellent durability, providing a long-lasting finish that resists chipping and peeling.
- Smooth Finish: Enamel paints offer a smooth, high-gloss finish that adds a polished and elegant look to wood surfaces.
- Protection: Enamel paint not only looks great but also provides protection to the wood surface. It forms a hard, protective layer that can prevent the wood from warping, cracking, and rotting due to moisture and external elements.
- Easy Maintenance: Enamel paints are easy to clean and maintain, requiring only mild soap and water for routine cleaning.
• Disadvantages of Enamel Paint on Wood
Despite its many advantages, there are also some downsides to using enamel paint on wood surfaces:
- Slower Drying Times: Oil-based enamel paints have a longer drying time, which can slow down the completion of a painting project.
- Fumes and VOCs: Oil-based and alkyd enamel paints contain volatile organic compounds (VOCs) that emit fumes during the drying process, which can be harmful to the environment and cause respiratory problems in some individuals.
- Difficult Cleanup: Oil-based enamel paints require the use of thinner or mineral spirits for cleanup, which can be messy and hazardous.
• Tips and Techniques for Applying Enamel Paint on Wood
Before applying enamel paint to a wood surface, follow these tips and techniques to ensure a smooth, professional finish:
- Prepare the Surface: Sand the wood surface with medium to fine grit sandpaper to remove imperfections and rough spots. Wipe down the surface with a tack cloth to remove dust and debris.
- Apply Primer: Use a high-quality, oil-based primer on the wood surface before applying enamel paint. Primer helps to ensure proper adhesion, improve paint coverage, and enhance the durability of the finish.
- Use Quality Brushes: Use a quality natural-bristle brush for oil-based enamel paints or a synthetic-bristle brush for water-based or alkyd enamel paints.
- Apply Thin Coats: Avoid painting thick coats that can lead to uneven paint coverage, runs, or sagging. Instead, apply thin, even coats and allow each coat to dry thoroughly before applying additional coats.
- Sanding Between Coats: Lightly sand between coats of paint with fine-grit sandpaper to promote proper adhesion and achieve a glass-like finish.
- Allow Sufficient Drying Time: Follow the manufacturer’s instructions for drying times between coats and before using the painted wood surface.
• Final Thoughts
Enamel paint can indeed be applied to wood surfaces, providing a durable and attractive finish that can withstand the test of time. By choosing the appropriate type of enamel paint and following proper application techniques, you can achieve a professional, long-lasting finish on your wood projects.
| Can you put enamel paint on the wood? |
|---|
| Yes, enamel paint can be applied on wood surfaces. Make sure to properly clean and prime the wood before painting to ensure the best results. |
Choosing the Right Paint Type for Wood
Painting wood surfaces can be a great way to bring new life to your home or furniture. However, it’s essential to choose the right type of paint to ensure a long-lasting and durable finish.
• Water-Based Paints
Water-based paints, also known as latex or acrylic paints, are a popular choice for painting wood due to their ease of use and quick drying time.
Available in a wide range of colors and finishes, water-based paints can be easily cleaned up with soap and water, making them a convenient option for DIY projects.
– Pros
- Low VOCs (Volatile Organic Compounds): Water-based paints have a lower concentration of harmful chemicals, making them more environmentally friendly and less likely to cause health problems during application.
- Quick Drying Time: These paints dry faster than oil-based paints, allowing you to complete your project quicker.
- Easy Clean-Up: Brushes and other painting tools can be easily cleaned with soap and water after use.
– Cons
- Less Durable: Water-based paints can be less resistant to wear and tear, making them less suitable for high-traffic areas, outdoor applications, or furniture.
- Easier to Damage when Wet: These paints can be more susceptible to damage, such as scratches and smudges, when they are still wet.
– Expert Recommendation
For most indoor wood surfaces, water-based paints are an excellent choice due to their low VOC content, fast drying time, and easy clean-up. However, if you need a more durable finish, consider using oil-based paint or applying a protective topcoat.
• Oil-Based Paints
Oil-based paints provide a durable and long-lasting finish, making them a popular choice for wood surfaces that require more protection from wear and tear, such as outdoor furniture or trimwork.
– Pros
- Durability: Oil-based paints offer a more robust and long-lasting finish, making them ideal for high-traffic areas or outdoor applications.
- Smooth Finish: These paints provide a smoother and more uniform finish when properly applied.
– Cons
- Higher VOCs (Volatile Organic Compounds): Oil-based paints contain higher levels of harmful chemicals, making them less environmentally friendly and posing a higher risk to health during application.
- Slow Drying Time: These paints can take longer to dry, slowing down the completion time of your project.
- Difficult Clean-Up: Brushes and tools used with oil-based paints require the use of solvents for cleaning, making it more challenging and time-consuming.
– Expert Recommendation
For wood surfaces that require more durability and protection, such as outdoor furniture or high-traffic areas, we recommend using oil-based paint despite its cons.
Be sure to follow safety guidelines when working with these paints due to their higher VOC content.
• Paint-and-Primer-in-One Products
Paint-and-primer-in-one products have grown in popularity due to their convenience and time-saving capabilities. These products are designed to function as both a primer and paint, eliminating the need for a separate primer coat.
– Pros
- Time-Saving: By combining the primer and paint steps into one application, these products can save time and speed up the completion of your project.
- Convenience: Since they function as both a primer and paint, there is no need to purchase and apply separate products.
– Cons
- Potentially Less Effective: Some experts argue that the two-in-one products may not be as effective as using a separate primer and paint, particularly in certain situations, such as covering severe stains or color changes.
– Expert Recommendation
For simpler, small-scale projects or when time is a significant factor, a paint-and-primer-in-one product can be a convenient choice.
However, if you’re dealing with more complex situations, such as significant color changes or areas with stains, a separate primer and paint may be necessary for optimal results.
• Ensuring a Successful Wood Painting Project
Regardless of the type of paint you choose, proper surface preparation and application techniques are essential for a successful wood painting project. Be sure to follow these steps:
- Prepare the Surface: Sand the wood surface to remove any old paint or rough patches, then clean it thoroughly with a lint-free cloth to remove dust and debris.
- Apply Primer: A high-quality primer is essential for creating a smooth base for your paint to adhere to. This is especially important when painting wood surfaces. Follow the primer’s instructions on the label for proper application.
- Apply Paint: Follow the paint manufacturer’s instructions for proper application, typically applying two or more thin, even coats for best results. Allow the paint to dry thoroughly between coats.
In conclusion, choosing the right paint for your wood surfaces depends on the specific needs and requirements of your project. Consider factors such as durability, ease of use, and environmental impact to select the best paint for your needs.
By using quality products and following proper surface preparation and application techniques, you can achieve a beautiful and long-lasting finish for your wood painting project.
| What kind of paint do you use on wood? | |
|---|---|
| 1. Acrylic Paint | Water-based, dries quickly, easy to clean up with soap and water |
| 2. Latex Paint | Also water-based, good adhesion, resistant to mildew and fungus |
| 3. Oil-Based Paint | High durability, solvent-based, takes longer to dry |
| 4. Chalk Paint | Matte finish, allows to create distressed effect, requires sealing with wax or topcoat |
| 5. Enamel Paint | High gloss and durability, can be oil or water-based, good for heavy-use surfaces |
| 6. Spray Paint | Quick application, even coat, can be used on various surfaces, needs ventilation |
| 7. Milk Paint | Eco-friendly, made from natural ingredients, gives furniture an antiqued look, needs a topcoat or sealer |
Consequences of Painting Wood without Primer
If you’re considering painting a wooden surface, whether it’s furniture, cabinetry, or your home’s exterior, using a primer should be an essential step in the process.
Primer, also known as a wood primer or wood sealer, is a preparatory coating that allows the paint to adhere better, providing a smooth, even finish and increased durability.
• Consequences of Skipping Primer When Painting Wood
1. Poor Paint Adhesion
One of the primary functions of primer is to promote paint adhesion. By skipping primer, you risk the paint not adhering properly to the wood, which can result in an uneven, splotchy appearance, and even peeling or chipping over time.
A high-quality primer, such as one designed specifically for wood surfaces, will provide the optimal surface for the paint to adhere to, ensuring a seamless and professional-looking final result.
However, not all wood surfaces necessarily require a primer. If you’re painting over wood that has already been painted, such as repainting a previously painted wall or piece of furniture, you may not need to use a primer as long as the old paint is still in good condition.
In these cases, you can consult this resource for further guidance.
2. A Less Durable Finish
Another major drawback of painting wood without primer is the reduced durability of the finished paint job. Primers contain ingredients that help seal the wood, preventing moisture and other environmental elements from causing damage to the paint.
A less durable finish means that the paint job will be more susceptible to issues such as peeling, cracking, and chipping. Over time, this could lead to costly repairs or the need to completely redo the paint job.
3. Increased Paint Absorption
Wood is a porous material, and without a primer, it will absorb more paint, requiring you to use more paint to completely cover the surface.
This not only makes the painting process more labor-intensive but also more expensive, as you may need to purchase additional paint to achieve the desired coverage.
4. Uneven Color and Sheen
When painting wood without primer, you’re more likely to see variations in the color and sheen across the surface. The natural color and texture variations in wood can show through your paint, leading to a less consistent appearance.
A primer, particularly one with stain-blocking properties, will help create a more uniform base, allowing for consistent color and sheen in the final paint job.
5. Difficulties in Masking Stains and Knots
Without primer, stains, and knots can often bleed through paint, leading to an unsightly and unprofessional finish. A primer is specifically designed to cover and seal stains and knots, ensuring that these imperfections do not become visible beneath the paint.
Choosing a primer with stain-blocking capabilities is essential if you’ll be painting over wood with visible stains or knots.
• Choosing the Right Primer for Wood
There are numerous types of primers available on the market, and it’s important to choose one that is specifically designed for use on wooden surfaces. Some key factors to consider when selecting a wood primer include the following:
- Oil-based vs. water-based: Oil-based primers tend to provide better adhesion and stain-blocking capabilities, making them a popular choice for unfinished or stained wood. Water-based primers are easier to clean up and produce less odor, making them suitable for indoor use. However, they may not perform as well on surfaces with significant staining or knots.
- Stain-blocking properties: As mentioned earlier, primers with stain-blocking properties are essential for preventing stains and knots from bleeding through the paint job.
- Latex or shellac-based: Latex primers are water-based and suitable for a wide range of applications, whereas shellac-based primers provide superior adhesion and stain-blocking capabilities but are more challenging to work with due to their odor and short drying time.
In conclusion, using a primer on wood surfaces before painting is crucial to achieving professional-looking results that stand the test of time.
Skipping this important step can lead to issues such as poor paint adhesion, reduced durability, uneven color and sheen, increased paint absorption, and difficulties masking stains and knots.
Investing in a high-quality wood primer and taking the time to apply it properly will ensure a successful, long-lasting paint job that you can be proud of.
Consequence | Description |
|---|---|
Poor adhesion | Paint may not stick well to the surface, leading to peeling or chipping |
Uneven appearance | Paint absorption may vary across the surface, resulting in an inconsistent finish |
Increased paint usage | More paint may be required to cover the surface, as the paint may be absorbed unevenly |
Decreased durability | Paint may wear off more easily, requiring more frequent maintenance and repainting |
Exposure to moisture | Without a primer to seal the wood, moisture may seep in, causing warping, rotting or mold growth |