How To Prep Your Interior For Painting, 25 Things You Should Know
Embarking on a home painting project can be both exciting and daunting. With the right preparation and approach, you can achieve a stunning transformation for your interior spaces. We’re here to guide you through the essential steps to prep your interior for a professional-quality paint job. Let’s dive in and explore the tips and tricks to make your painting experience smooth, efficient, and satisfying. You’ll soon be on your way to a refreshed and revitalized indoor ambiance.
How to prep your interior for painting:>
To prep your interior for painting, gather supplies, protect furniture and flooring, clean walls and baseboards, repair wall imperfections, mask off trim and outlets, sand the walls, and apply primer. Proper preparation ensures a smooth, even finish and prolongs the paint’s longevity.

Unleash the full potential of your home’s interior by giving it a fresh coat of paint. Read on to discover expert tips and techniques on preparing your walls, choosing the right supplies, and achieving a flawless finish that will transform your living space. Don’t miss out!
Contents
Preparing Your Interior Space for a Paint Job
Painting the interior of your home can be a fantastic way to refresh and transform your living spaces. However, proper preparation is essential to ensure a smooth and long-lasting finish.
• Gather Your Supplies
Before starting your preparation, gather all the necessary tools and materials. These may include:
- Drop cloths or plastic sheeting
- Painter’s tape
- Cleaning supplies (sponges, rags, vacuum cleaner)
- Patching compound
- Putty knife
- Sandpaper (various grits)
- Primer
- Paintbrushes and rollers
Having all your supplies ready beforehand will make the process more efficient and help avoid unnecessary interruptions.
• Protect Your Furniture and Flooring
It’s crucial to protect your furniture and flooring from potential paint spills and splatters. Start by moving all the furniture away from the walls and into the center of the room. Cover the furniture with drop cloths or plastic sheeting to shield it from dust and paint.
Next, cover your flooring with drop cloths, making sure they reach the edges of the walls. Secure them in place using painter’s tape to prevent any paint from accidentally dripping onto the floor.
• Clean the Walls and Baseboards
To achieve an even paint finish, it’s important to clean your walls and baseboards thoroughly. Use a sponge or cloth and mild soap water to gently remove dust, dirt, and grease from the surfaces. Pay special attention to areas near light switches and door handles, as they tend to accumulate more dirt.
Once the walls are clean, focus on the baseboards. Use a damp cloth or sponge to eliminate dust and dirt. If necessary, use a vacuum cleaner with a brush attachment to remove any remaining dust.
Allow the surfaces to dry completely before moving on to the next step.
• Repair Wall Imperfections
Examine your walls for any holes, cracks, or dents. These imperfections must be repaired to create a smooth canvas for painting. Use a putty knife to apply a patching compound to these areas, following the manufacturer’s instructions.
Allow the compound to dry as instructed, then use sandpaper to smooth the patched areas. Wipe the walls with a damp cloth to remove any dust created by sanding.
For more tips on repairing wall damage, visit the U.S. Department of Housing and Urban Development’s guide on maintenance and repairs.
• Mask Off Trim and Outlets
Use painter’s tape to carefully mask off any areas you do not want to paint, such as trim, doorframes, window frames, and electrical outlets. This will help you achieve clean lines and prevent paint from bleeding onto unintended surfaces.
Remember to press the tape firmly against the wall to ensure it adheres properly and creates a tight seal.
• Sand Your Walls
Sanding your walls before painting will help create a smoother and more even finish. Begin with coarse-grit sandpaper (around 120-grit), and sand the entire wall surface in a circular motion. Be careful not to apply too much pressure, as this may cause damage to the wall.
After sanding with coarse-grit paper, repeat the process with fine-grit sandpaper (around 220-grit) for an even smoother finish.
Wipe the walls with a damp cloth or use a vacuum cleaner with a brush attachment to remove any dust created by sanding.
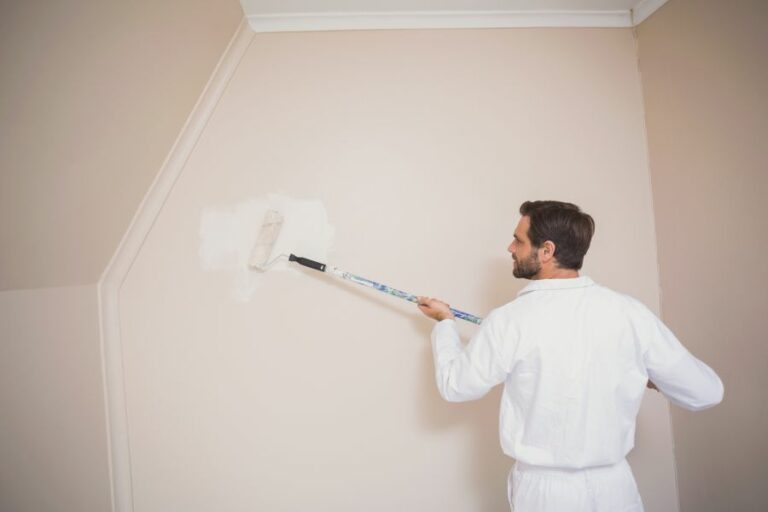
• Apply Primer
Applying primer is essential for ensuring your paint adheres well to the surface and lasts longer. It also helps to cover any stains or discolorations on the wall, providing a uniform base for the paint.
Use a paintbrush or roller to apply a layer of primer to the walls, following the manufacturer’s instructions regarding drying time.
Once the primer is completely dry, your interior is ready for painting.
• Conclusion
Preparing your interior for painting might seem like a daunting task, but it’s essential for achieving professional and long-lasting results. By following these steps and taking the time to properly clean, repair, and prime your surfaces, you’ll create the perfect canvas for a beautiful paint job.
Step | Description |
|---|---|
1. Clear the room | Remove all furniture, artwork, and other items to make space for painting and to protect them from paint splatter. |
2. Protect the floor | Place drop cloths or plastic sheeting on the floor to protect it from paint spills and splatters. |
3. Clean the surface | Wash the walls with mild soap and water to remove dirt, grease, and other debris that can cause paint to peel or not adhere properly. |
4. Repair wall imperfections | Fill any holes, cracks, or dents with spackle or joint compound, then sand it smooth once it’s dry. This will create a smooth surface for your paint to adhere to. |
5. Tape off adjacent surfaces | Use painter’s tape to protect baseboards, trim, and other surfaces adjacent to the walls you’ll be painting. |
6. Prime the walls | Apply a coat of primer to the walls before painting. This will help block stains, cover imperfections, and provide a smooth base for the paint to adhere to. |
7. Gather your materials | Assemble your paint, brushes, rollers, paint tray, and any other tools you’ll need to complete your project. |
Steps to Ready Your Home’s Interior for Painting
A well-executed paint job can transform the interior of your house, giving it a fresh, clean look. Achieving that perfect finish requires adequate preparation.
• Clear the Room
Before starting any interior painting project, it is crucial to clear the room of all furniture and decorative items. This allows for easier access to walls and ceilings and helps prevent any accidents or damage to your belongings.
If the furniture is too heavy or large to remove, simply move it to the center of the room and cover it with plastic sheeting or drop cloths.
• Protect Your Floors
Paint splatters and spills can be difficult to clean, so it is vital to protect your floors during the painting process. Cover the entire floor with drop cloths or plastic sheeting, using painter’s tape to secure the edges. Be sure to overlap the sheets to prevent paint seepage.
• Remove Electrical Covers and Fixtures
Remove all outlet and switch covers, as well as any light fixtures and ventilation grates. This ensures a neater, more professional-looking paint job and eliminates the risk of getting paint on these items. Store screws and covers in labeled plastic bags, so you can easily find them when it’s time to reinstall.
• Clean the Surfaces
Cleaning the surfaces to be painted is an essential step, as dust, dirt, and grease can hinder paint adhesion. Use a mild detergent mixed with water to clean walls and trim, and wipe them down with a damp sponge or cloth.
For greasier areas, such as kitchens, use a stronger degreaser, which can be found at your local hardware store. Once the surfaces are clean, let them dry completely before proceeding.
• Repair Damaged Areas
Inspect the surfaces and fill any holes, cracks, or dents with a suitable patching compound, such as spackling paste or wood filler.
Once the compound has dried, lightly sand the repaired areas to ensure a smooth, even surface. For larger repairs, like damaged drywall, consider hiring a professional to ensure a seamless finish.
• Sand and Degloss Surfaces
Sanding and deglossing are essential steps in achieving a smooth, professional-looking paint job. Lightly sand surfaces to remove any imperfections or rough spots, and use a tack cloth to remove any dust or debris.
If the surface is glossy, use a liquid deglosser to ensure proper paint adhesion. Be sure to follow the manufacturer’s instructions for proper application and drying times.
• Apply Painter’s Tape
Applying painter’s tape helps to create clean, precise lines and protect areas you don’t want to be painted. Apply the tape along the edges of the trim, baseboards, and any other areas you want to protect. Be sure to press the tape down firmly to prevent paint seepage.
• Prime the Surfaces
Priming your walls and ceilings is critical, especially if you are covering dark colors, stains, or glossy surfaces. Priming provides a consistent base for your paint, ensures better coverage, and improves paint adhesion. Choose a high-quality primer, and apply it according to the manufacturer’s instructions. Allow the primer to dry thoroughly before applying paint.
• Choose the Right Tools
Using the appropriate tools is essential for a successful paint job. Invest in a good-quality brush for cutting in around trim and edges, and use a paint roller for larger surfaces.
Choose the correct nap length for your roller based on the texture of your walls (shorter naps for smooth surfaces, longer naps for textured surfaces). Be sure to have an extension pole for your roller, as it makes painting ceilings and high walls much easier.
• Start Painting
Now that your interior space is prepped and ready, it’s time to apply your paint. Begin by cutting in around the edges with a brush, then use a roller to fill in the larger areas. Remember to work in small sections and maintain a wet edge to avoid lap marks. Apply your paint in a “W” pattern, and then fill in the spaces for even coverage.
In conclusion, properly preparing your interior house for painting is key to achieving a professional-looking paint job. By following these essential steps, you will be well on your way to transforming your space with a fresh, new look. Good luck, and happy painting!
Importance of Prepping Interior Walls Prior to Painting
The short answer to this question is: yes, properly prepping interior walls is a crucial step in the painting process. As a seasoned professional, I can attest to the fact that taking the time to prepare your walls will drastically improve the final outcome and longevity of your paint job.
• Assessing the Condition of Your Walls
Before you begin, thoroughly inspect your walls for any visible flaws or damages. Some common issues you may encounter include:
- Cracks and holes
- Peeling or chipped paint
- Signs of water damage
- Mold or mildew
Regardless of the state of your walls, proper preparation can help address these issues and ensure your paint adheres effectively.
• Cleaning the Surface
It’s essential to clean your walls before painting, as paint adheres better to a clean surface. Remove any dirt, dust, or grime using a mild detergent and a sponge or cloth. For more stubborn stains, you can use a mixture of water and household vinegar.
Once clean, allow the walls to dry completely. If you encounter mould or mildew during the cleaning process, I recommend using a fungicidal solution to prevent regrowth before painting.
• Repairing Cracks and Holes
Smooth and even walls make for the best painting surface. Utilize a putty knife or a spatula to fill any cracks, holes, or dents with high-quality filler.
Follow the manufacturer’s instructions to ensure proper drying times, and then use sandpaper to smooth the surface. When sanding, take care to wear a dust mask and safety goggles to protect yourself from dust particles.
• Tackling Peeling or Chipped Paint
Unsightly peeling or chipped paint can mar the final look of your paint job. Properly removing these areas and smoothing the surface can significantly improve the outcome.
Start by using a scraper to lift any loose paint, followed by sanding the edges to achieve a seamless transition between the affected and unaffected areas. Finally, wipe down the walls with a damp cloth to remove any sanding residue.
• Dealing with Water Damage
Water damage can lead to paint blistering or bubbling, making it essential to tackle this issue before painting. First, identify and repair the source of the leak. Next, remove any damaged building materials and allow the area to dry thoroughly.
Apply a stain-blocking primer to affected areas to prevent any residual moisture from seeping through the new paint.
• Sanding for a Smooth Finish
Sanding is a crucial step in prepping your walls for the best paint adhesion. Begin with a medium-grit sandpaper (around 120 grit) and sand the entire surface, taking care to address any imperfections.
This process creates a smoother surface and eliminates any existing glossy surfaces, improving the new paint’s adhesion. Don’t forget to wipe down the wall with a damp cloth to remove any dust after sanding.
• Priming Your Walls
The next step in wall preparation is applying a high-quality primer. Primers are specifically designed to provide a proper base for paint, ensuring optimal adhesion and longevity.
Additionally, primers help even out the porosity of the surface and cover any stains, marks, or previous colors. Remember to allow the primer to dry thoroughly before applying paint.
• Protecting Your Space
Lastly, protect your floors, furniture, and any items in the room from paint splatters and spills. Use drop cloths or plastic sheeting to cover floors and move furniture to the center of the room.
Apply painter’s tape to baseboards, trim, and any areas you do not want to be painted. Taking this extra step helps ensure a stress-free and tidy painting process.
• Final Thoughts
As a painting professional, I cannot stress the importance of properly prepping your interior walls before painting enough. By following these steps, you set yourself up for a successful, long-lasting, and visually appealing paint job.
Remember, investing time and effort in thorough preparation will undoubtedly pay off in the end, resulting in a beautiful, durable, and impressive paint job.
| Do you need to prep interior walls before painting? | |
|---|---|
| Yes | Prepping the interior walls before painting is essential for a smooth and long-lasting finish. Proper preparation includes cleaning the walls, patching any holes or cracks, sanding, and applying a primer if necessary. |
Proper Sequence for Painting an Interior Room
When painting an interior room, following a specific order can help you achieve a professional result with minimal time and stress.
• 1. Remove Furniture and Prep the Room
Before diving into the actual painting, it’s crucial to remove furniture and other items from the space to ensure smooth operation without any obstacles. This also includes taking down window treatments, fixtures, and switch plates to avoid any paint splatters on them.
Afterward, thoroughly clean the walls and surfaces to remove dirt and dust, as it can prevent the paint from adhering well to the surface.
• 2. Prepare the Walls
After prepping the room, the next step is to examine the walls for any imperfections, such as holes, dents, or cracks, that need to be addressed before painting. Use a joint compound to fill in these imperfections and smoothen the wall surface.
Once the compound has dried, sand the filled areas until they’re flush with the rest of the wall, then wipe away any dust with a tack cloth.
• 3. Apply Painter’s Tape
To achieve a clean painted edge, apply painter’s tape around the borders of the walls, as well as any adjacent surfaces such as window frames, door frames, and baseboards.
Make sure the tape is pressed tightly against the surface to prevent paint from seeping underneath it. This step is essential for ensuring a professional-looking finish.
• 4. Prime the Walls
Priming the walls is vital, especially if you’re covering a darker color or there are any stains on the surface. A primer’s primary purpose is to provide a uniform and smooth surface for the paint to adhere to, resulting in a more polished appearance.
Choose a primer that’s compatible with your chosen paint type, and apply one to two coats, depending on the manufacturer’s recommendations.
• 5. Start With the Ceiling
It’s best to paint the ceiling first, as it allows you to fix any drips or mistakes on the walls later. Use a long-handled roller brush to apply paint in straight lines, working across the room’s length. Overlap each stroke slightly to ensure even coverage.
If the ceiling requires multiple coats, wait for the first coat to dry completely before applying the second one.
• 6. Paint the Walls
After the ceiling has dried, it’s time to tackle the walls. Start by cutting in the edges using a high-quality paintbrush. Cutting in refers to painting the corners and edges that a roller brush can’t reach. Be sure to do this carefully to create a seamless transition between the ceiling and walls.
Next, use a roller brush to apply paint to the walls, working in an overlapping “W” pattern. This technique ensures even coverage with no visible roller marks. Just like with the ceiling, allowing each coat to dry before applying the next one if multiple coats are required.
• 7. Paint Trim and Baseboards
Once the walls have dried, remove the painter’s tape and proceed to paint the trim (window and door frames) and the baseboards. Use a high-quality paintbrush, preferably one with a straight edge, for precise application. Again, painter’s tape can be used to protect surfaces where necessary.
• 8. Paint Doors and Windows
Now it’s time to paint the doors and windows. Lay down a drop cloth beneath the doors and windows to catch any drips. Use a paintbrush to apply paint using smooth, even strokes.
If the doors or windows have panels, start with them first before moving on to the rest of the surface. As always, allow each coat to dry before applying the next if required.
• 9. Clean Up and Reassemble the Room
Lastly, once all painted surfaces are completely dry, it’s time to clean up and put the room back together. Reinstall any fixtures, switch plates, and window treatments that were removed, and carefully rearrange the furniture.
Following the steps outlined in this guide will ensure your interior painting project is executed professionally and efficiently. Don’t be afraid to take your time and pay attention to detail during each step, as this will lead to an expertly painted room that you can be proud of.
Expert Techniques for Prepping Walls by Professional Painters
• Step 1: Assessing the Walls’ Condition
Before any preparation work begins, professional painters take the time to assess the condition of the walls. This involves normal wear and tear, along with any damage like cracks, holes, or water stains. This step is crucial as it will guide the rest of the process.
Recommended source for assessing wall damages: National Institute of Building Sciences
• Step 2: Cleaning the Walls
Once a thorough assessment is made, professional painters clean the walls to remove any dirt, dust, and grime. This ensures better adhesion of the primer and paints to the wall.
Different cleaning methods may be used, such as vacuuming, wiping with a damp cloth, or using mild detergents for more stubborn stains.
• Step 3: Repairing Wall Imperfections
After cleaning, it’s time to address any damage discovered during the assessment. This may include:
- Filling small holes and cracks with patching compound or spackling
- Repairing larger holes with drywall patches or joint compound
- Fixing dents or damaged areas with a putty knife or scraper
- Sanding rough edges to create a smooth and even surface
It’s essential to follow the manufacturer’s recommendations for drying times before moving on to the next step.
• Step 4: Removing Loose Paint and Wallpaper
To ensure a proper bond between the new paint and the wall, any loose paint or wallpaper must be removed. This can be achieved through several methods:
- Scrape loose paint using a paint scraper or putty knife.
- Sand stubborn areas with sandpaper, ensuring a smooth transition between old paint and the wall surface.
- Use a wallpaper steamer or wallpaper remover solution for wallpaper removal.
- Follow up with a thorough cleaning to remove any remaining debris.
• Step 5: Sanding the Walls
Sanding the walls creates a smooth surface for optimal paint adhesion. Professional painters typically start with coarse-grit sandpaper like 80 or 100-grit and progress to finer-grit sandpapers like 150 or 220-grit. It’s essential to wear proper protective gear like a dust mask and goggles during this step.
• Step 6: Priming the Walls
Priming is an essential step in prepping walls for painting, as it enhances paint adhesion, seals and protects the surface, and prevents stains from bleeding through the final paint. Professional painters may use different types of primers, such as:
- Latex primer: suitable for drywall, softwoods, and masonry
- Oil-based primer: ideal for stained surfaces, metal, and hardwoods
- Shellac-based primer: recommended for heavily stained surfaces or surfaces with smoke damage
When applying primer, painters typically use a roller for large areas, a brush for edges and corners, or a spray gun for even coverage.
• Step 7: Caulking and Sealing
This step involves sealing any gaps, cracks, or seams with caulk. Professional painters use an appropriate caulk for different materials (latex or silicone) and apply it using a caulking gun. Some common areas to caulk include:
- Gaps between the wall and trim
- Cracks around windows and doors
- Seams between different materials like drywall and wood trim
After applying caulk, a putty knife or damp cloth is used to smooth and remove excess caulk, ensuring a clean and professional finish.
• Step 8: Masking and Protecting
The final step before painting involves masking off areas that need protection from paint, such as light fixtures, switches, outlets, and trims.
Additionally, painters cover floors and furniture with drop cloths to prevent paint splatters and stains. Proper masking ensures a clean, sharp finish and makes the painting process more efficient.
In conclusion, thorough preparation is a key aspect of professional wall painting, as it ensures a high-quality result that lasts. By following the steps above, you can achieve a professional-looking paint job that not only enhances the appearance of your space but also extends the life of your walls.