Best Cleaning Practices Prior To Painting. What Pros Say
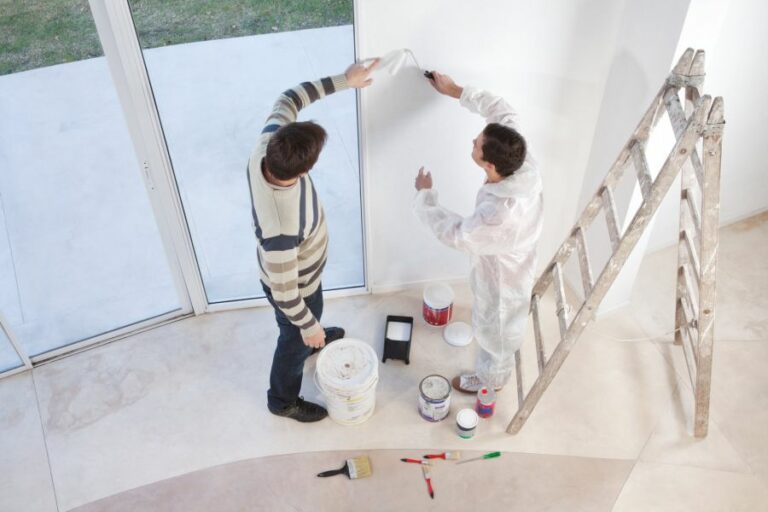
When achieving a flawless paint job, one crucial step often overlooked is properly cleaning the surfaces before you begin painting. Luckily, we have gathered the best cleaning practices that will help ensure your paint adheres beautifully and lasts for many years. With our guidance and expertise, you can be confident that your painting project will go smoothly, leaving you with professional-looking results.
Best cleaning practices prior to painting:
Best cleaning practices before painting include clearing the area, dusting, and dry cleaning surfaces, repairing any cracks or holes, cleaning with detergent, treating mold and mildew, sanding and dust removal, and applying a primer. These steps ensure proper paint adhesion and a professional-looking finish.

Want to achieve a flawless paint job? The secret lies in proper cleaning before you even pick up a brush! Dive in to discover industry-approved cleaning practices that remove dirt, debris, and imperfections, ensuring a perfect canvas for your paint. Read on and get ready for smooth, lasting results!
Contents
- 1 Top Pre-Painting Cleaning Techniques
- 2 Ideal Cleaning Solutions Before Painting
- 3 Expert Painters’ Wall Cleaning Methods
- 3.1 • The Importance of Cleaning Walls
- 3.2 • Assessing the Condition of the Walls
- 3.3 • Basic Cleaning: Dust and Dirt Removal
- 3.4 • Addressing Grease Stains and Adhesive Residues
- 3.5 • Tackling Mold and Mildew Growth
- 3.6 • Cleaning Textured Walls
- 3.7 • Repairing Surface Imperfections
- 3.8 • Final Preparations
- 3.9 • Conclusion
- 4 Using Dawn for Pre-Painting Wall Washing
Top Pre-Painting Cleaning Techniques
A successful paint job starts with proper preparation, and cleaning is one of the most critical steps for achieving professional-looking results.
• Clearing the Area
Before starting the cleaning process, it’s essential to clear the space to be painted. Removing furniture, art, and other decorations will provide you with sufficient room to work without any obstructions.
If it’s impossible to remove certain items, cover them with plastic sheets to protect them from dust and debris generated during the cleaning process.
• Dusting and Dry Cleaning
Start by dusting the surfaces to be painted, as loose dust and dirt can cause poor paint adhesion. Use an extendable duster or a microfiber cloth, going from top to bottom, to reach all areas, including baseboards, window sills, and other crevices in the room.
Once the surfaces are dust-free, use a vacuum cleaner with a soft brush attachment or a dry microfiber cloth for more in-depth cleaning. Skipping this step could lead to paint peeling or flaking after the painting process is complete, so it’s crucial to ensure you eliminate all traces of dirt.
• Repairing Surfaces
To properly adhere to the paint, surfaces should be free of cracks, holes, or loose paint. Inspect the walls and ceiling, fixing any visible irregularities, such as nail holes, with a putty knife and filler. Scrape off loose paint with a scraper or a wire brush, and sand the area to create a smooth surface.
For larger cracks and holes, use a joint compound or a patching material. Apply it using a putty knife, making sure to blend it into the surrounding surface to avoid noticeable patches after painting.
• Cleaning with Detergent
A detergent-based cleaning solution can help remove tough dirt, grease, and grime from your walls and ceilings. This step is particularly important in areas such as kitchens, where grease accumulation may be present.
Mix a mild detergent or a TSP (trisodium phosphate) substitute with warm water in a bucket. Use a sponge or a soft-bristled brush to scrub the surfaces, working from the bottom upward to prevent streaking.
After cleaning with the detergent solution, rinse the surfaces thoroughly with clean water to remove any residue.
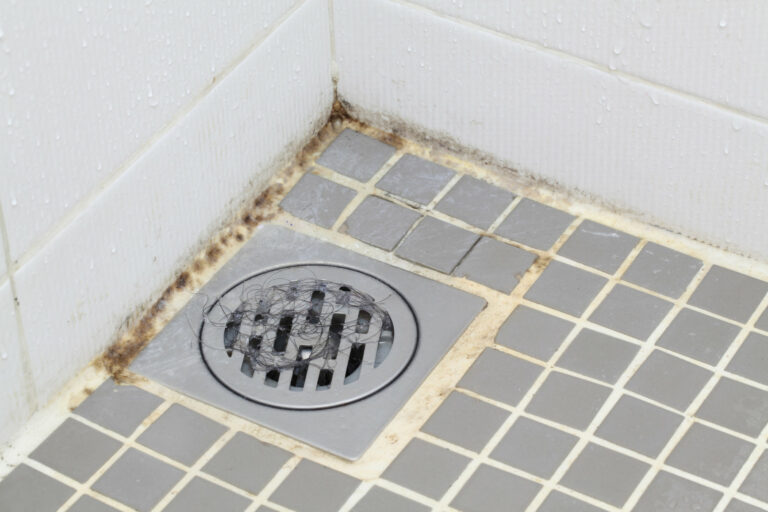
• Dealing with Mold and Mildew
In rooms with high humidity levels, such as bathrooms, mold, and mildew can be an issue. Cleaning the walls with a solution of one part bleach and three parts water effectively kills mold and mildew.
Make sure to wear gloves and protect your eyes and open the window in the room for proper ventilation.
After treating the affected areas, rinse them thoroughly with water and let them dry completely before starting the painting process.
• Sanding and Dust Removal
Before painting, sanding the surfaces is crucial for a smooth paint application. Using fine-grit sandpaper (120-150 grit) or a sanding sponge, lightly sand the walls and ceiling to remove any imperfections or residues and provide a better surface for the paint to adhere to.
After sanding, it’s essential to remove any dust created during the process. Use a vacuum with a soft brush attachment or a tack cloth to eliminate all traces of dust.
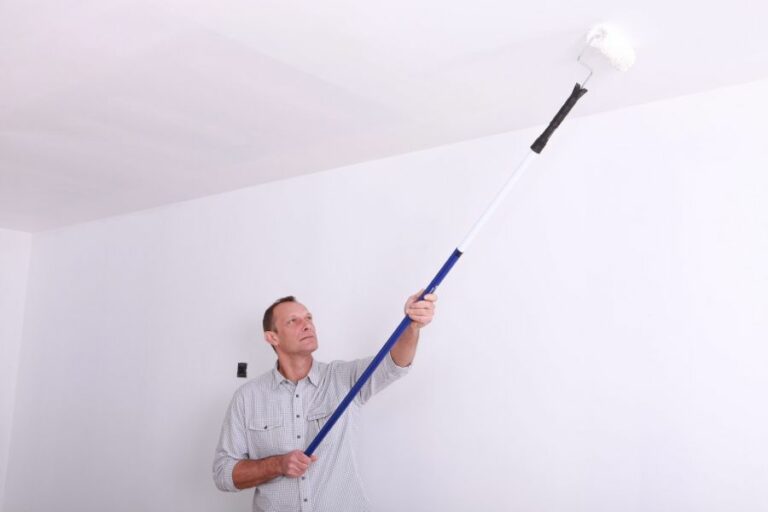
• Priming
To ensure proper paint adhesion and coverage, applying a primer is highly recommended. A primer not only creates a uniform surface for the paint to adhere to but also helps seal any stains, preventing them from bleeding through the final paint coat.
Choose the appropriate primer for your surface, whether it’s oil-based or water-based, and follow the manufacturer’s instructions for application and drying times.
Having completed these essential cleaning and surface preparation practices, your painting project is ready to begin. By investing time in these steps, you can rest assured that the final result will be a smooth, professional-looking finish that will last for years to come.
Step | Task | Description |
|---|---|---|
1 | Remove Dust and Dirt | Use a broom or vacuum cleaner to remove dust, dirt, and cobwebs from walls and ceilings. |
2 | Clean Grease and Stains | Use a mixture of warm water and mild dish soap to remove grease, grime, and stains from walls. Use a sponge or cloth to scrub the surface, then rinse with clean water. |
3 | Remove Mold and Mildew | Use a commercial mold remover or mix 1 part bleach with 4 parts water to clean mold and mildew from walls. Apply the solution to affected areas, let sit for 15 minutes, then scrub thoroughly and rinse with clean water. |
4 | Dry Surfaces | Allow all cleaned surfaces to dry completely before proceeding to paint. Use fans or dehumidifiers to speed up the drying process if needed. |
5 | Sand and Repair | Sand any rough or uneven areas on the walls, and fill any cracks or holes with a suitable filler. Once the filler dries, sand the area smooth and wipe away any dust with a damp cloth. |
6 | Apply Primer | Before painting, apply a coat of primer to ensure even coverage and adhesion of the paint. Allow the primer to dry according to the manufacturer’s instructions. |
Ideal Cleaning Solutions Before Painting
A proper cleaning before painting is essential, as it ensures better paint adhesion, resulting in an excellent finish. But what is the best thing to clean with before painting?
• All-Purpose Cleaner for Basic Cleaning
For general-purpose cleaning, an all-purpose cleaner is a great option. It is mild enough to avoid damaging surfaces while being strong enough to remove dirt, grease, and grime.
I recommend using T.S.P. (trisodium phosphate) as an all-purpose cleaner. It is available in most hardware stores and is effective on various surfaces, including walls, ceilings, and trim.
You can dilute it with water based on the manufacturer’s recommendations to create the perfect cleaning solution.
Follow these steps to clean with T.S.P. before painting:
- Protect yourself with gloves and eye protection.
- Mix T.S.P. with water according to the package instructions.
- Apply the solution to the surface using a sponge or rag.
- Wipe away dirt and residue with a clean, damp sponge or rag.
- Rinse with clean water and allow the surface to dry thoroughly.
While T.S.P. is a versatile cleaner, it’s essential to consider environmental factors while using it. If you’re concerned about using a cleaner with phosphates, look for a phosphate-free T.S.P. substitute specially formulated for cleaning surfaces before painting.
• Vinegar for Light Dirt and Mildew
If you’re dealing with mild dirt and mildew, vinegar is an eco-friendly cleaning option. It’s gentle, effective, and inexpensive.
To create a vinegar-cleaning solution, mix equal parts white vinegar and warm water. Clean the surface following the same steps as you would with T.S.P., making sure to rinse with clean water and allow the surface to dry completely.
• Denatured Alcohol for Walls with Wallpaper Glue Residue
In case you have removed wallpaper from the walls and need to clean off any remaining glue residue, denatured alcohol is the best option. It effectively breaks down the adhesive, allowing for a smooth, clean surface.
To clean with denatured alcohol, dampen a clean cloth or sponge with the alcohol and gently rub it over the surface. Rinse with clean water and let the surface dry completely.
• Solvent-Based Cleaners for Greasy and Oily Surfaces
Greasy kitchen walls, cabinets, or garage surfaces require a heavy-duty cleaner. A solvent-based cleaner, such as mineral spirits or acetone, will efficiently cut through oil and grease, providing a clean surface for painting.
However, keep in mind that solvent-based cleaners are powerful and require proper ventilation and safety precautions.
Here’s how to clean with a solvent-based cleaner:
- Wear gloves, safety goggles, and ensure proper ventilation.
- Dampen a cloth or sponge with the cleaner.
- Apply the cleaner to the greasy surface, rubbing gently.
- Rinse with clean water and allow the surface to dry.
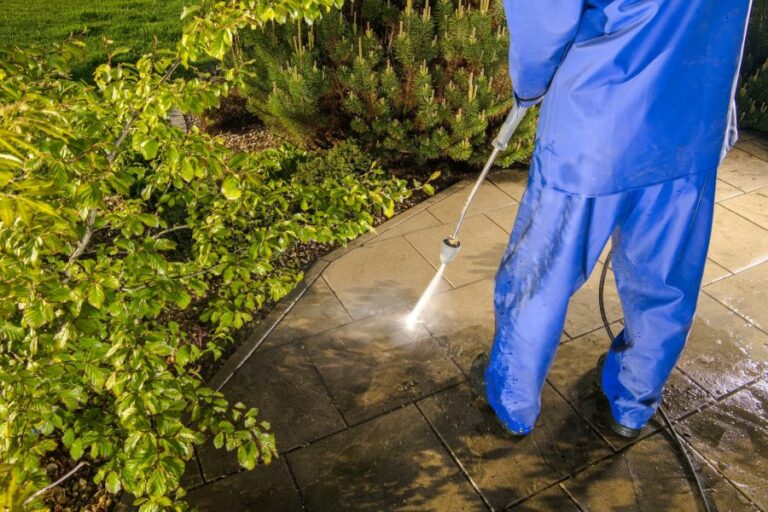
• Pressure Washing for Exterior Surfaces
For exterior walls or surfaces with significant dirt, algae, or mildew, pressure washing is the best method. A pressure washer, available for rent or purchase, combines a high-pressure water stream with a cleaning solution to clean various exterior surfaces efficiently.
Follow the manufacturer’s instructions for mixing the cleaning solution and operating the pressure washer. Always wear protective gear, and start with lower pressure settings to avoid damaging the surface. Rinse the area with clean water and allow it to dry entirely before painting.
• Final Thoughts
Selecting the best cleaning solution for your painting project depends on the type of surface, its condition, and the level of dirt or debris. Remember, properly cleaning the surface before painting is crucial for achieving a long-lasting, professional finish.
By following the guidelines in this article, you’ll have a clean and prepared surface, ready for a successful painting job.
Cleaning Solution | Usage | Benefits |
|---|---|---|
TSP (Trisodium Phosphate) | Dilute with water and apply to the surface with a sponge or cloth | Effective at removing grease, grime, and dirt; helps paint adhere better |
Warm soapy water | Mix mild dish soap with warm water and apply to the surface with a sponge or cloth | Safe for most surfaces; removes light dirt and grime |
White vinegar solution | Mix equal parts white vinegar and water, and apply to the surface with a sponge or cloth | Effective at removing grime and mildew; natural and eco-friendly option |
Degreaser | Spray onto the surface and wipe clean with a cloth or sponge | Effective at removing grease, especially in kitchens and bathrooms |
Alcohol-based cleaner | Apply to a cloth or sponge and wipe the surface clean | Effective at removing dirt and grime without leaving residue |
Expert Painters’ Wall Cleaning Methods
Cleaning walls before applying a new coat of paint is a crucial step in the painting process. Let’s talk about the methods that professional painters employ to clean the walls before painting. Proper cleaning ensures that the new paint adheres well to the surface and lasts longer.
• The Importance of Cleaning Walls
Walls are prone to accumulate dirt, dust, and grime over time. A thorough cleaning not only enhances the final appearance of the paint job but also increases the durability of the paint.
Removal of surface contaminants prevents peeling, flaking, and other paint-related issues that may appear later on. In addition, clean walls make it easier to spot any existing surface imperfections that might require repair before painting.
• Assessing the Condition of the Walls
Before starting the cleaning process, a professional painter will inspect the walls to determine their condition. This involves checking for visible dirt, grease stains, mold, and mildew.
A careful assessment helps the painter decide on the most appropriate cleaning technique for each particular situation.
• Basic Cleaning: Dust and Dirt Removal
The first step in cleaning walls is removing loose dust and dirt. This can be done using a damp cloth or a microfiber duster. Professionals often use a vacuum cleaner with a soft-bristle brush attachment to remove accumulated dust, especially in hard-to-reach areas.
• Addressing Grease Stains and Adhesive Residues
Grease stains and adhesive residues are common problems, particularly in kitchens, bathrooms, and children’s rooms. A professional painter will use a degreaser or mild detergent mixed with warm water to clean these spots.
Using a soft sponge or cloth, the cleaner is gently applied in a circular motion until the stain disappears. Afterward, the area is rinsed with clean water and allowed to dry.
• Tackling Mold and Mildew Growth
Mold and mildew are not only unsightly but also pose health risks. Before painting, it is essential to remove any existing mold or mildew growth. Professional painters use a solution of bleach and water (one part bleach to four parts water) to eliminate mold and mildew.
After applying the solution, they allow it to sit for several minutes before rinsing the area with clean water. It is crucial to let the walls dry completely before proceeding with painting.
In case of extensive mold growth, it is recommended to consult a mold remediation specialist for proper treatment.
• Cleaning Textured Walls
Textured walls require special care when cleaning to avoid damaging the texture. A soft-bristle brush can be used to gently remove dirt and dust from the contours of the surface. Afterward, a damp cloth can be employed to wipe away any remaining debris.
• Repairing Surface Imperfections
Before painting, it is essential to address any surface imperfections, such as cracks, holes, or peeling paint. A putty knife can be utilized to remove old paint and apply a patching compound to fill in larger gaps.
Smaller imperfections can be filled using a lightweight spackling compound. These fillers should be allowed to dry before being sanded smooth.
• Final Preparations
Once the walls are clean and dry, a professional painter will take additional steps to prepare the surface for painting. This may include:
- Using fine-grit sandpaper to lightly sand the walls, which promotes better paint adhesion.
- Applying a primer to seal the surface and create a uniform base for the new paint.
- Masking off adjacent surfaces, such as trim and fixtures, to protect them from paint splatters.
• Conclusion
Properly cleaning walls before painting ensures not only an improved appearance but also enhanced durability of the final paint job. By following the methods outlined in this article, professional painters deliver a high-quality result that meets their clients’ expectations.
Using Dawn for Pre-Painting Wall Washing
• Importance of Wall Cleaning Before Painting
Before starting any painting project, it is crucial to have a clean surface. Dirt, grease, grime, and other contaminants can have a detrimental impact on paint adhesion, leading to poor paint coverage and even peeling paint.
Washing the walls is indeed an essential step in the painting process that should never be overlooked.
One of the most common questions people ask is whether or not they can use Dawn dish soap to clean their walls before painting. And the answer is yes; Dawn can be an effective cleaning agent for this purpose.
• Benefits of Using Dawn for Wall Cleaning
Dawn dish soap is a versatile cleaning product that can be used for a variety of tasks, including washing walls. Here are some benefits of using Dawn for wall cleaning:
– Cost-effective
Dawn is an affordable product, making it an excellent choice for budget-conscious homeowners. It can effectively clean your walls without breaking the bank.
– Versatile
Dawn can be used to clean various surfaces and materials, such as wood, metal, and vinyl. This means you can use it on different types of walls and achieve the desired results.
– Effective at Removing Grease and Grime
Dawn was explicitly designed to tackle grease, making it ideal for removing grease and grime from walls. This is particularly important in high-traffic areas, such as kitchens and bathrooms, where walls are more likely to become contaminated by cooking oils, food particles, and other contaminants.
– Eco-friendly
Unlike some cleaning products, Dawn is biodegradable, making it a more environmentally friendly option. This also means it is safer to use around children and pets.
• How to Use Dawn to Clean Walls Before Painting
Using Dawn to clean your walls before painting is quite simple. Follow these steps to ensure your walls are thoroughly cleaned:
– Step 1: Mix the Cleaning Solution
In a bucket, mix a solution of warm water and a few drops of Dawn dish soap. You do not need a large amount of soap; about one teaspoon of Dawn per gallon of water should suffice.
– Step 2: Apply the Solution to the Wall
Using a clean sponge, cloth, or rag, apply the cleaning solution to the wall, starting at the top and working your way down. It is essential to work in small areas to ensure the soap does not dry before you can rinse it off.
– Step 3: Scrub the Wall Surface
For particularly dirty or greasy walls, you may need to scrub the surface gently with a sponge or cloth. This will help loosen any stubborn dirt, making it easier to remove.
– Step 4: Rinse the Wall
Once you have cleaned a section of the wall, use a clean sponge or cloth dampened with clean water to rinse away the soap residue. Be sure to replace the rinse water frequently to avoid reintroducing contaminants onto the wall.
– Step 5: Dry the Wall
Use a clean, dry towel or cloth to pat the wall dry. This will help prevent water stains and ensure the wall is ready for painting. Allow the wall to air dry completely before starting your painting project.
– Step 6: Inspect the Wall
After the wall has fully dried, inspect it for any remaining dirt, grease, or soap residue. If necessary, repeat the cleaning process until the wall is thoroughly clean and ready for painting.
• Precautions and Considerations
While using Dawn dish soap for wall cleaning can be beneficial, there are a few precautions and considerations to keep in mind:
- If you have wallpaper or a delicate wall surface, it is essential to test the cleaning solution on a small, inconspicuous area before applying it to the entire wall. This will ensure the soap does not cause any damage to your wall.
- Avoid using excessively hot water, as this can cause some paint types to soften, making it more susceptible to damage during the cleaning process.
- Avoid using heavily scented or colored Dawn varieties, as these can potentially leave residue or stains on your walls. Opt for the unscented, original blue Dawn for best results.
- After cleaning with Dawn, ensure that no soap residue remains on the wall. Soap residue can interfere with paint adhesion, leading to poor paint coverage and potential peeling issues.
• Alternatives to Using Dawn
If you prefer not to use Dawn dish soap for cleaning your walls, there are other options available. Some popular alternatives include:
- Trisodium phosphate (TSP): A heavy-duty cleaner often recommended for pre-painting wall cleaning. TSP is available at most hardware stores and can be mixed with water to create an effective cleaning solution. Follow the manufacturer’s instructions for proper use.
- Vinegar and water: A solution of equal parts white vinegar and water is a mild, natural alternative to commercial cleaning products. Vinegar is particularly effective at breaking down grease.
- Commercial wall cleaning products: There are several pre-painting wall cleaning products available at most hardware and paint stores. These products are specifically designed to clean walls prior to painting.
In conclusion, using Dawn dish soap to clean walls before painting is an effective, budget-friendly, and eco-friendly option. Following the steps outlined above will help ensure that your walls are clean and ready for a fresh coat of paint.