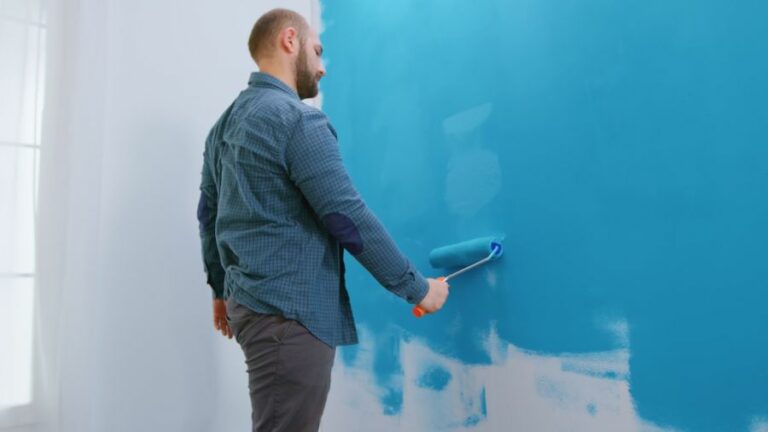
Must-Have Tools For Surface-Prepping Tasks
Are you trying to figure out which tools are essential for surface-prepping tasks? No need to search any further! We understand that each surface preparation project is unique, and having the right tools can make or break the final result. We have compiled a list of must-have tools you cannot go without for any surface preparation job.
Must-have tools for surface-prepping tasks:
Essential tools for surface preparation tasks include abrasive blasting equipment (sandblasters, blast cabinets, and blast rooms), hand tools (wire brushes, scrapers, and sandpaper), power tools (angle grinders, power sanders, and rotary hammers), and chemical products (paint removers, strippers, concrete densifiers, and hardeners). Using the right tools ensures optimal results and improved adhesion for paint or coating.

Discover the essential tools for optimal surface-prepping tasks in various applications, from painting to flooring installations. Explore our comprehensive guide and elevate your skills with these must-have tools for perfect surface preparation. Keep reading to unlock the secrets!
Contents
- 1 Essential Tools for Surface Preparation Tasks
- 2 Top Power Tools for Surface Prep Work
- 3 Key Considerations in the Surface Preparation Process
- 4 The 9-Step Guide to Effective Surface Preparation
- 5 Various Tools & Equipment for Shipboard Surface Prep
Essential Tools for Surface Preparation Tasks
Surface preparation is crucial before painting, coating, or refinishing any surface, be it wood, concrete, metal, or plastic. As a professional with years of experience, I can attest to the fact that using the right tools can significantly impact the final outcome.
• Abrasive Blasting Equipment
Abrasive blasting is an effective way to clean and prepare surfaces for painting or coating. It involves propelling abrasive material against a surface under high pressure to remove contaminants such as rust, paint, or oil and to create a clean and rough surface with improved adhesion.
– Sandblasters
Sandblasters are the most common abrasive blasting equipment. They use compressed air to propel sand or other abrasive material through a nozzle and onto the surface being prepared. There are various types of sandblasters available, such as:
- Siphon-fed sandblasters
- Pressure-fed sandblasters
- Gravity-fed sandblasters
I recommend using a pressure-fed sandblaster for most surface-prepping tasks, as it offers consistent pressure and reduces clogging.
– Blast Cabinets
Blast cabinets are enclosed chambers that contain the abrasive blasting process, making them ideal for small to medium-sized objects. They are also beneficial for controlling dust and debris, as well as providing operator safety.
– Blast Room Systems
For larger objects or large-scale surface preparation tasks, a blast room system, a full-scale enclosure designed for abrasive blasting, is the most suitable option.
Blast rooms offer ample space for moving and maneuvering large objects and provide proper ventilation and pollutant collection.
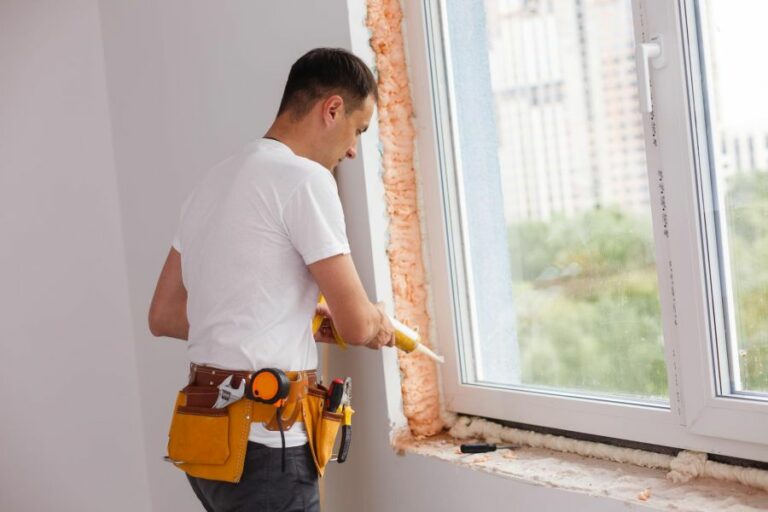
• Hand Tools for Surface Preparation
While abrasive blasting equipment is incredibly effective, sometimes hand tools are necessary, especially for smaller tasks or precision work.
– Wire Brushes
Wire brushes, available in various shapes and sizes, are perfect for removing rust, scale, and paint from metal surfaces. Always choose a wire brush with bristles made from a material harder than the surface you’re working on to avoid any damage.
– Scrapers
Scrapers come in various styles and sizes and are ideal for removing paint, wallpaper, or other coatings from surfaces. A good-quality scraper with a comfortable grip and sharp blade will save you time and effort during surface-prepping tasks.
– Sandpaper
Sandpaper is essential for removing imperfections, smoothing surfaces, and creating the ideal surface for paint or coating to adhere to. Different grits of sandpaper ranging from coarse to fine are available to suit the specific needs of your surface preparation task.
For most projects, starting with a coarser grit and gradually working your way to a finer grit will yield the best results.
• Power Tools for Surface Preparation
For larger tasks or those requiring greater efficiency, power tools can significantly speed up the surface preparation process.
– Angle Grinders
Angle grinders fitted with abrasive discs, wire cup brushes, or wire wheels are great for removing paint, rust, and other surface imperfections on metal surfaces.
– Power Sanders
Power sanders, such as orbital sanders and palm sanders, are more effective and efficient than manual sanding. They are suitable for smoothing wood surfaces, providing a consistent finish with less effort.
– Rotary Hammers
For preparing concrete surfaces, a rotary hammer with a chisel bit is an essential power tool. It is perfect for removing loose or damaged concrete and creating a rough surface for improved adhesion.
• Chemical Surface Preparation
In some cases, using chemical products is necessary to prepare surfaces thoroughly.
– Paint Removers and Strippers
Paint removers and strippers are suitable for removing paint layers from surfaces without damaging the substrate. Take caution when using these chemicals; always follow the manufacturer’s instructions and safety precautions to prevent any health risks.
– Concrete Densifiers and Hardeners
These products are specifically designed for treating concrete surfaces and improving their durability. By applying a concrete densifier or hardener before painting or coating, you can enhance the surface’s adhesion and resistance to wear and tear.
In conclusion, having the right tools for surface preparation tasks is essential for achieving the best results. Invest in high-quality equipment and follow recommended techniques to ensure your surfaces are prepped to perfection before painting or coating. Happy prepping!
Top Power Tools for Surface Prep Work
Surface preparation is a crucial step in various industries, including construction, painting, and woodworking.
To achieve the desired finish on materials, it’s essential to equip yourself with the appropriate power tools to remove old paint, smooth out surfaces, and create a clean surface for coating or bonding.
• Electric and Pneumatic Handheld Grinders
Handheld grinders are versatile tools that can be used for various surface preparation tasks, such as removing paint, leveling, and deburring. These grinders can be electric or pneumatic, depending on your preference and workspace requirements.
Electric grinders usually require access to a power outlet, while pneumatic grinders need an air compressor to operate.
– Angle Grinders
Angle grinders are powerful tools that can be used for grinding, cutting, and polishing various materials, including metal, concrete, and masonry. They use abrasive wheels to remove surface layers, which makes them suitable for surface preparation tasks such as cleaning and material removal.
Angle grinders are available in various sizes and power ratings, so it’s essential to select the appropriate model based on your specific needs.
– Die Grinders
Die grinders are high-speed rotary tools that can be used for grinding, sanding, honing, and polishing various materials. These small, portable tools are especially suitable for intricate work and hard-to-reach areas.
Die grinders come with various attachments, such as coated abrasives and wire brushes, making them a versatile solution for surface preparation tasks.
• Sanding and Polishing Machines
Sanding and polishing machines are essential tools for surface preparation, especially when working with wood and metal. These machines use abrasive belts, disks, or sheets for smoothing and finishing surfaces.
– Belt Sanders
Belt sanders use abrasive belts wrapped around two drums to remove material quickly and efficiently. They are an excellent choice for leveling large surfaces and removing paint or varnish from wooden materials.
Belt sanders are available in handheld and benchtop models, with each offering different levels of maneuverability and power depending on the scale of the work.
– Random Orbit Sanders
Random orbit sanders use a sanding disk attached to a backing pad, which moves in a random orbital motion. This provides a smooth and swirl-free finish on wood, metal, and plastic surfaces.
Random orbit sanders are an excellent tool for preparing surfaces that require a high-quality finish, such as furniture and cabinetry.
– Orbital Sanders
Orbital sanders, also known as finishing or palm sanders, operate by moving the sanding pad in a small circular motion. They are less aggressive than belt sanders and random orbit sanders, making them ideal for finishing tasks on softer materials like wood.
• Shot Blasters
Shot blasting is a powerful and efficient method for surface preparation, especially on concrete and steel surfaces. Shot blasters work by propelling abrasive materials at high speeds onto surfaces, removing contaminants, and creating a rough texture ideal for bonding and coating.
Shot blasters come in different sizes, from small portable units to large walk-behind models suitable for large-scale industrial projects.
• Scarifiers
Scarifiers, also known as concrete planers or milling machines, are used for aggressive surface preparation tasks, such as removing thick layers of concrete, asphalt, or other materials.
These powerful machines use rotating cutters to chip away at the surface, creating a rough texture suitable for bonding and coating.
Scarifiers can be handheld or walk-behind devices, depending on the size and scale of the surface preparation task.
• Pressure Washers
Pressure washers use a high-pressure water jet to clean surfaces, making them an effective tool for removing dirt, grime, and loose paint or coatings.
Pressure washers can be paired with specialized attachments, such as rotating brushes and surface cleaners, to enhance their surface preparation capabilities.
They are particularly useful for cleaning large exterior surfaces, such as walls, driveways, and decks, before painting or coating.
In conclusion, choosing the right power tool for surface preparation is critical to achieving the desired result at the end of your project.
By understanding the different options available and selecting the appropriate tool based on your specific needs, you can ensure a high-quality finish while also increasing efficiency and saving time.
Remember to always follow safety guidelines and wear appropriate protective gear when using power tools for surface preparation tasks.
Power Tools for Surface Preparation
Tool Name | Usage |
|---|---|
Angle grinder | Used for grinding, sanding, polishing, and cutting various materials. |
Sander | Used to smooth surfaces by an abrasive action, typically using sandpaper. |
Wire brush | Used for cleaning, deburring, and removing rust, paint, or scale from surfaces. |
Shot blaster | Used to clean and prepare surfaces by propelling abrasive material at high velocity onto the surface. |
Scarifier | Used to remove coatings, roughen concrete, and repair uneven surfaces by abrading the surface with rotating cutting tools. |
Needle scaler | Used to remove rust, scale, and old paint from surfaces using a reciprocating motion of compressed air-powered needles. |
Diamond grinder | Used for grinding and polishing hard materials like concrete, stone, or terrazzo using diamond-impregnated abrasive discs. |
Key Considerations in the Surface Preparation Process
Surface preparation is a crucial aspect in various applications ranging from painting, coating, or bonding materials. Properly prepared surfaces result in better adhesion, enhanced durability, and a superior overall finish.
• Type of Material
Different materials require diverse methods and techniques for surface preparation. Understanding the type of material is crucial in determining the best approach to use for your project.
- Metals: Metal surfaces need a thorough cleaning to remove any debris, rust, and grease to ensure optimal adhesion. This may be achieved through methods such as mechanical abrasion or chemical treatments.
- Wood: Wood surfaces should be free from loose fibers or previous finishes, such as paint or varnish. This is best achieved by sanding; desired surface roughness should be achieved, and any sawdust should be completely removed.
- Concrete: Surface preparation for concrete involves cleaning the surface of any dirt, grease, or oils and ensuring the smoothness and uniformity of the surface. Rough or uneven surfaces may require grinding or patching to achieve the desired smoothness.
• Surface Contaminants
To ensure proper adhesion, it is essential to thoroughly clean the surface of any contaminants such as dirt, grease, oil, or previous finishes. Removing these contaminants can be achieved through several methods, including:
- Washing with soap and water
- Solvent wiping
- Sanding or abrasive blasting
- Chemical treatments, such as etching or degreasing
A surface free from contaminants ensures a strong bond, increasing the longevity and durability of the applied product.
• Surface Profile
The surface profile, or roughness, impacts the adhesion properties of the applied product. Achieving the optimal surface profile provides better mechanical bonding and improves the overall result.
- Smooth surfaces: Surfaces that are too smooth need to be roughened to provide a better mechanical bond. This can be achieved through methods such as sanding, abrasive blasting (e.g., sandblasting, bead blasting), or chemical etching.
- Rough surfaces: Surfaces that are too rough may require smoothing. This can be achieved through methods such as grinding, sanding, or using a patching compound.
• Environmental Conditions
It’s essential to consider the environment in which the surface is prepared and the application is performed. Some critical environmental factors include:
- Temperature: Ensure that surfaces and the applied products are within their recommended temperature range. Materials may behave differently at extreme temperatures, potentially affecting the overall finish.
- Humidity: High humidity levels can cause improper curing or drying of certain products, leading to product failure. It is important to follow product guidelines and be aware of the humidity when working on surface preparation.
- Ventilation: Proper ventilation is vital when working with chemicals or products that emit harmful fumes or particles. Ensure that there is adequate airflow, and appropriate protective equipment should be used.
• Surface Preparation Techniques
There are several surface preparation techniques available, and it’s essential to choose the most suitable method for your specific project:
- Mechanical Abrasion: Techniques such as sanding, grinding, or abrasive blasting physically remove surface contaminants and help create the desired surface profile.
- Chemical Treatments: Chemical treatments, such as etching or degreasing, remove surface contaminants and can promote better adhesion of applied materials.
- Thermal Methods: Thermal methods, such as flame cleaning or laser ablation, are effective in removing surface contaminants or altering the surface profile.
In conclusion, surface preparation plays a vital role in achieving a successful project. Understanding the type of material, addressing surface contaminants, achieving the desired surface profile, and considering environmental factors all contribute to completing a project with optimal results.
Proper surface preparation techniques lead to a solid foundation for adhesion, increasing the performance and lifespan of the applied product or material.
The 9-Step Guide to Effective Surface Preparation
Surface preparation is a crucial step in ensuring the success of any coating or painting application. Proper surface preparation can significantly enhance the performance, durability, and overall appearance of the applied materials.
• 1. Inspection and Assessment
Before starting the surface preparation process, it is necessary to inspect and assess the condition of the surface. This can be done visually or with the assistance of tools such as a moisture meter to check for the presence of moisture.
During the inspection, look for any visible defects, contaminants, or damage, such as cracks, peeling paint, or rust. Additionally, assess whether the surface is adequately clean, dry, and free of debris. This initial inspection will inform the subsequent steps of the preparation process.
• 2. Surface Cleaning
The first hands-on step of surface preparation is surface cleaning. It is essential to remove any dirt, dust, or debris from the surface to be prepared.
This can be done using a broom, air blower, or vacuum cleaner, depending on the type of surface and the level of contamination.
Always ensure that the cleaning tools and equipment are clean and well-maintained, as dirty equipment can lead to the further spread of contaminants.
• 3. Chemical Cleaning
In some cases, chemical cleaning may be required to remove residues or contaminants that cannot be removed using traditional cleaning methods. Examples of commonly used chemical cleaners include solvents, alkaline cleaners, and acidic cleaners.
When using chemical cleaners, always follow the manufacturer’s instructions and safety guidelines. Additionally, ensure sufficient ventilation and the use of appropriate personal protective equipment (PPE), such as gloves and masks.
• 4. Degreasing
Degreasing is the process of removing oils, grease, and other hydrocarbon-based contaminants from the surface. Degreasing can be performed using specially formulated degreasing agents, solvents, or detergent-based cleaners.
It is important to thoroughly rinse the surface with clean water after degreasing to remove any remaining residue. Failure to remove all residues can lead to adhesion problems and premature coating failure.
• 5. Abrasive Blasting
For rough or uneven surfaces or in cases where strong adhesion is required, abrasive blasting may be necessary to achieve the desired surface profile. This method involves the use of high-pressure air and abrasive particles to clean and create a uniform surface texture.
Common abrasive materials used for blasting include sand, steel grit, and glass beads. As with chemical cleaning, always follow the equipment manufacturer’s guidelines and safety recommendations when performing abrasive blasting.
• 6. Grinding and Sanding
Grinding and sanding are alternative methods for creating a suitable surface profile for coatings, particularly on smaller areas or surfaces with limited accessibility. These methods can be done using power tools, such as angle grinders and orbital sanders, or manually using sandpaper.
When grinding or sanding, begin with a coarse grit abrasive and progress towards finer grits to achieve the desired surface profile. Finish with a final pass using a fine-grit abrasive to remove any remaining marks or scratches.
• 7. Patching and Repairing
Once the surface is clean and the desired profile is achieved, any visible defects, such as cracks, holes, or damaged areas, should be repaired. Depending on the surface material and type of damage, different repair products may be required, such as epoxy fillers for concrete or spackling paste for drywall.
Following repair, the repaired areas may need additional sanding or smoothing to ensure a uniform appearance and texture.
• 8. Priming
Priming is a crucial step in surface preparation, as it helps to improve the adhesion of the coating or paint to the surface, therefore extending the life of the applied material. Be sure to select a primer specifically designed for the surface material and intended topcoat.
Before applying the primer, ensure the surface is clean and free of any dust or debris. Apply the primer as per the manufacturer’s specifications and allow it to cure fully before applying any topcoat.
• 9. Final Inspection
The final step of surface preparation is a thorough inspection of the prepared surface. This inspection should check for any areas or defects that may have been missed during the earlier stages of preparation.
If any issues are identified, they should be addressed before the application of the coating or paint. This final inspection helps to ensure a high-quality, long-lasting finish.
In conclusion, the nine crucial steps of surface preparation include inspection and assessment, surface cleaning, chemical cleaning, degreasing, abrasive blasting, grinding and sanding, patching and repairing, priming, and a final inspection.
By following these steps diligently, you can achieve a well-prepared surface that is ready for the application of coatings or paints, ultimately ensuring a durable and aesthetically pleasing finish.
Step Number | Step Description |
|---|---|
1 | Remove all dirt, dust, and debris from the surface. |
2 | Strip off any old coatings or paint that may be present. |
3 | Clean the surface with a detergent or degreaser to remove any contaminants, oils, or grease. |
4 | Rinse the surface with clean water and allow it to dry completely. |
5 | Inspect the surface for any defects, such as cracks or holes, and repair as necessary. |
6 | Smooth the surface using sandpaper or a sanding machine to remove any roughness or uneven areas. |
7 | Apply a primer to the surface to ensure proper adhesion of the coating or paint. |
8 | Allow the primer to dry according to the manufacturer’s instructions. |
9 | Apply the desired coating or paint to the prepared surface. |
Various Tools & Equipment for Shipboard Surface Prep
Surface preparation is an essential part of maintaining a ship’s integrity, safety, and performance. The process involves removing contaminants, old paint, rust, and mill scale to ensure proper adhesion of new protective coatings.
• Abrasive Blasting Equipment
The most commonly used method for surface preparation in the maritime industry is abrasive blasting. This process involves projecting abrasive particles onto surfaces with high-pressure air or water jets.
It effectively removes rust, old paint, mill scale, and other contaminants. Several types of abrasive blasting equipment are available, including:
– Dry Abrasive Blasting Machines
Dry abrasive blasting machines utilize compressed air to propel abrasive particles onto surfaces. They can be portable or stationary and come in various sizes and capacities, depending on the scale of the job. The most common types of abrasives used are grit, shot, and copper slag.
Recommendation: I personally recommend using portable dry abrasive blasting machines for ship surface preparation, as they can easily be moved around the shipyard and on board the ship.
– Wet Abrasive Blasting Machines
Wet abrasive blasting machines mix water with the abrasive material, reducing the dust generated during the process and increasing its efficiency.
This method is particularly helpful in confined spaces or when working with hazardous materials. Common abrasives used in wet blasting include garnet, glass beads, and steel grit.
Recommendation: For surface preparation in tight or hazardous spaces, wet abrasive blasting machines are the better option.
– Vacuum Abrasive Blasting Machines
Vacuum abrasive blasting machines, also known as dustless abrasive blasting machines, use a closed-loop system to recycle abrasive materials and eliminate dust emissions.
These machines are especially beneficial for removing hazardous materials, such as lead-based paint.
Recommendation: For environmentally friendly and dust-free surface preparation, I recommend vacuum abrasive blasting machines.
• Hand and Power Tools
Hand and power tools are essential for surface preparation tasks that require precision, safety, and efficiency. They are also useful for spot cleaning or maintenance work. Below are some of the commonly used hand and power tools for surface preparation on board ships.
– Needle Scalers
Needle scalers, also known as needle guns, are handheld pneumatic tools that use a set of thin, chisel-like needles to remove rust, paint, and other surface contaminants. They are particularly useful for small-scale or spot-cleaning tasks.
Recommendation: Needle scalers are an indispensable tool for quick, small-scale surface preparation tasks.
– Grinders
Grinders, such as angle grinders and disc sanders, are handheld power tools used for the abrasive removal of surface contaminants, grinding, and polishing. They come with various attachments, such as grinding wheels, wire brushes, and flap discs.
Recommendation: Grinders are a versatile tool for surface preparation tasks that require precision and control.
– Scrappers and Chisels
Manual scrapers and chisels are simple hand tools used for removing loose rust, paint, and other surface contaminants. They are handy for small-scale jobs and areas that are difficult to reach with larger equipment.
Recommendation: Always keep a set of scrapers and chisels on board for minor surface preparation tasks or when working in tight spaces.
• Chemical Surface Preparation Methods
Chemical methods of surface preparation involve using solvents or chemical compounds to remove contaminants from surfaces. These methods are generally less invasive and produce less dust than abrasive or mechanical methods. Examples of chemical surface preparation methods include:
– Degreasers and Chemical Cleaners
Degreasers and chemical cleaners are used to remove grease, oil, and other surface contaminants before abrasive or mechanical surface preparation begins.
These chemicals improve the effectiveness of subsequent methods and help ensure better adhesion of protective coatings.
Recommendation: Always use a degreaser or chemical cleaner before beginning abrasive or mechanical surface preparation for optimal results.
– Paint Removers
Paint removers are chemical solutions that soften and dissolve old paint layers for easy removal. They are particularly useful for removing old coatings that are difficult to remove with abrasive or mechanical methods.
Recommendation: Use paint removers when the existing coating is challenging to strip with abrasive methods.
• Safety Precautions and Personal Protective Equipment (PPE)
Using surface preparation equipment and materials on board ships can be hazardous. Therefore, it is essential to take precautionary measures and use proper personal protective equipment (PPE) to ensure the safety of workers.
Some examples of PPE commonly used during surface preparation processes include:
- Safety goggles or face shields
- Respirators or dust masks
- Earplugs or earmuffs
- Safety gloves
- Protective clothing
Recommendation: Always prioritize the safety of workers by providing appropriate PPE and following established safety guidelines during surface preparation tasks.
• Conclusion
The various tools and equipment discussed in this article are indispensable for surface preparation tasks on board ships. By understanding the benefits and limitations of each tool and method, you can choose the most appropriate options for your specific requirements.
Correctly utilizing these tools and equipment, along with proper safety precautions and PPE, ensures efficient surface preparation, contributing to the longevity and performance of your ship.